
 Layout Tool
The Layout tool arranges two or more reporting snippets to output as a report via the Render tool. The Layout tool organizes snippets horizontally or vertically, sets the width and height of columns and rows, and adds borders and separators.
Use a Join Multiple tool to join all report snippets together before adding a Layout tool.
Configure the tool
- Layout Mode: Select a method for grouping records together. Beneath each option is an example image that works off of the assumed incoming data:
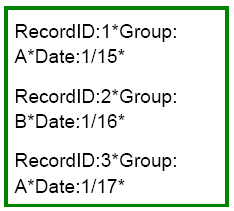
- Each Individual Record: Lays out all the individual reporting snippets.
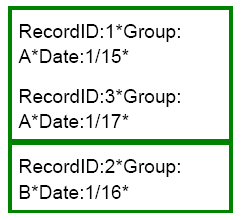
- Each Group of Records: Lays out each group of records for batch reporting. A report is generated for each group.
- Group By: Select the fields to group by.
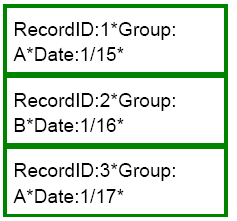
- All Records Combined: Combines all records from one data field/reporting snippet.
- Include Source Fields in Output: Select this option to use the fields in a downstream tool. Deselect this option to create a report.
| Record ID | Group | Date |
|---|---|---|
| 1 | A | 1/15 |
| 2 | B | 1/16 |
| 3 | A | 1/17 |
Use the following options to set the Layout Configuration.
- Orientation: Specify if the reporting snippets should be laid out horizontally or vertically. With vertical orientation, these additional options are available:
- Vertical with Section Breaks: Creates a section break, which varies based on the report format, when a Section Name is specified.
- For .xls and .xlsx, a section break is equivalent to a new sheet within a workbook.
- For .pdf, .doc, .docx, and .rft, a section break is equivalent to a new page.
- For .html and .pcxml, a section break is not created.
- Vertical Merge Contents to Line up Table Columns: Ensures all table snippets in the layout align correctly.
- Layout Width: Select the width of the layout.
- Automatic: Sets the minimum width for the data contained within a snippet to display.
- Percentage: Sets the percentage of the page for the data to be displayed, where 100% is the entire width of the page.
- Fixed: Sets the width of the data in inches.
- Layout Height: Specify the height of the layout. The height can be either Automatic or Fixed and set in inches.
- Border: Select this option to add a border, select the color of the border, and indicate the border size in pixels.
- Separator: Select this option to add a separator between records, select the color of the separator, and indicate the size in pixels.
- Cell Padding: Specify the padding in pixels to be added around each reporting snippet.
- If the layout orientation is vertical, set the Per Row Configuration. If the layout orientation is horizontal, set the Per Column Configuration.
- Select the snippets to include in the layout.
- Click a snippet and use the up and down arrows to change the order the snippets display in the report.
- Click a snippet to configure the following attributes:
- Width: If the orientation for the layout is Horizontal, select Automatic, Percentage or Fixed, set in inches, for the width of the snippet within a row.
- Height: If the orientation for the layout is Vertical with a fixed height, select Automatic, Percentage, or Fixed, set in inches, for the height of the snippet within a column.
- Alignment (V): Select the vertical alignment of top, middle, or bottom.
- Alignment (H): Select the horizontal alignment of left, center, or right.
- Fill Color: Select the fill color for the snippet.
- Section Name: If the orientation of the layout is Vertical with Section Breaks, select the field to use as the Section Name.
- For .xlsx, the Section Name is used as the Excel worksheet name.
- For .pdf, the Section Name is used as bookmarks, which act as links to that part of the .pdf file.
- For .doc, .docx, and .rtf the Section Names are used for bookmarks.
- For .pptx, .png, and .html files Section Names are not used.
Fixed layout width or height: expected behavior
If Default Distance Units is set to kilometers, this field is calculated in centimeters. See Localization.
Fixed width or height: expected behavior
If Default Distance Units is set to kilometers, this field is calculated in centimeters. See Localization.
Horizontal alignment for text snippets must be configured within the Text tool.