 Microsoft Power BI Output Tool
The Microsoft Power BI Output Tool uses the Power BI REST API to upload a data table from your Alteryx workflow to the Power BI web application. From there, you can create and share dashboards containing any number of data visualizations and reports.
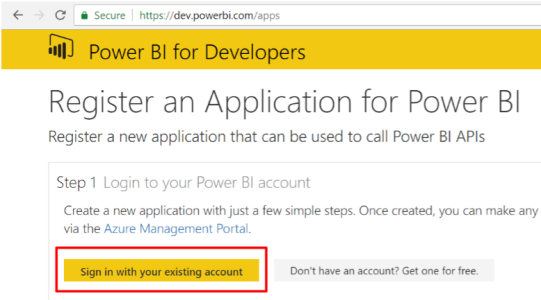
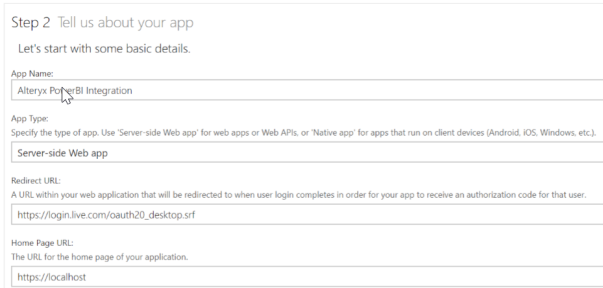
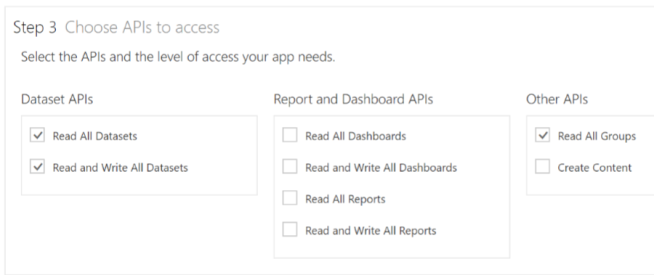
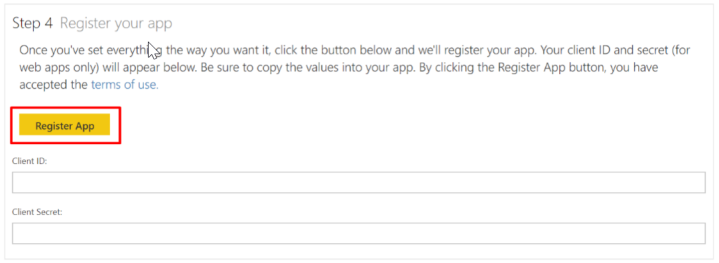
Before the Power BI Output tool can be used, a web application must be created and configured with permissions to access the desired Power BI instance.
Gallery tool
This tool is not automatically installed with Designer. To use this tool, download it from the Alteryx Analytics Gallery.
 Configure the tool
- Enter the unique identifier for the Azure Active Directory tenant associated with the Power BI instance. Click here for instructions on obtaining the Azure Active Directory Tenant ID.
- In the Client ID field, enter the Application ID for the application created.
- Enter the Client secret key for the application created.
- Select Refresh token or Persist credentials.
- When Refresh token is selected, you will need to enter your user e-mail and password for Power BI in the Username and Password fields that display under the Authentication drop down. This will allow the tool to remain logged in on your behalf until the Refresh token expires or is revoked.
- When Persist credentials is selected, you will need to enter your user e-mail and password for Power BI in the Username and Password fields that display under the Authentication type drop down. This will allow the tool to remain logged in on your behalf until your user credentials change.
- After entering the authentication configuration, click the Log in button.
- Select the workspace you would like to create the dataset in from the workspaces you have access to.
- Enter the name of the dataset you would like to create or overwrite (depending on your existing dataset and table behavior).
- Enter the name of the table to which you would like to create or append rows.
- Enter how many rows of the table you would like to write to Power BI per network request. Default batch size is 500.
- For an existing dataset, select from one of the following options:
- Append rows to table
- Creates the specified dataset and table if they do not exist
- If the dataset and table exist, rows are appended to the table
- If the dataset exists, but does not contain the table, the workflow will abort with an error message
- Create new dataset
- Creates the specified dataset and table if the do not exist
- If the dataset exists, the workflow will rename the dataset on your behalf
- Replace existing dataset
- Creates the specified dataset and table if they do not exist
- If the dataset exists, the dataset and all of its tables will be deleted and a new dataset/table with the same name will be created
- Select the Apply check box on the configuration UI. This allows the configurations to be used in the current workflow, but does not save the actual workflow.
- Click onto the canvas to save the configurations.
 Microsoft Power BI Output Tool


