 Assisted Modeling Tool
Step-by-Step Tutorial
The Assisted Modeling tool simplifies the model-building process. With Assisted Modeling, you're guided through the process of building and evaluating several predictive models and selecting the one that best suits your business use case. Assisted Modeling helps you identify a target, set data types, select features, select the most relevant algorithms, and build your models.
At each step, Alteryx analyzes your dataset and the choices you've made so far, makes further suggestions and then allows you to make the final decision.
To get started, follow the steps below. If you want to practice with sample datasets, visit Practice Assisted Modeling.
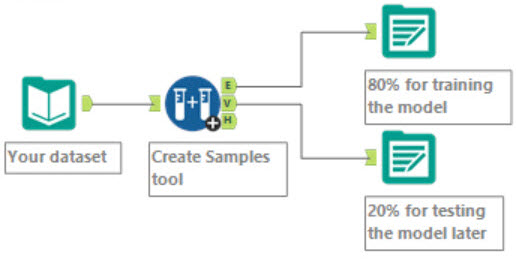
Step 1. Create Samples

Sample workflow (yours may be different)
As a best practice, you should split your dataset into two datasets. One for training the model and another for testing the model. You can then compare the model's accuracy with how well it performed on the test data.
One way to create samples is with the Create Samples Tool.
To do this:
- Prepare and clean your dataset.
- Create a new workflow and label it Samples.
- Split your dataset into training and testing datasets using the Create Samples Tool. Alteryx recommends 80% estimation and 20% validation.
- Use the Output Data Tool to output the smaller sample to an Alteryx database file and save it for later.
Once you've completed these steps, you can start building a machine learning pipeline.
Step 2. Create Model Pipeline

Sample workflow (yours may be different)
As a best practice, you should create a workflow to train and save your model. This workflow will contain your model pipeline. Assisted modeling creates a model pipeline for you during the Assisted Modeling process.
To create an assisted modeling pipeline:
- Create a new workflow and label it "training only".
- Drag an Input Data Tool onto the canvas and connect it to your training dataset. You can use the 80% sample you created and saved.
- Click the Assisted Modeling tool in the Machine Learning tool palette and drag it to the workflow canvas, connecting it to your existing workflow. At minimum, you must have an input tool, such as the Input Data Tool, already connected to your dataset.
- Run your workflow to enable Assisted Modeling. If Assisted Modeling does not display, click the Assisted Modeling tool on the canvas and then click Run.
- Select the Assisted option.
- Click Start Assisted Modeling.
-
Click Start Building in the onboarding window. Onboarding is an introductory tutorial explaining the steps in Assisted Modeling. You can dismiss onboarding so that it does not display again.
- Follow the steps in assisted modeling to build and select a model:
Step 3. Validate Your Model

Sample workflow (yours may be different)
As a best practice, you should test, or validate, your model. This test is a simulation of the way the model will behave once it sees new data. You can compare predictions between the dataset used to build the model and the sample you saved off for testing purposes. The predicted outcome may not be exactly the same, but it should not be vastly different.
- Create a copy of your workflow and label it Testing.
- Using an Input Data Tool, connect your 20% sample dataset to the D anchor on the Predict Tool.
- Add a Browse tool and then run the workflow to evaluate results.
Did the model perform as well or better than it did in the Assisted Modeling tool? If yes, you can create more workflows and connect unseen datasets in place of the test data input. If your test dataset is representative of the training dataset, you can expect results to be nearly the same.
If the model did not perform well on the test data, then you have a basis for tuning the model. To find out more, visit the Alteryx Community Data Science blog, Hyperparameter Tuning Black Magic.
