Recipe Basics
In the Transformer page, every transformation that you apply to your data adds a new step to your recipe. A recipe is the sequence of steps that are applied to your imported datasets to transform them for output.
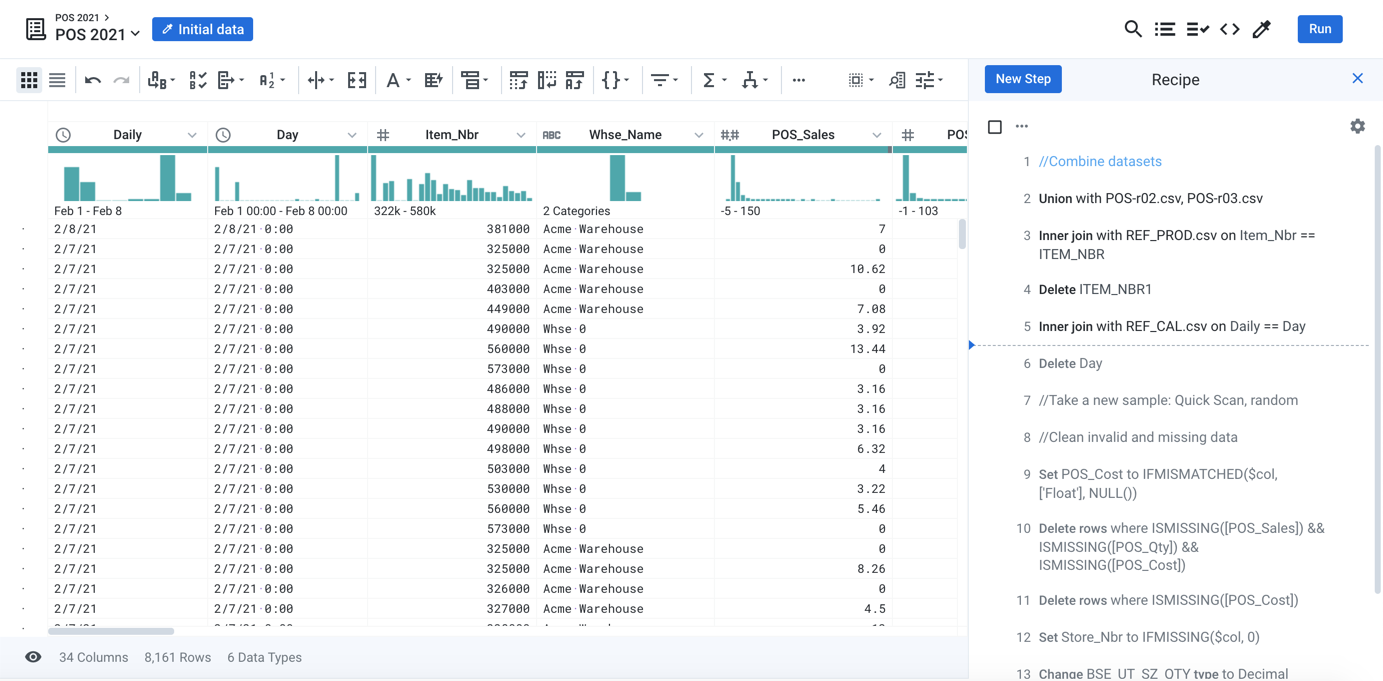
When you select items and apply suggestions or perform other transformative actions in the Transformer page, you are creating new steps for your recipe. Your recipe in development is available through the Recipe panel. If the panel on the right below is not visible, click the Recipe icon in the toolbar at the top of the screen:

Figure: Transformer page with Recipe panel
Steps are crafted in a proprietary language. Wrangle is created for use in Designer Cloud.
By default, recipe steps are displayed in a readable, more natural language than the underlying Wrangle.
From the Gear icon, you can choose Display language to view the underlying language steps.
Recipe Panel
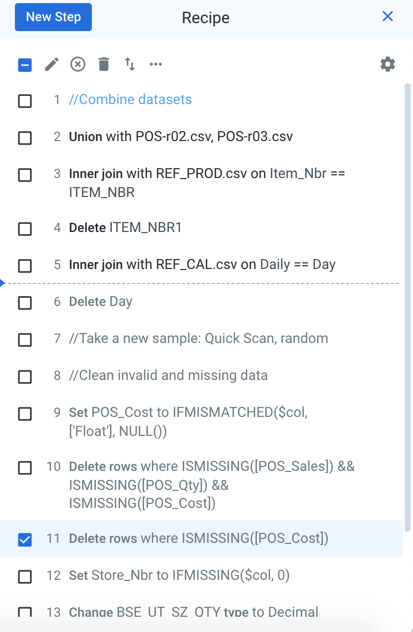
In the Recipe panel, you can review and manipulate your recipe steps, including re-ordering them, editing them, and disabling them. The list of steps in the Recipe panel represent the current state of your recipe. Each numeric item corresponds to:
The sequence number in the recipe when the step is executed.
The description of the transformation in the step.

Figure: Recipe panel
Key elements of the recipe panel:
Recipe cursor: Represented by the dotted line in the above image, the recipe cursor indicates the state of the data in the data grid at that step. The current data is the current sample of data, plus all of the steps between the sample and the recipe cursor.
Selected step: The step with the selected checkbox next to it is the currently selected step. In the context menu of the selected step are a set of commands that you can apply to it. See below.
Tip
You can select multiple steps using
SHIFT+ click orCMD/CTRL+ click. The available context menu options may change for multiple steps.Tip
If you make a mistake, press
CMD/CTRL+Zto try to undo it. Some recipe actions cannot be undone.
Step Actions
Tip
When you add, edit, or delete a recipe step, your changes to the recipe are automatically saved.
Add a new step
Steps:
Move the recipe cursor to the location after which you wish to add a step.
Tip
You can also select a step and then select Insert after step to insert a new step.
Click Add New Step.
In the Search panel, search for the transformation or function to add. Select the appropriate one from the list.
Specify the transformation settings as needed.
Click Add.
Edit steps
To edit a step, select the step. From the step context menu, select Edit.
Note
You cannot change the base transformation of a step. Create a new step instead.
To disable a step, select Disable from the step context menu.
Tip
Disabling a step is a good way to experiment with different steps at that location. After disabling the step, you can add a new step, which is automatically enabled. If the new step works, then you can safely delete the disabled step.
To delete a step, select Delete from the step context menu.
Warning
Deleting a step cannot be undone.
Move steps
Steps:
Select the step or steps that you wish to move. You can select multiple steps if needed.
In the step context menu, select Move. In the sub-menu, choose where you wish to move the step or steps.
Tip
You can also click the Up/Down arrows in the recipe menu bar.
Make additional selections to move as needed. You can undo the move if needed.
Cut, copy, and paste steps
From the step context menu, you can cut, copy, and paste steps.
Recipe Toolbar
Some of the above commands are also available through the toolbar at the top of the recipe. Additional commands are available through the Gear icon.
Review edit history
You can see the history of changes and who made them to the recipe. From the Gear icon, select See edit history.
Download recipe
You can download the current recipe as a text file containing the Wrangle steps. From the Gear icon, select Download Recipe as wrangle.
Download sample
You can download the current state of the data grid in CSV format. Select the step that you'd like to see in the data grid. Then, from the Gear icon, select Download Sample data as CSV.