Data Bridges
重要
Data Bridgesは高可用性(HA)をサポートしていません。
Alteryx Data Bridges使用すると、Workspace Executionで実行されるワークフローがユーザー管理型のデータソースに安全に接続できるようになります。Data Bridgesは、AWS PrivateLinkを使用して接続を確立するため、パブリックインターネットに公開することなくプライベートリソースにアクセスできます。
既存のワークフローを変更する必要はありません。Alteryx Engineは、ネットワーク内で実行するときと同じホスト名とポートを使用してデータソースに接続します。
Data Bridgesは、AlteryxデータプレーンのWorkspace Executionでの使用を目的とした設計になっています。これは、パブリックインターネットアクセスを必要とせずに、それらのワークフローをユーザーのデータソースに安全に接続するための唯一の方法です。
請求と利用資格
Data Bridgesは、Alteryx One Platformのエンタープライズ2025エディションで使用できます。それ以前のエディションには、この機能は含まれていません。
Data Bridgesを使用する権利(「資格」)は、請求アカウントに紐付いています。各請求アカウントでは、複数のブリッジクライアントリソースを作成できます。
[管理者コンソール] > [Data Bridges]からData Bridgeを設定するには、Alteryx Oneサブスクリプションに紐付いている請求アカウントの管理者である必要があります。
用語
ブリッジクライアント: ユーザーのAWS仮想プライベートクラウド(VPC)にデプロイされた軽量のAMD64 Amazon Linux 2023バイナリ。AWS PrivateLinkと動作し、パブリックインターネットを使用することなく、Alteryxとユーザーデータソース間に認証済みのプライベート接続を提供します。
AWS PrivateLink: プライベートIPアドレスを使用して、VPCとAWSまたはサードパーティサービス(ブリッジクライアントなど)間のプライベート接続を可能にするAWSサービス。トラフィックはパブリックインターネットを通過しません。
データソース: TCPを介してアクセス可能なユーザー管理型データベースまたはサービス。
Workspace Execution: これを使用して、ユーザーはDesigner Desktopでワークフローを構築し、ローカルマシンではなくクラウドベースのコンピューティングとストレージを使用して、Alteryx Oneでワークフローを保存、スケジュール設定、実行できます。
Alteryxデータプレーン: クラウドリソースを複数のユーザー間で安全に共有できる、Alteryxのマルチテナントクラウド実行環境。
システムアーキテクチャの概要
下の図は、Alteryx Data Bridgesがすべてのユーザーデータをプライベートネットワークに保持しながら、Workspace Executionワークフローをユーザー管理型のデータソースに安全に接続する方法を示しています。
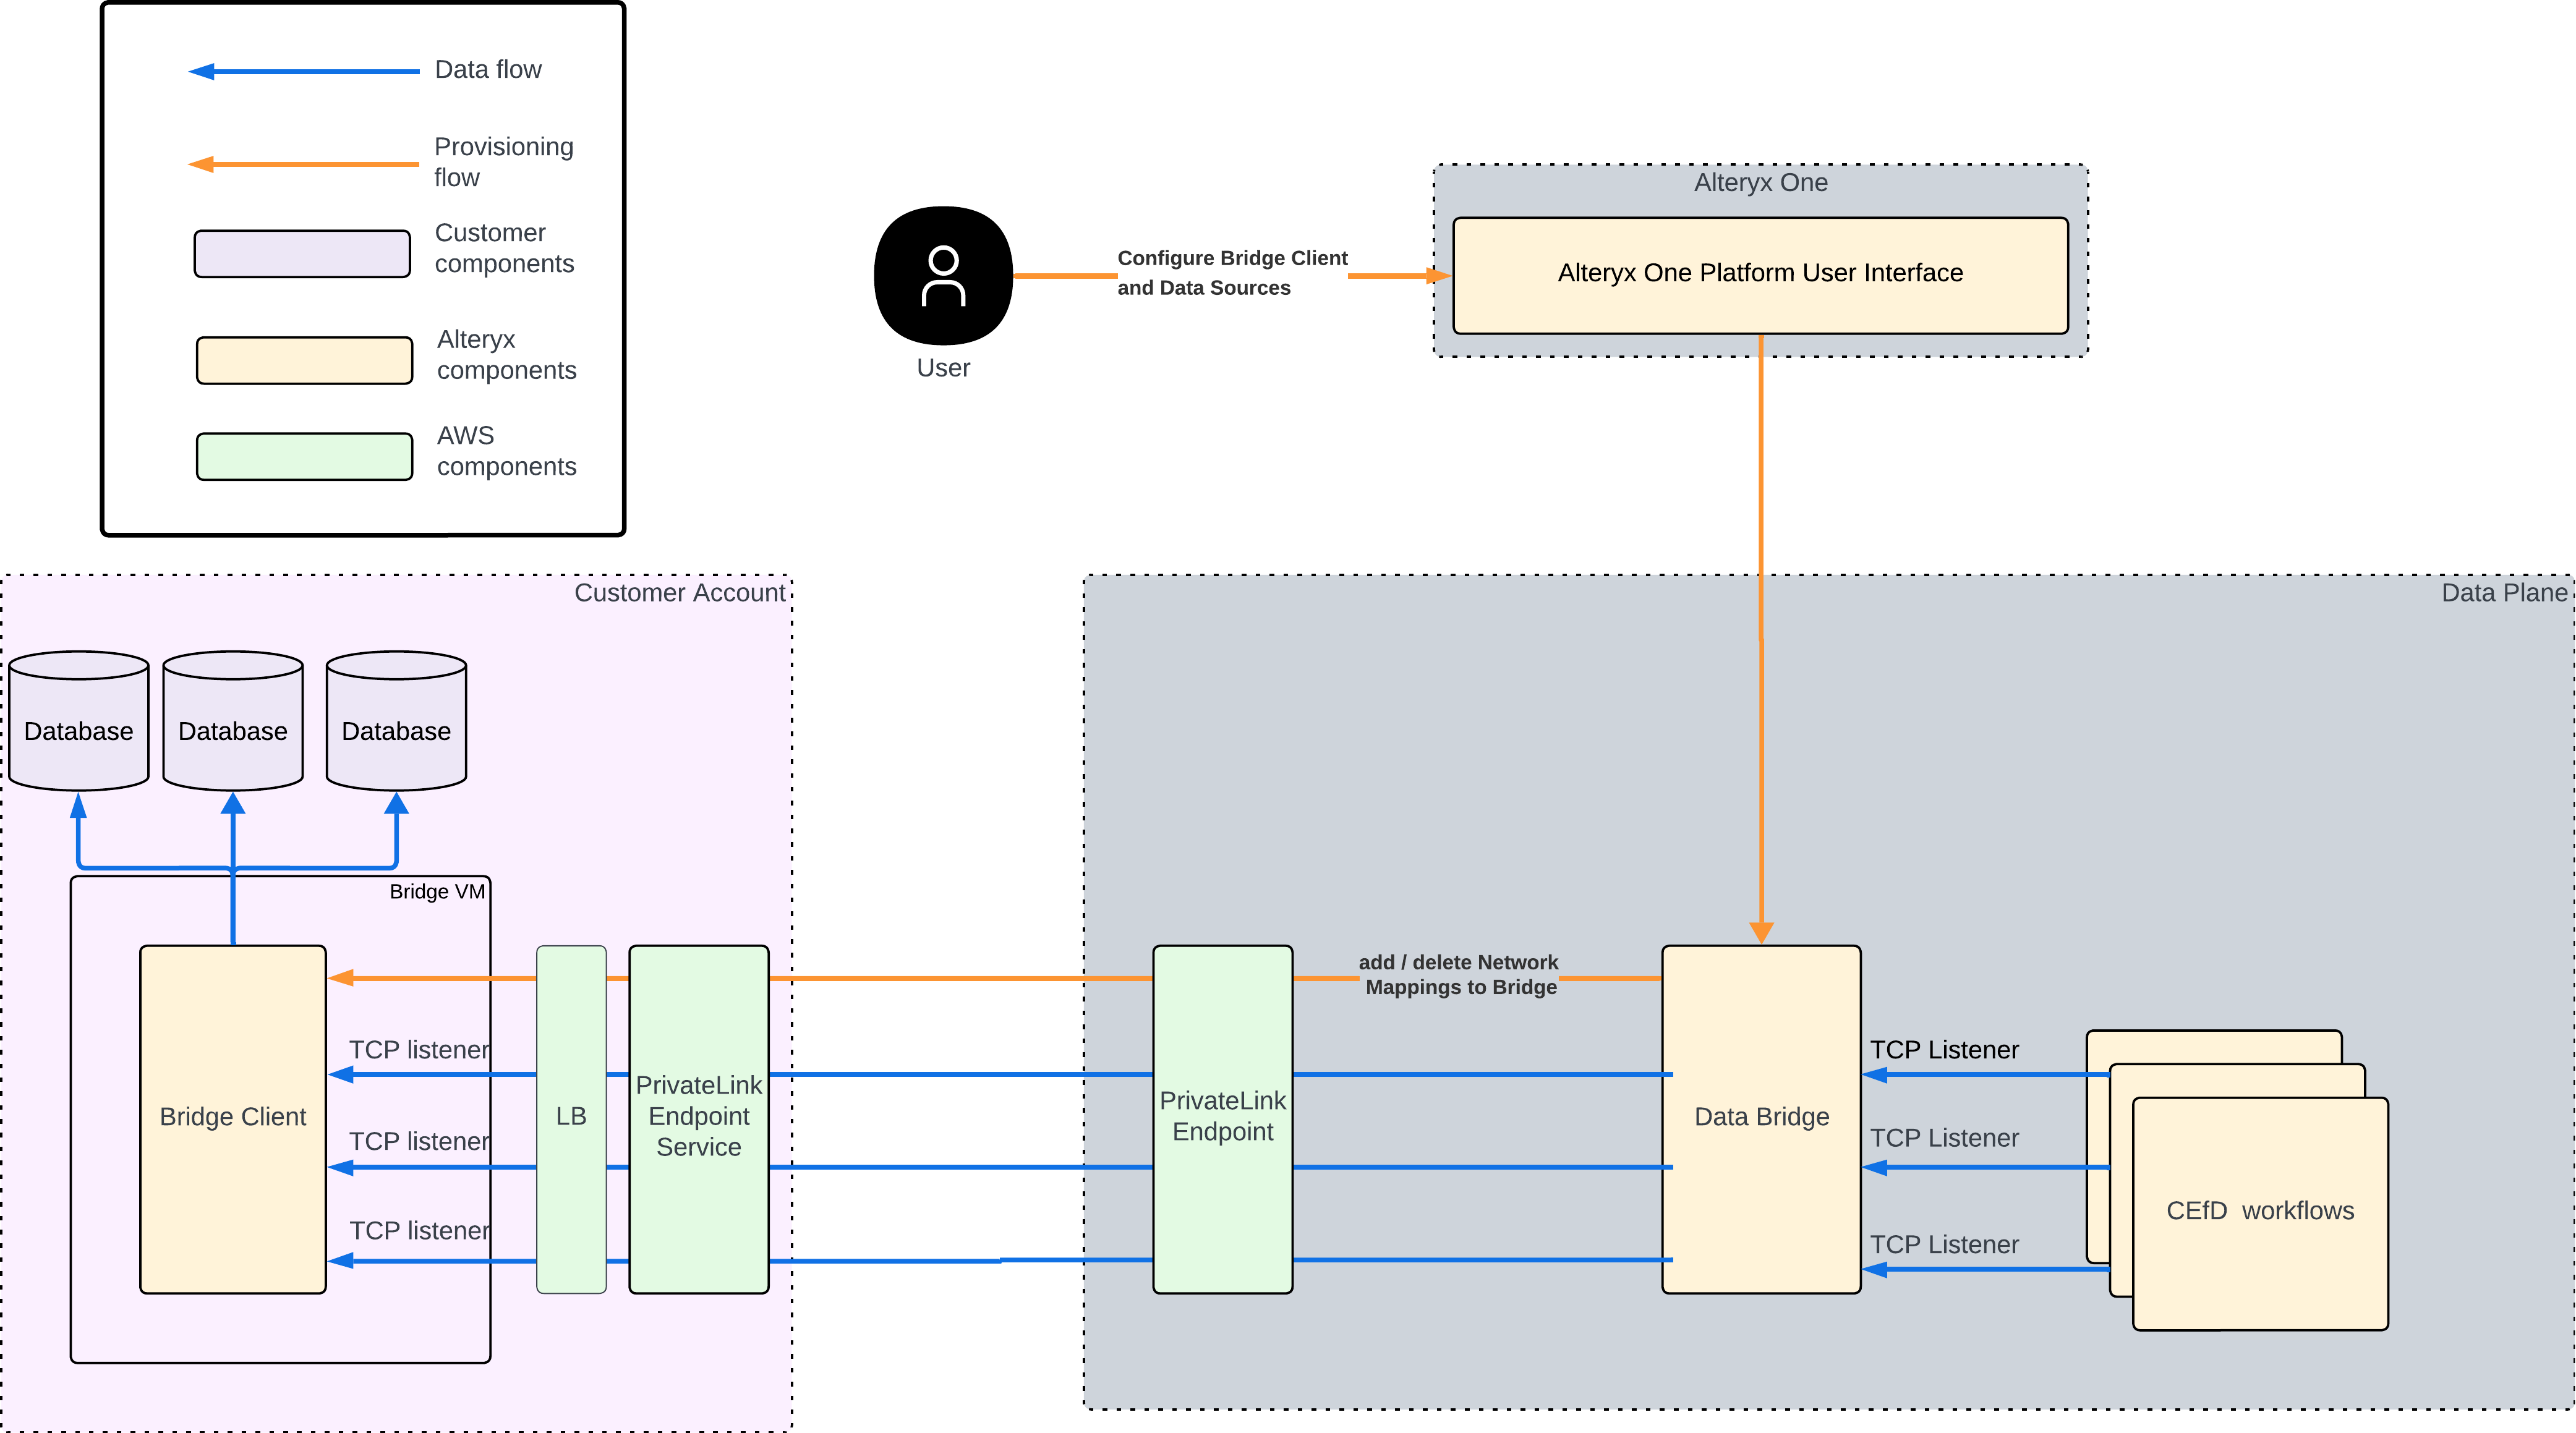
データフロー(青い矢印)
AlteryxデータプレーンのWorkspace Executionで実行されているワークフローは、標準のホスト名とポートを使用してデータソースへの接続を開始します。
トラフィックはAWS PrivateLinkを介してプライベートにユーザーのAWS VPCに流れます。
ユーザーのネットワーク内で実行されているブリッジクライアントは、ターゲットデータソース(データベースなど)にトラフィックを転送します。
データは、同じプライベートパスを介して実行中のワークフローに戻ってきます。
メタデータと制御フロー(オレンジ色の矢印)
メタデータと制御フローは、設定、プロビジョニング、ライフサイクル管理を管理します。ユーザーデータを伝送することはありません。
ユーザーは、Alteryx One Platformユーザーインターフェースを介してData Bridgeとネットワークマッピングを設定します。
設定は、Alteryxデータプレーンに送信され、最終的にはAWSプライベートリンクを介してブリッジクライアントに送信されます。
この分離により、制御トラフィックとオーケストレーショントラフィックがユーザーのデータトラフィックから切り離されるため、セキュリティと信頼性の両方が向上します。
Data Bridgeとワークスペースの設定オプション
各Data Bridgeは、1つ以上のワークスペースに関連付けることができます。また、各ワークスペースも、0、1つ、または複数のData Bridgesに関連付けることができます。
ワークスペース間の高い分離性が必要な場合は、Data Bridgeとワークスペース間のマッピングを1対1にすることをお勧めします。最も一般的なシナリオでは、管理を容易にするために、単一のData Bridgeを複数のワークスペースに接続することが推奨されます。
管理者は、セットアップ時に、Data Bridgeを使用できる接続を制御します。これにより、管理者が承認したデータソースにのみ接続が確立されます。
概要
ユーザーデータは、実行時のワークフローとユーザーインフラストラクチャ間のプライベートネットワークパスを介してのみ流れます。
メタデータ、プロビジョニング、運用トラフィックは、Alteryxサービスによって個別に処理されます。
ワークフローを変更する必要はなく、ユーザーデータソースを公開する必要もありません。
このアーキテクチャにより、ユーザーは、自社ネットワーク内で実行するのと同じセキュリティ体制を維持しながら、デスクトップで作成されたワークフローをクラウドで実行できます。
ユーザーワークフロー
必要条件
Alteryx Oneの前提条件
組織がAlteryx One Platformのエンタープライズ2025エディションを利用している。これより前のエディションには、Data Bridgeは含まれていません。
Alteryx Oneサブスクリプションに紐付いている請求アカウントへのアクセス権がある。
その請求アカウントの管理者であり、ブリッジクライアントリソースを作成および管理できる。
Workspace Executionが有効になっており、Data Bridgeを使用するワークスペースのAlteryxデータプレーンで実行されている。
Data Bridgeを介して接続するプライベートデータソースへのアクセスに必要な内部承認と資格情報がある。
アクセスするデータソースがパブリックインターネットに公開されていない(プライベートネットワークまたはVPN経由でのみアクセスできるデータソースなど)。
AWSの前提条件
ブリッジクライアントをホストするAWSアカウントがある。
The Bridge Client binary must be installed on a Linux-based virtual machine that runs one of these supported Linux distributions:
RHEL 9
Ubuntu 22
Amazon Linux 2023 (AL2023)
アクセスするデータソースが、少なくとも1つのAWS VPCを介してアクセスできる。
そのAWSアカウントに次の権限がある。
EC2インスタンスを作成し管理する権限(ブリッジクライアントのホスト用)
AWS PrivateLinkエンドポイントを設定する権限(該当する場合)
ネットワークリソースとセキュリティリソース(VPC、セキュリティグループなど)を管理する権限
AWS環境に、Data Bridgeを介してアクセスするプライベートデータソースへのネットワーク接続がある。
推奨されるEC2インスタンスのサイズ
以下は、ハード製品の要件ではなく、一般的なAWSのベストプラクティスに基づく使用開始時の例です。社内のクラウドチームまたはインフラチームと検証し、必要に応じてワークロードに合わせて調整してください。
開発、テスト、または極めて軽量な用途の場合、t3.small (2 vCPU、2 GiB RAM)から始めます。
多くの本番ワークロードには、既定としてt3.medium (2 vCPU、4 GiB RAM)を使用します。
CPUまたはメモリの使用率が常に高い場合、または同時実行ワークロード数が多いと予想される場合は、拡張(t3.largeまたはm6i.largeなど)してください。
Data Bridgeの設定
Data Bridgeを設定するには、以下の手順を実行します。完了すると、関連付けられているワークスペース内のWorkspace Executionワークフローは、接続されたデータソースにアクセスできるようになります。
Data Bridgeの作成
Alteryx Oneで、[管理者コンソール] > [Data Bridges]の順に移動します。次に、[Data Bridgeを作成]を選択します。入力:
Data Bridge名
リージョン: リージョンはVPCリージョンと一致している必要があります。既定では、現在のリージョンに設定されています。
アベイラビリティゾーンID: アベイラビリティゾーンIDは、このエンドポイントが使用可能なAWSのアベイラビリティゾーンを識別します。
ポート: ポートは、Data BridgeをAlteryxに接続するために使用されます。既定は9001です。
[次へ]を選択します。
次のページで、VPCにブリッジクライアントバイナリをインストールして設定するよう求められます。
ライセンスポータルからブリッジクライアントバイナリファイルをダウンロードする。
AWSシークレットアクセスを使用してブリッジクライアントをEC2にインポートする:
プライベートデータソースに接続でき、AWS Secrets Managerでシークレットの読み取りまたは書き込みの権限を持つAmazon Linux AMIを使用して、EC2インスタンスをAWSで作成します。EC2インスタンスの作成方法の詳細については、AWSドキュメントのAmazon EC2の使用を開始するを参照してください。
次に、ブリッジクライアントを
/の/home/ec2-userディレクトリにインポートします。注記
The file will have a name with a version like
bridge-client-v1.0.0but should be renamed tobridge-clientto work with the following scripts.Make the binary executable. The Bridge Client binary must have executable permissions before it can be run.
chmod +x bridge-client
設定スニペットをファイルに保存する:
スニペットをコピーして、ブリッジクライアントによって参照される、
/home/ec2-userディレクトリ内のbridge-client-config.jsonという名前の設定ファイルに貼り付けます。例:
{
  "logging": {
    "logLevel": "info",
    "logFormat": "json"
  },
  "bootstrap" : {
    "storageType": "secretsManager",
    "secretName": "<Name of the AWS Secrets Manager secret where the Bridge Client will store its private key. The Bridge Client will create and populate this secret automatically.>"
  },
  "libp2pPort": 9001,
  "libp2pBindIP": "<Private IPv4 address of the EC2 Instance>",
  "resourceFile": "/home/ec2-user/resources.json"
}
注記
libp2pBindIPは、ブリッジクライアントがデプロイされているEC2インスタンスのプライベートIPv4アドレスになります。そのEC2インスタンスについてはAWS管理コンソールを確認してください。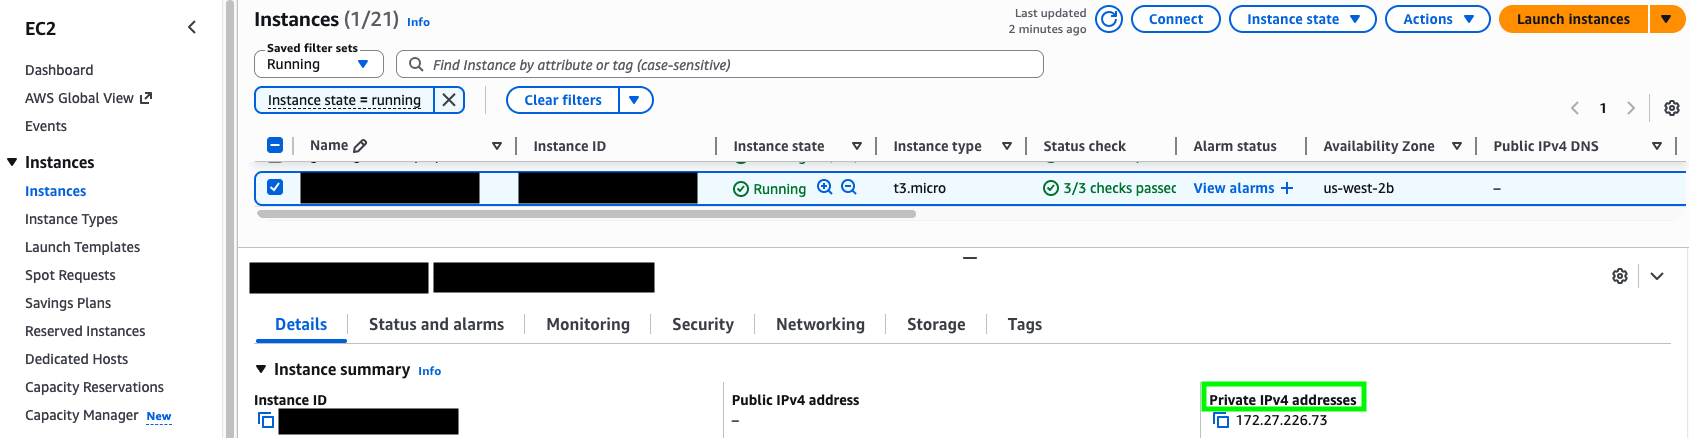
Optional: Add a Customer-Managed AWS KMS Key
If your organization requires Bridge Client secrets in AWS Secrets Manager to be encrypted with a customer-managed key, add an optional
awsobject underbootstrap configin thebridge-client-config.jsonfile. SetkmsKeyIDto your AWS KMS key ARN or alias ARN.If you omit this value or leave it empty, Bridge Client continues to use the default AWS Secrets Manager encryption behavior.
Example:
{
  ...
  "bootstrap": {
    "storageType": "aws",
    "secretName": "<Name of the AWS Secrets Manager secret where the Bridge Client will store its private key. The Bridge Client will create and populate this secret automatically.>",
    "aws": {
      "kmsKeyID": "arn:aws:kms:<region>:<account-id>:key/<key-id>"
    }
  }
  ...
}
Before you restart Bridge Client with
kmsKeyIDconfigured, make sure the EC2 instance role has permission to use the AWS KMS key through AWS Secrets Manager. If an existing secret uses a different AWS KMS key, Bridge Client updates the secret to use the configured key during startup.The EC2 instance role must include these AWS KMS permissions in addition to the existing Secrets Manager permissions:
{ "Effect": "Allow", "Action": [ "kms:Decrypt", "kms:Encrypt", "kms:GenerateDataKey", "kms:DescribeKey" ], "Resource": "arn:aws:kms:<region>:<account-id>:key/<key-id>", "Condition": { "StringEquals": { "kms:ViaService": "secretsmanager.<region>.amazonaws.com" } }resources.jsonファイルを作成する:resources.jsonという名前のファイルを/home/ec2-userディレクトリに作成します。このファイルは、ブリッジクライアントが実行時にリソースを起動および管理するために必要になります。ファイルには空のJSONオブジェクト(
{})が含まれている必要があり、空白にすることはできません。ブリッジクライアントをプロセスとして実行する:
systemdを使用して、systemdで管理される長時間実行プロセスとしてブリッジクライアントを実行します。次のコンテンツをファイルにコピーし、
/etc/systemd/systemディレクトリでbridge-client.serviceという名前を付けます。[Unit] Description=Bridge Client [Service] # App Running ExecStart=/home/ec2-user/bridge-client -c /home/ec2-user/bridge-client-config.json Restart=always RestartSec=30s [Install] WantedBy=multi-user.target
次のコマンドを使用してブリッジクライアントを起動します。
sudo systemctl start bridge-client
次のコマンドを使用して、シャットダウン時にブリッジクライアントが自動的に起動するようにします。
sudo systemctl enable bridge-client
次のコマンドを実行して、ブリッジクライアントの健全性を確認します。
sudo systemctl status bridge-client
プロセスの状態が
Active: active (running)であることを確認します。そうでない場合は、起動時に問題が発生している可能性があり、ログを使用してトラブルシューティングを行う必要があります。systemdサービスのログにアクセスするには、次のコマンドを実行します。ここでは、-uはユニット名、-nは表示する最新のログ行数を示します。journalctl -u bridge-client -n 50
正常に起動したら、
stdoutからブリッジクライアントのピアIDを記録します。以下は、ピアIDを取得するための便利なスクリプトです。
sudo journalctl -u bridge-client -n 500 -r --no-pager \
| grep -m1 '"peerID"' \
| sed -E 's/.*"peerID":"([^"]+)".*/\1/'
または、次のようなログ行を手動で探します。
{"level":"info","ts":"2025-10-18T01:17:27Z","caller":"bootstrap/bootstrap.go:47","msg":"peerID","name":"bridge_client","peerID":"QmA7kT2Yp8ZLxNwC4H6B5eVJg9sDoUScmRyb3FhXPaMq"}peerID値は各プライベートキーに対して生成され、ブリッジクライアントごとに異なります。各ブリッジクライアントは、個別のプライベートキーを使用する、または所有する必要があります。プライベートキーは、ブリッジクライアント間で再利用できません。
PrivateLinkエンドポイントサービスをセットアップする:
インストールが完了したら、VPCでPrivateLinkエンドポイントサービスを設定します。
ブリッジクライアントが存在する特定のEC2インスタンスをターゲットとする、ターゲットグループを作成して接続します。健全性チェックは、ブリッジクライアントの
/readyエンドポイントを指すポート8081に対してターゲットグループで設定する必要があります。bridge-client-config.jsonのlibp2pPortがデプロイされているポート(既定は9001)のすべてのTCPトラフィックを転送するネットワークロードバランサーを作成します。注記
エンドポイントサービスに使用されるロードバランサには2つのアベイラビリティーゾーン(AZ) IDが含まれている必要があり、そのうちの1つはブリッジクライアントがデプロイされているAZと一致している必要があります。
Customers must allow inbound TCP traffic on the required service port. The default port is
9001.Allow traffic from the Alteryx-provided VPC CIDR ranges. This is required when the customer Network Load Balancer security group enforces inbound rules for PrivateLink traffic. Inbound rule enforcement is enabled by default.
To use the PrivateLink connection, add these IP ranges to the inbound rules of the Network Load Balancer security group with TCP access to port
9001:10.60.0.0/2110.60.8.0/2110.70.0.0/18
The security group of the backend instance must also allow traffic from the corresponding Network Load Balancer security group.
EC2インスタンスと同じVPCネットワーク上にある、内部サービス用のInterface型のPrivateLinkエンドポイントサービスを作成します。
注記
クロスリージョンのPrivateLinkを作成する場合、エンドポイントサービスは、ターゲットリージョンと、ブリッジクライアントEC2インスタンスがデプロイされているリージョンの両方を、[サポートされているリージョン]フィールドのエントリとして選択する必要があります。
Alteryx One > [管理者コンソール] > [Data Bridges]に戻り、エンドポイントサービスの準備ができたら、[次へ]を選択します。次のように入力します。
エンドポイントサービス名
ステップ2で記録したブリッジクライアントのピアID。
[Data Bridgeを作成]を選択します。
これで、ワークスペースを追加できるようになります。
ワークスペースの追加
管理者コンソールでData Bridgeを作成したら、このData Bridgeに複数のワークスペースを追加できます。ワークスペースを関連付けるプロセスは通常、完了までに13-15分かかります。
Alteryx One > [管理者コンソール] > [Data Bridges]で、[ワークスペースを追加]を選択します。
[ワークスペースを追加]ウィンドウが開きます。
ドロップダウンからワークスペースを選択します。Workspace Executionが有効になっているワークスペースのみが表示されます。[次へ]を選択します。
IAMロールが表示されます。プライベートVPCの[許可するプリンシパル]のリストにコピーして貼り付けます。AWS IAM Identity Centerの設定に関する詳細については、IAMアイデンティティセンターを使用した開始方法またはAWS CLIを使用したIAMアイデンティティセンター認証の設定を参照してください。
完了したら、[次へ]を選択します。
Go to the PrivateLink service in your AWS Console, then accept the private endpoint connection from the Alteryx account. Make sure the status is green before you continue.
Go to the 3-dot menu next to the workspace entry, then select Test Connection for that workspace. A toast message appears in the lower-left corner and shows the test status and result.
If the test fails, the setup might not be complete and the remaining steps won’t work.
After the connection test succeeds, you can create a new data source network mapping.
データソースの新しいネットワークマッピングの作成
ネットワークマッピングを作成して、Data Bridgeが特定のプライベートデータソースにトラフィックをルーティングできるようにします。通常、ネットワークマッピングの作成には10-20秒かかります。
Alteryx One > [管理者コンソール] > [Data Bridges]で、[新しいネットワークマッピング]を選択します。
[新しいネットワークマッピング]ウィンドウが開きます。入力:
名前
説明
ホスト: 接続マネージャーまたはDesignerのデータソース接続から取得するホスト名またはIPアドレスを正確に入力します。
ポート: データソース用に設定されたポート番号。
次に、[作成]を選択します。
トラブルシューティングとFAQ
インストールと設定に関する一般的な問題
接続エラーまたはDNSエラー
接続に失敗した場合は、以下の一般的なDNS解決に関する問題を確認してください。
症状: ブリッジクライアントがAlteryx Cloudまたはユーザーのデータソースに接続できない。
考えられる原因: VPCネットワークが正しく設定されていないか、DNS設定が間違っている。
解決手順: VPC DNS設定、PrivateLinkエンドポイント設定、ファイアウォールルールを確認する。
接続制限
DDoS (分散型サービス妨害)から保護するため、ブリッジクライアントは入力同時接続数をデータソースあたり256に制限します。この上限数を増やす必要がある場合は、Alteryxサポートにお問い合わせください。
Network Mapping and Connection Errors
When you run a workflow that uses a Data Bridge connection, you might encounter connection errors if the hostname or port defined in the workflow doesn't match the hostname or port configured in the Data Bridge network mapping.
Error messages vary depending on the connector or driver being used. Look for references to host, hostname, or port in the error details. For example:
1|3|Internal Error SQLDriverConnect: [Simba][MySQL] (1001) Error occurred while creating socket with message: This is usually a temporary error during hostname resolution and means that the local server did not receive a response from an authoritative server.
If you encounter this type of error, confirm with your administrator that the hostname and port used in the workflow match the values configured in the Data Bridge network mapping. In some cases, a workflow might run successfully on your local machine because it uses a valid alternative hostname that is not available through the Data Bridge configuration.
メトリックとサポート
ブリッジクライアントのデバッグにサポートが必要な場合は、/metrics.jsonエンドポイントを呼び出して、JSON形式のステータスレポートを取得します。取得したレポートをサポートチケットまたはメッセージに添付して、サポートチームに問題の確認を依頼してください。
また、ブリッジクライアントはPrometheus形式の/metricsエンドポイントを表示します。これを取得してダッシュボードを作成したり、データを個別に分析したりできます。
アップグレードと互換性
互換性
Data Bridgeは以下ではサポートされていません。
プライベートデータ処理のデプロイ環境
プライベートデータストレージの設定
アップグレード
Upgrades to the Bridge Client are typically required when new features or security updates are released.