数据桥
重要
数据桥不支持高可用性 (HA)。
Alteryx Data Bridges enables workflows running in Workspace Execution to securely connect to customer-managed data sources. It establishes private connectivity so workflows can access private resources without exposing them to the public internet.
无需更改现有工作流。Alteryx 引擎连接数据源时,所使用的主机名和端口与在网络内部运行时完全一致。
数据桥旨在配合 Alteryx 数据平面上的 Workspace Execution 使用。这是将此类工作流安全连接至客户数据源且无需公共互联网访问的唯一受支持方法。
计费与权益
Alteryx One Platform 的 Enterprise 2025 层级提供数据桥功能。早期版本不包括此功能。
您使用数据桥的权利(“权益”)与您的计费账户相关联。每个计费账户均可创建一个或多个 Bridge Client 资源。
要在管理控制台 > 数据桥中设置数据桥,您必须是与您的 Alteryx One 订阅关联的计费账户的管理员。
术语
Bridge Client: A lightweight Linux-based binary deployed in the customer cloud environment. It works with private connectivity services to provide a private, authenticated connection between Alteryx and customer data sources without using the public internet.
AWS PrivateLink:一种 AWS 服务,支持使用专用 IP 地址在 VPC 与 AWS 或第三方服务(如 Bridge Client)之间建立专用连接。流量不会经过公共互联网。
Google Cloud Private Service Connect (PSC): A Google Cloud service that enables private connectivity between VPC networks and supported Google Cloud, partner, or customer-managed services using internal IP addresses. Traffic doesn’t traverse the public internet.
数据源:可通过 TCP 访问的任何客户管理的数据库或服务。
Workspace Execution:允许用户在 Designer Desktop 中构建工作流,随后即可在 Alteryx One 中使用基于云的计算和存储(而非本地计算机)进行保存、计划和运行。
Alteryx 数据平面:Alteryx 的多租户云执行环境,其中云资源在多个客户之间安全共享。
系统架构概览
本图展示了 Alteryx 数据桥如何将 Workspace Execution 工作流安全连接至客户管理的数据源,同时确保所有客户数据保留在私有网络中。
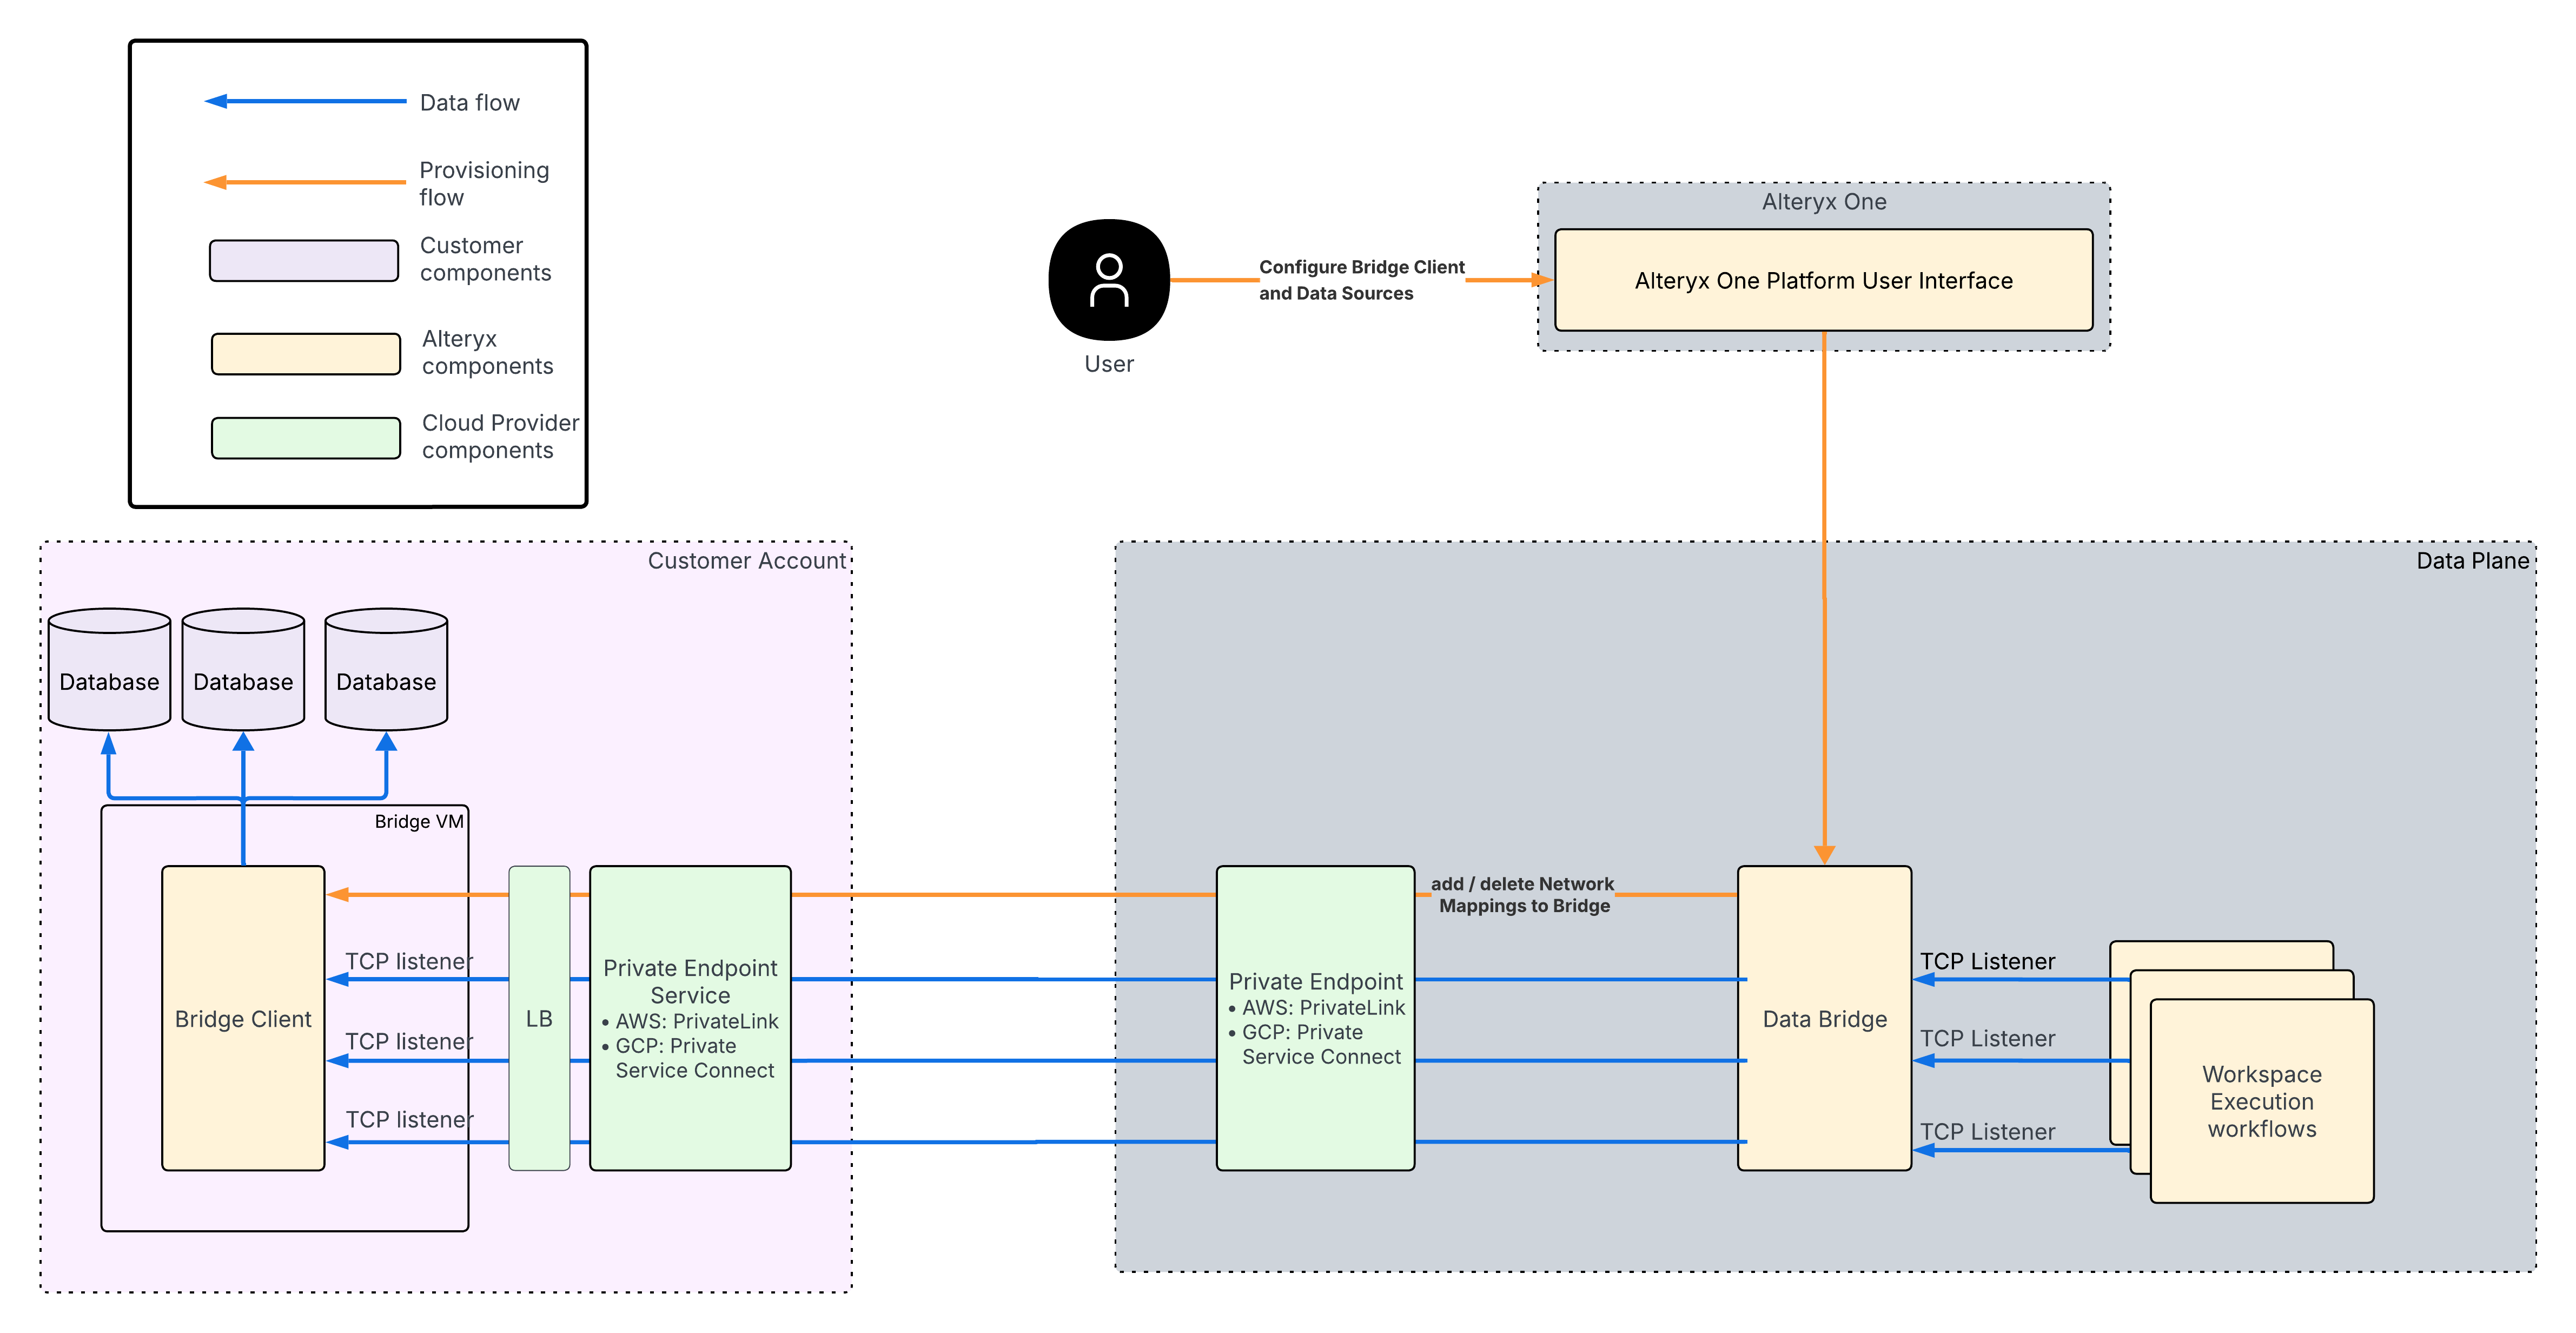
数据流(蓝色箭头)
在 Alteryx 数据平面的 Workspace Execution 中运行的工作流会使用标准主机名和端口发起数据源连接。
流量通过 AWS PrivateLink 以私有方式进入客户的 AWS VPC。
在客户网络内部运行的 Bridge Client 会将流量转发至目标数据源(例如数据库)。
数据将沿同一私有路径返回至正在执行的工作流。
元数据和控制流(橙色箭头)
元数据和控制流负责管理配置、置备及生命周期管理,且从不传输客户数据:
客户通过 Alteryx One Platform 用户界面配置数据桥和网络映射。
配置将通过 AWS Private Link 传输至 Alteryx 数据平面,并最终传输至 Bridge Client。
这种分离确保了控制与编排流量同客户数据流量相互隔离,从而提升了安全性和可靠性。
数据桥和工作区配置选项
每个数据桥都可以与一个或多个工作区关联。每个工作区也可以与零个、一个或多个数据桥关联。
若需要工作区之间的高度隔离,建议在数据桥与工作区之间建立一对一映射。针对大多数常见场景,建议使用连接到多个工作区的单个数据桥,以便于管理。
管理员可在设置过程中控制哪些连接可以使用数据桥。这可确保仅与管理员批准的数据源建立连接。
摘要
客户数据仅在运行时流经工作流与客户基础设施之间的专用网络路径。
元数据、置备和运营流量由 Alteryx 服务分别进行处理。
无需更改工作流,且客户数据源无需公开访问。
该架构允许客户在云中运行由 Desktop 创建的工作流,同时保持与在其自有网络内部运行时相同的安全态势。
客户工作流
先决条件
Alteryx One 先决条件
您的组织目前处于 Alteryx One Platform 的 Enterprise 2025 层级。早期版本不包含数据桥。
您可以访问与您的 Alteryx One 订阅关联的计费账户。
为了创建和管理 Bridge Client 资源,您必须是该计费账户的管理员。
针对将使用数据桥的工作区,其工作区执行功能已启用并在 Alteryx 数据平面上运行。
您已获得必要的内部批准并拥有相应凭证,可访问计划通过数据桥连接的专用数据源。
您要访问的数据源未暴露在公共互联网上(例如,它们只能通过私有网络或 VPN 访问)。
Bridge Client Download Access
Before you begin Data Bridge setup, confirm that the administrator who performs the setup can access the Bridge Client download:
In Alteryx One, select Download > Activate.
Confirm that the Data Bridge tab is available and that you can download the Bridge Client binary.
If the Data Bridge tab isn't available:
In Account Admin, go to Workspaces.
Find the workspace currently selected in Alteryx One, select its 3-dot menu, and select Manage Admins.
Add the user who will download the Bridge Client as a Workspace Admin, then select Invite.
In Account Admin > Settings > Capabilities, confirm that these capabilities are enabled:
Data Bridge
Download All On Prem Installers
Allow a few minutes for the access changes to take effect, then refresh Alteryx One or sign out and sign back in.
Return to Download > Activate. The Data Bridge tab should now be available.
注意
Workspace Admin is currently a reliable way to grant the download access required for Data Bridge because the role includes the Download All On Prem Installers capability. If the user already has this capability through another role, you don’t need to assign the Workspace Admin role.
If the Data Bridge tab is still unavailable after these checks, contact Alteryx Support.
Other Prerequisites
For additional prerequisites, refer to the relevant deployment section.
设置数据桥
AWS 先决条件
您拥有一个将托管 Bridge Client 的 AWS 账户。
The Bridge Client binary must be installed on a Linux-based virtual machine that runs one of these supported Linux distributions:
RHEL 9
Ubuntu 22
Amazon Linux 2023 (AL2023)
您要访问的数据源可通过至少一个 AWS VPC 访问。
您在该 AWS 账户中拥有以下权限:
创建和管理 EC2 实例(用于承载 Bridge Client)
配置 AWS PrivateLink 端点(如果适用)
管理网络和安全资源(VPC、安全组等)
AWS 环境与将通过数据桥访问的私有数据源之间具有网络连接。
推荐的 EC2 实例大小
以下示例仅作为基于一般 AWS 最佳实践的参考起点,而非硬性产品要求。请与您的内部云或基础设施团队核实,并根据您的工作负载需求进行调整。
从 t3.small(2 个 vCPU、2 GiB RAM)开始,适用于开发、测试或非常轻量级的使用场景。
使用 t3.medium(2 个 vCPU、4 GiB RAM)作为大多数生产工作负载的默认配置。
如果 CPU 或内存使用率持续较高,或者您预计会有大量并发工作负载,请向上扩展(例如 t3.large 或 m6i.large)。
按照以下步骤配置数据桥。完成后,关联工作区中的 Workspace Execution 工作流将有权访问已连接的数据源。
创建数据桥
在 Alteryx One 中,转至管理控制台 > 数据桥。然后选择创建数据桥。输入:
数据桥名称
Cloud Provider: AWS
Network Transport: The selected cloud provider determines the private connectivity service. When you select AWS, Alteryx uses AWS PrivateLink. This value is populated automatically and can’t be edited.
区域:该区域必须与您的 VPC 区域匹配,并且应默认为您当前所在的区域。
可用区 ID:可用区 ID 用于标识此端点所在的 AWS 可用区。
端口:该端口用于将数据桥连接到 Alteryx。默认值为 9001。
选择下一步。
在下一页上,系统会提示您在 VPC 中安装和配置 Bridge Client 二进制文件。
从许可门户下载 Bridge Client 二进制文件。
使用 AWS 私密访问将 Bridge Client 导入 EC2:
在 AWS 中,使用 Amazon Linux AMI 创建一个 EC2 实例。该实例需能够连接到您的私有数据源,并拥有读取或写入 AWS Secrets Manager 中私密密钥的权限。有关如何创建 EC2 实例的详细信息,请参阅 AWS 文档开始使用 Amazon EC2。
然后,将 Bridge Client 导入到根目录
/下的/home/ec2-user目录中。注意
The file will have a name with a version like
bridge-client-v1.0.0but should be renamed tobridge-clientto work with the following scripts.Make the binary executable. The Bridge Client binary must have executable permissions before it can be run.
chmod +x bridge-client
将配置片段保存到文件:
将此代码片段复制并粘贴到
/home/ec2-user目录下名为bridge-client-config.json的配置文件中,该文件将被 Bridge Client 引用。示例:
{
  "logging": {
    "logLevel": "info",
    "logFormat": "json"
  },
  "bootstrap" : {
    "storageType": "secretsManager",
    "secretName": "<Name of the AWS Secrets Manager secret where the Bridge Client will store its private key. The Bridge Client will create and populate this secret automatically.>"
  },
  "libp2pPort": 9001,
  "libp2pBindIP": "<Private IPv4 address of the EC2 Instance>",
  "resourceFile": "/home/ec2-user/resources.json"
}
注意
libp2pBindIP应为部署 Bridge Client 的 EC2 实例的私有 IPv4 地址。请在 AWS 管理控制台中查看该 EC2 实例。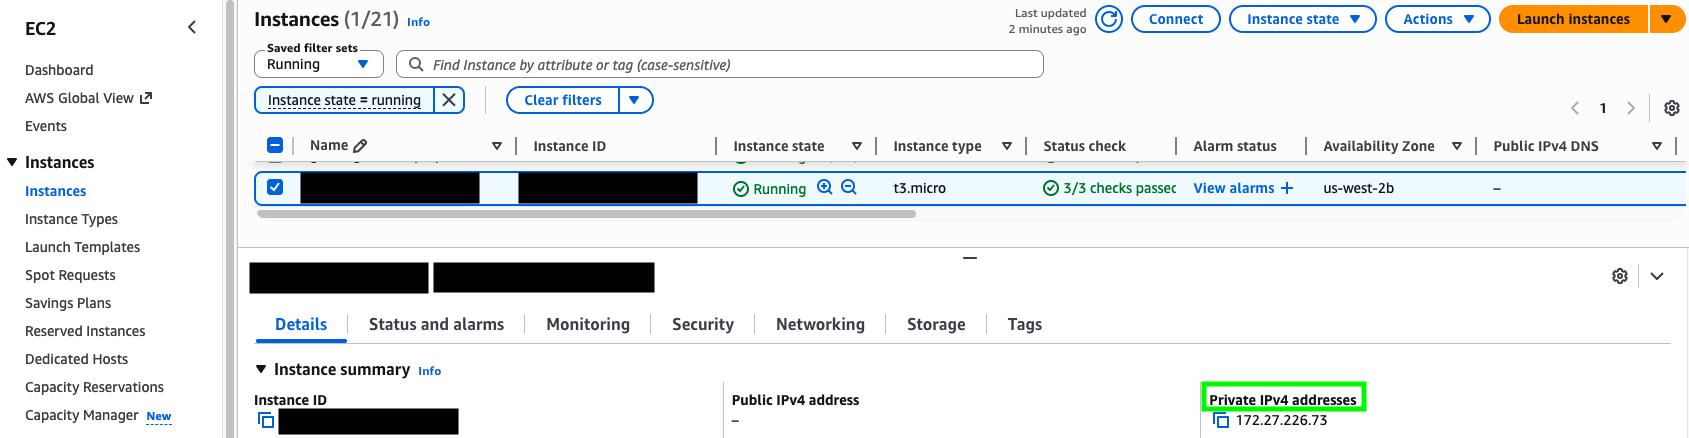
Optional: Add a Customer-Managed AWS KMS Key
If your organization requires Bridge Client secrets in AWS Secrets Manager to be encrypted with a customer-managed key, add an optional
awsobject underbootstrap configin thebridge-client-config.jsonfile. SetkmsKeyIDto your AWS KMS key ARN or alias ARN.If you omit this value or leave it empty, Bridge Client continues to use the default AWS Secrets Manager encryption behavior.
Example:
{
  ...
  "bootstrap": {
    "storageType": "aws",
    "secretName": "<Name of the AWS Secrets Manager secret where the Bridge Client will store its private key. The Bridge Client will create and populate this secret automatically.>",
    "aws": {
      "kmsKeyID": "arn:aws:kms:<region>:<account-id>:key/<key-id>"
    }
  }
  ...
}
Before you restart Bridge Client with
kmsKeyIDconfigured, make sure the EC2 instance role has permission to use the AWS KMS key through AWS Secrets Manager. If an existing secret uses a different AWS KMS key, Bridge Client updates the secret to use the configured key during startup.The EC2 instance role must include these AWS KMS permissions in addition to the existing Secrets Manager permissions:
{
  "Effect": "Allow",
  "Action": [
    "kms:Decrypt",
    "kms:Encrypt",
    "kms:GenerateDataKey",
    "kms:DescribeKey"
  ],
  "Resource": "arn:aws:kms:<region>:<account-id>:key/<key-id>",
  "Condition": {
    "StringEquals": {
      "kms:ViaService": "secretsmanager.<region>.amazonaws.com"
    }
  }
创建
resources.json文件:在
/home/ec2-user目录中,创建一个名为resources.json的文件。Bridge Client 在运行时启动和管理资源需要此文件。该文件必须包含一个空的 JSON 对象 (
{}),且不能为空白。{}将 Bridge Client 作为进程运行:
使用
systemd将 Bridge Client 作为 systemd 服务或长期运行的进程来运行。将以下内容复制到文件中,并在
/etc/systemd/system目录下将其命名为bridge-client.service:[Unit] Description=Bridge Client [Service] # App Running ExecStart=/home/ec2-user/bridge-client -c /home/ec2-user/bridge-client-config.json Restart=always RestartSec=30s [Install] WantedBy=multi-user.target
使用以下命令启动 Bridge Client:
sudo systemctl start bridge-client
使用以下命令配置 Bridge Client 在关机时自动启动:
sudo systemctl enable bridge-client
运行以下命令以检查 Bridge Client 的运行状况:
sudo systemctl status bridge-client
确保进程状态为
Active: active (running)。如果不是,则可能存在启动问题,应通过日志进行排查。通过运行以下命令可访问
systemd服务日志,其中-u为单元名称,-n用于指定要显示的最新日志行数。journalctl -u bridge-client -n 50
成功启动后,请从
stdout中记录 Bridge Client 对等 ID。用于检索对等 ID 的快捷脚本:
sudo journalctl -u bridge-client -n 500 -r --no-pager \
| grep -m1 '"peerID"' \
| sed -E 's/.*"peerID":"([^"]+)".*/\1/'
作为替代方案,手动查找类似以下的日志行:
{"level":"info","ts":"2025-10-18T01:17:27Z","caller":"bootstrap/bootstrap.go:47","msg":"peerID","name":"bridge_client","peerID":"QmA7kT2Yp8ZLxNwC4H6B5eVJg9sDoUScmRyb3FhXPaMq"}peerID值根据每个私钥生成,因此每个 Bridge Client 的该值各不相同。请注意,每个 Bridge Client 都应使用或拥有自己的私密密钥。私密密钥不应在 Bridge Client 之间重复使用。
设置 PrivateLink 端点服务:
安装完成后,在 VPC 中设置 PrivateLink 端点服务。
创建并附加一个目标组,使其指向 Bridge Client 所在的特定 EC2 实例。应在目标组上针对 8081 端口配置运行状况检查,并指向 Bridge Client 的
/ready端点。创建一个网络负载均衡器,用于转发
bridge-client-config.json中libp2pPort所部署端口(默认为 9001)上的所有 TCP 流量。注意
用于端点服务的负载均衡器必须包含两个可用区 (AZ) ID,且其中一个必须与部署 Bridge Client 的可用区相匹配。
Customers must allow inbound TCP traffic on the required service port. The default port is
9001.Allow traffic from the Alteryx-provided VPC CIDR ranges. This is required when the customer Network Load Balancer security group enforces inbound rules for PrivateLink traffic. Inbound rule enforcement is enabled by default.
To use the PrivateLink connection, add these IP ranges to the inbound rules of the Network Load Balancer security group with TCP access to port
9001:10.60.0.0/2110.60.8.0/2110.70.0.0/18
The security group of the backend instance must also allow traffic from the corresponding Network Load Balancer security group.
为内部服务创建一个类型为“接口”的 PrivateLink 端点服务,该服务与 EC2 实例位于同一 VPC 网络。
注意
如果选择创建跨区域 PrivateLink,则端点服务必须在支持的区域字段中,将目标区域以及部署了 Bridge Client EC2 实例的区域均添加为条目。
返回到 Alteryx One > 管理控制台 > 数据桥,待端点服务就绪后,选择下一步。然后输入:
端点服务名称
在第 2 步中记录的 Bridge Client 对等 ID。
选择创建数据桥。
现在,您可以开始添加工作区。
添加工作区
在管理控制台中创建数据桥后,您即可将一个或多个工作区添加至该数据桥。工作区关联过程通常需要 13–15 分钟才能完成。
在 Alteryx One > 管理控制台 > 数据桥中,选择添加工作区。
系统将打开添加工作区窗口。
从下拉列表中选择一个工作区。仅显示已启用 Workspace Execution 的工作区。然后选择下一步。
系统将显示 IAM 角色。将其复制并粘贴到您私有 VPC 的允许的主体列表中。有关配置 AWS IAM Identity Center 的更多信息,请参阅开始使用 IAM Identity Center 或使用 AWS CLI 配置 IAM Identity Center 身份验证。
完成后,选择下一步。
Go to the PrivateLink service in your AWS Console, then accept the private endpoint connection from the Alteryx account. Make sure the status is green before you continue.
Go to the 3-dot menu next to the workspace entry, then select Test Connection for that workspace. A toast message appears in the lower-left corner and shows the test status and result.
If the test fails, the setup might not be complete and the remaining steps won’t work.
After the connection test succeeds, you can create a new data source network mapping.
Set Up a Data Bridge on GCP
GCP Prerequisites
You have a Google Cloud project that will host the Bridge Client.
The Bridge Client binary must be installed on a Linux-based Compute Engine VM that runs a supported Linux distribution.
The data sources you want to access are reachable from the VPC network where the Bridge Client VM is deployed.
You have permissions in the Google Cloud project to:
Create and manage Compute Engine VMs.
Create and manage instance groups, health checks, backend services, forwarding rules, subnetworks, and firewall rules.
Create and manage Private Service Connect service attachments.
Create and manage Secret Manager secrets, if Bridge Client will create or store its private key in Google Cloud Secret Manager.
Required APIs are enabled in the producer project:
Compute Engine API
Secret Manager API
IAP API, if you use IAP for SSH or file transfer.
The VM service account has permission to read the configured Secret Manager secret. If the Bridge Client will create or update the secret during bootstrap, grant the additional Secret Manager permissions required by your organization.
The VM must have Cloud API access scopes that allow Secret Manager access. For example, use the cloud-platform scope when creating the VM.
The GCP environment has network connectivity to the private data sources that will be accessed through Data Bridge.
A dedicated PSC NAT subnet CIDR is available. The CIDR must not overlap existing subnets, peered ranges, VPN or interconnect ranges, or planned internal ranges.
Recommended Compute Engine Machine Types
These machine types are suggested starting points based on general Google Cloud best practices. They aren’t product requirements. Validate the machine type with your internal cloud or infrastructure team and adjust it as needed for your workloads.
Start with
e2-smallore2-mediumfor development, testing, or light usage.Use
e2-mediumor larger as the default for most production workloads.Scale up if CPU or memory is consistently high or you expect heavy concurrent workloads.
Follow these steps to configure a Data Bridge using Google Cloud Private Service Connect. Once complete, Workspace Execution workflows in the associated workspaces will have access to the connected data sources.
Create a Data Bridge
In Alteryx One, go to Account Admin > Data Bridges. Then select Create Data Bridge. Enter:
Data Bridge Name
Cloud Provider: Google Cloud, if shown.
Network Transport: The selected cloud provider determines the private connectivity service. When you select GCP, Alteryx uses Private Service Connect. This value is populated automatically and can’t be edited.
Region: The region must match the region where you will deploy the Bridge Client and Private Service Connect service attachment.
Availability Zone ID: The Availability Zone ID identifies the AWS availability zones where this endpoint is available.
Port: The port used to connect the Data Bridge to Alteryx. The default is
9001.
Select Next.
On the next page, install and configure the Bridge Client binary in your GCP VPC.
Download the Bridge Client binary file for your region:
Create a Compute Engine VM that can connect to your private data source. The VM should be deployed without a public IP address unless your organization explicitly requires one.
Attach a service account that can access the configured Google Cloud Secret Manager secret.
Make sure the VM has Cloud API access scopes that allow Secret Manager calls.
Import Bridge Client to the VM:
Import the Bridge Client binary to the VM, for example under
/etc/ayx/bridge-clientdirectory.注意
The file might have a versioned name with a version like
bridge-client-v1.0.0. Rename it tobridge-clientto work with the following examples.Make the binary executable. The Bridge Client binary must have executable permissions before it can be run.
sudo chmod +x /etc/ayx/bridge-client/bridge-client
Save configuration snippet to a file:
Copy and paste the snippet into a configuration file named
bridge-client-config.jsoninside of the/etc/ayx/bridge-clientdirectory.Example:
{
  "logging": {
    "logLevel": "info",
    "logFormat": "json"
  },
  "bootstrap": {
    "storageType": "gcp",
    "secretName": "<Name of the GCP Secret Manager secret where the Bridge Client will store its private key>",
    "gcp": {
      "projectID": "<GCP project ID that owns the Secret Manager secret>"
    }
  },
  "libp2pPort": 9001,
  "peerLibp2pPort": 9001,
  "libp2pBindIP": "<Internal TCP load balancer forwarding rule IP>",
  "resourceFile": "/etc/ayx/bridge-client/resources.json",
  "stateStorage": {
    "type": "file",
    "path": "/etc/ayx/bridge-client/resources.json"
  },
  "rest": {
    "port": "8081"
  }
}
注意
For GCP PSC deployments,
libp2pBindIPmust be the internal forwarding rule IP for the internal TCP load balancer that fronts the Bridge Client, not the VM public IP.Optional: Add a Customer-Managed GCP KMS Key
If your organization requires Bridge Client secrets in Google Cloud Secret Manager to be encrypted with a customer-managed key, add an optional
kmsKeyIDvalue under thegcpobject in thebootstrapconfig. SetkmsKeyIDto the full Cloud KMS CryptoKey resource name.If you omit this value or leave it empty, Bridge Client continues to use the default Google Cloud Secret Manager encryption behavior.
Example:
{
  ...
  "bootstrap": {
    "storageType": "gcp",
    "secretName": "<Name of the GCP Secret Manager secret where the Bridge Client will store its private key.>",
    "gcp": {
      "projectID": "<GCP project ID that owns the Secret Manager secret>",
      "kmsKeyID": "projects/<kms-project-id>/locations/<location>/keyRings/<key-ring>/cryptoKeys/<key-name>"
    }
  }
  ...
}
For Secret Manager secrets that use automatic replication, the Cloud KMS key must be in the global location. For user-managed replication, the key location must match the replica location.
Before you restart Bridge Client with
kmsKeyIDconfigured, make sure the Secret Manager service agent has permission to use the Cloud KMS key. Grant the Cloud KMS CryptoKey Encrypter/Decrypter role to the Secret Manager service agent:gcloud kms keys add-iam-policy-binding "<key-name>" \ --project "<kms-project-id>" \ --location "<location>" \ --keyring "<key-ring>" \ --member "serviceAccount:service-<secret-manager-project-number>@gcp-sa-secretmanager.iam.gserviceaccount.com" \ --role "roles/cloudkms.cryptoKeyEncrypterDecrypter"
The Bridge Client VM service account must still have the required Secret Manager permissions to read the configured secret. If Bridge Client creates or updates the secret during startup, grant the VM service account the additional Secret Manager permissions required by your organization.
If an existing Secret Manager secret uses a different Cloud KMS key, Bridge Client updates the secret to use the configured key during startup and adds a new secret version encrypted with that key.
Reference: Google Cloud’s Secret Manager CMEK docs note that CMEK uses Cloud KMS keys you manage, Secret Manager automatic replication requires a
globalkey, and the Secret Manager service agent needsroles/cloudkms.cryptoKeyEncrypterDecrypteron the key.Create the
resources.jsonfile:Create a file named
resources.jsonin the/etc/ayx/bridge-clientdirectory. This file is required for the Bridge Client to start and manage resources at runtime.The file must contain an empty JSON object (
{}) and must not be blank.{}Run Bridge Client as a process:
Use
systemdto run the Bridge Client as a long-running service.Copy the following content into
/etc/systemd/system/bridge-client.service:[Unit] Description=Bridge Client [Service] ExecStart=/etc/ayx/bridge-client/bridge-client -c /etc/ayx/bridge-client/bridge-client-config.json Restart=always RestartSec=30s [Install] WantedBy=multi-user.target
Start the Bridge Client with the following command:
sudo systemctl start bridge-client
Enable Bridge Client to start automatically after reboot:
sudo systemctl enable bridge-client
Check the health of the Bridge Client:
sudo systemctl status bridge-client
Ensure the process state is
Active: active (running). If it is not, review the logs.journalctl -u bridge-client -n 50
On successful startup, record the Bridge Client peer ID from
stdout.Convenience script for retrieving the peer ID:
sudo journalctl -u bridge-client -n 500 -r --no-pager \
| grep -m1 '"peerID"' \
| sed -E 's/.*"peerID":"([^"]+)".*/\1/'
Set up the internal TCP load balancer:
In Google Cloud, create these resources in the same region as the Bridge Client deployment.
A zonal unmanaged instance group that contains the Bridge Client VM.
A regional HTTP health check that checks port
8081and path/ready.A regional internal TCP backend service that uses the Bridge Client instance group as its backend.
An internal forwarding rule that forwards TCP traffic on port
9001to the backend service.
Configure firewall rules to allow:
TCP
9001from the PSC NAT subnet CIDR.TCP
8081from Google Cloud load balancer health check ranges:35.191.0.0/16and130.211.0.0/22. For more information, go to Firewall rules in Google Cloud Documentation.
Create a PSC NAT subnet:
Create a dedicated subnet in the producer VPC with purpose
PRIVATE_SERVICE_CONNECT.The PSC NAT subnet...
Must be in the same VPC and region as the service attachment.
Must be dedicated to Private Service Connect.
Must not overlap any existing subnet, peered range, VPN or interconnect range, or planned internal range.
Must not be reused across multiple service attachments.
Should be
/24or larger.
Create the Private Service Connect service attachment:
Create a PSC service attachment that points to the internal TCP load balancer forwarding rule.
Use the service attachment URI from the selected Google Cloud region. Example:
projects/PROJECT_ID/regions/REGION_ID/serviceAttachments/bridge-client-pscFor stricter access control, configure the service attachment to accept connections manually and add the Alteryx-provided consumer project, VPC network, or endpoint to the consumer accept list.
注意
Google Cloud supports automatic acceptance or explicit acceptance for selected consumers. Alteryx recommends explicit acceptance when your organization requires approval of each consumer connection.
Leave PROXY protocol disabled unless Alteryx explicitly instructs you to enable it for Bridge Client.
After the service attachment is created, record the service attachment URI.
Go back to Alteryx One > Account Admin > Data Bridges and select Next once the PSC service attachment is ready. Then enter:
The PSC service attachment URI
The Bridge Client peer ID recorded from the Bridge Client logs.
Select Create Data Bridge.
Now you can start adding Workspaces.
Add a Workspace
Once you’ve created a Data Bridge in Admin Console, you can add one or more Workspaces to this Data Bridge. The workspace association process typically takes 13–15 minutes to complete.
In Alteryx One > Account Admin > Data Bridges, select Add Workspace.
A window Add Workspace opens.
Select a Workspace from the dropdown. Only workspaces with Workspace Execution enabled are shown. Then select Next.
Copy the Alteryx-provided GCP consumer identifier. Depending on the configuration, this might be a consumer project, VPC network, or PSC endpoint identifier.
In Google Cloud, update the PSC service attachment consumer accept list or approve the pending connection request.
In Google Cloud, update the PSC service attachment consumer accept list or approve the pending connection request.
Return to Account Admin > Data Bridges, and select Confirm.
After the connection is ready, go to the 3-dot menu next to the workspace entry and select Test Connection.
If the test fails, the setup might not be complete and the remaining steps won’t work.
After the connection test succeeds, you can create a new data source network mapping.
创建新的数据源网络映射
创建网络映射,以允许数据桥将流量路由到特定的专用数据源。创建网络映射通常需要 10–20 秒。
在 Alteryx One > 管理控制台 > 数据桥中,选择新建网络映射。
系统将打开新建网络映射窗口。输入:
名称
描述
主机:这是连接管理器或 Designer 中数据源连接的确切主机名或 IP 地址。
端口:为您的数据源配置的端口号。
然后选择创建。
Expand the Network mapping row and confirm that the workspace you added earlier is associated with the network mapping.
If the workspace isn’t associated, select the 3-dot menu next to the network mapping, then select Manage Workspaces to associate the workspace.
After the workspace is associated with the network mapping, expand the network mapping, select the 3-dot menu next to the workspace, then select Test Connection.
注意
Note: Test Connection verifies that the data source is reachable from Bridge Client and that the data plane can connect to Bridge Client for the network mapping.
故障排除和常见问题解答
Data Bridge Doesn't Appear under Download & Activate
Symptom: You can create or manage Data Bridges in Account Admin, but the Data Bridge tab isn’t available under Download & Activate, so you can’t download the Bridge Client binary.
To resolve the issue:
Confirm that the Data Bridge and Download All On Prem Installers capabilities are enabled for the account.
Confirm that the user who downloads the Bridge Client has the required download access. Assigning the user the Workspace Admin role for the currently selected workspace grants the Download All On Prem Installers capability.
Allow a few minutes for the permission changes to take effect, then refresh Alteryx One or sign out and sign back in.
Return to Download & Activate > Data Bridge, then download the Bridge Client.
If the Data Bridge tab is still unavailable, contact Alteryx Support.
常见的安装和配置问题
连接或 DNS 错误
若遇到连接失败的情况,请检查常见的 DNS 解析问题。
症状:Bridge Client 无法连接到 Alteryx Cloud 或客户数据源。
可能的原因:VPC 网络配置错误或 DNS 设置不正确。
后续步骤:确认 VPC DNS 设置、PrivateLink 端点配置以及防火墙规则。
Private Endpoint Creation Fails
If Alteryx can't establish a connection to your VPC, check the service configuration for your cloud provider.
AWS: Verify that the endpoint service name is correct and that its allowed IAM principals and supported AWS Regions are configured correctly.
GCP: Verify that the service attachment URI is correct and that the accepted projects list is configured correctly.
连接限制
为提供 DDoS(分布式拒绝服务)保护,Bridge Client 会将每个数据源的传入并发连接数限制为 256 个。如需增加此限制,请联系 Alteryx 支持团队。
Network Mapping and Connection Errors
When you run a workflow that uses a Data Bridge connection, you might encounter connection errors if the hostname or port defined in the workflow doesn't match the hostname or port configured in the Data Bridge network mapping.
Error messages vary depending on the connector or driver being used. Look for references to host, hostname, or port in the error details. For example:
1|3|Internal Error SQLDriverConnect: [Simba][MySQL] (1001) Error occurred while creating socket with message: This is usually a temporary error during hostname resolution and means that the local server did not receive a response from an authoritative server.
If you encounter this type of error, confirm with your administrator that the hostname and port used in the workflow match the values configured in the Data Bridge network mapping. In some cases, a workflow might run successfully on your local machine because it uses a valid alternative hostname that is not available through the Data Bridge configuration. Data Bridge requires a fully qualified domain name (FQDN) in the network mapping.
指标与支持
如果您需要有关调试 Bridge Client 的帮助,请调用 /metrics.json 端点以检索 JSON 格式的状态报告。请将此输出附加至您的支持请求单或消息,以便支持团队审阅该问题。
Bridge Client 还公开了 Prometheus 风格的 /metrics 端点,您可抓取此端点以创建仪表板或独立分析数据。
升级和兼容性
兼容性
数据桥在以下环境中不受支持:
私有数据处理部署
注意
Data Bridge can coexist with Private Data Storage (PDS) in the same workspace. However, PDS doesn’t use Data Bridge.
升级
Upgrades to the Bridge Client are typically required when new features or security updates are released.