Notifications
Server admins can set up email notifications for various events, for example, Server account registration, password changes, or workflow sharing. Manage enabled email notifications, message text, and notification groups on the Notifications page.
Important
As an Server admin, you can't add or remove users to an email group. Email groups serve to group notifications that users can opt in or out of.
Only users who have logged into the Server UI at least once receive email notifications.
Email notifications aren't supported for distribution emails, for example, sales@alteryx.com.
To enable email notifications, enter the SMTP server information in System Settings on the Server UI > SMTP screen. Go to the Server UI help page for more info.
To manage notifications, go to the Notifications page of the Server Admin interface.
Add a System Message
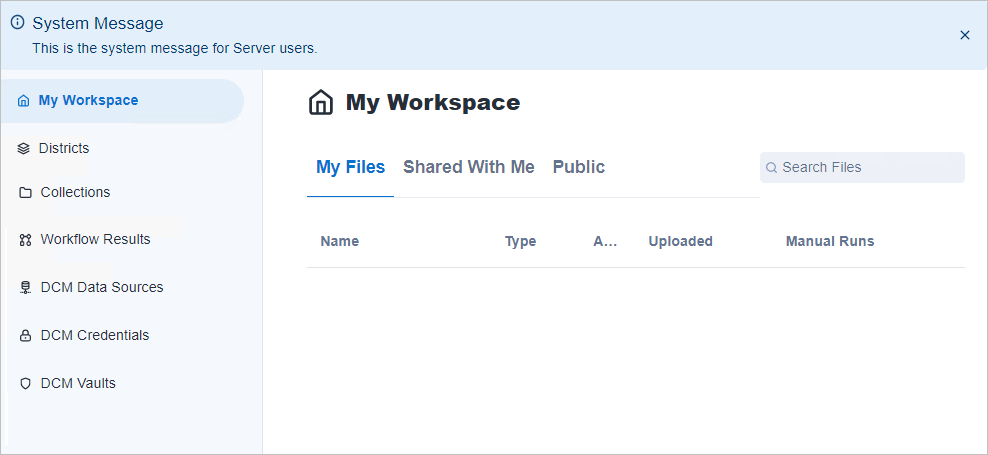
You can add a system message to display to Server users when they log into the Server UI. The system message displays as a banner alert at the top of the page when Server users log in. Users can close the system message by selecting OK. You might use this message to notify users of changes or system downtime.

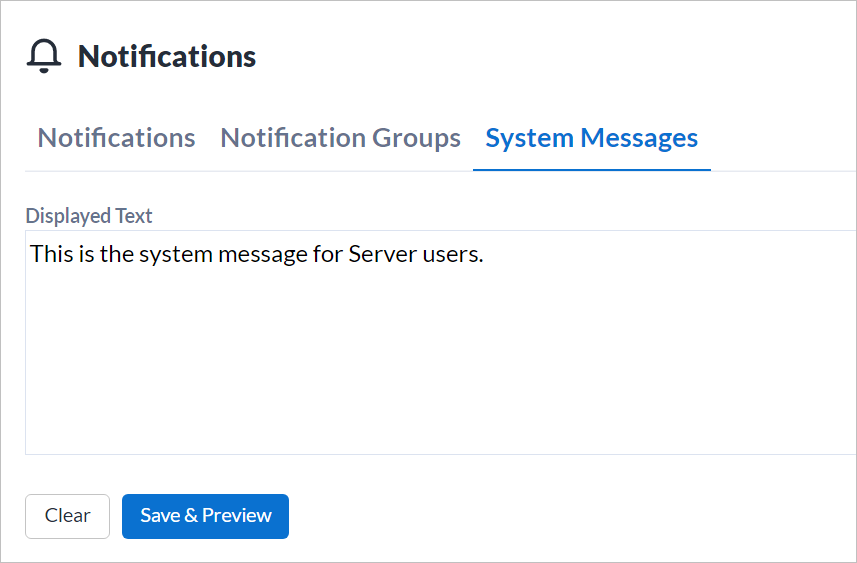
To add a system message, go to the Notifications page, then select the System Messages tab. Enter your message text in the Displayed Text field and select Save & Preview. To remove a system message, delete the text in the Displayed Text field and select Save & Preview.

Enable or Disable Notifications
To enable or disable notifications, select the Notifications tab. Then select a notification in the list. To enable a notification, check the Email status box. To disable a notification, uncheck the Email status box.
Change Notifications to HTML or Plain Text
Notifications send as HTML by default. HTML emails support images and text formatting. Plain text emails do not support image or text formatting. If users are having trouble viewing the content of email notifications, you may want to switch to plain text. To change how notifications are sent, select a notification in the list. Change Send email as to HTML or Plain Text.
Edit Notification Text
To edit the default notification text, select a notification in the list.
In the Subject field, edit the default subject of the notification.
In the Body field, edit the message text.
Select Group to change the email group to whom the notification is sent. You can also manage notification groups on the Notification Groups page.
Select Save.
ADD Placeholder Variables
The email subject line and body contain placeholder variables that populate based on the user's profile.
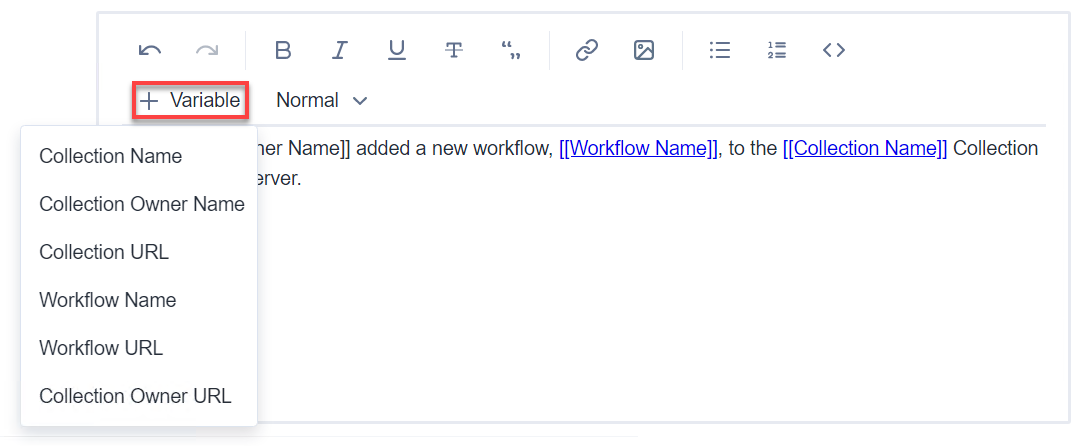
To add a placeholder variable, select + Variable, and then select the variable from the dropdown. To confirm your changes, select Save.
The following variables are available: Collection Name, Collection Owner Name, Collection URL, Workflow Name, Workflow URL, and Collection Owner URL.

Note
Due to a known defect TPRI-1481, images and links are not localized. For more information, go to Server 2023.1 Release Notes.
Notification Groups
Use notification groups to create a grouping of email notifications to quickly turn those notifications on and off.
There are 3 default notification groups:
Workflows shared in the Public Gallery
Collections shared with me
Workflows added to or updated in collections shared with me
To review and change the email notifications included in these groups, select an email notification and select a notification group in the Group dropdown.
Create a New Notification Group
You can also create a custom notification group in the Notification Groups tab of the Notifications page.
Enter a notification Group Name.
Then select the notifications you want to add to the notification group in the Notification dropdown. You can select multiple notifications.
Select Create.
Disable or Enable a Group of Notifications by Turning a Notification Group On or Off
Once you have grouped your email notifications using notification groups, you can quickly enable and disable multiple email notifications by turning the notification group On and Off under Notifications Groups.
Opt Out of a Notification Group
Users can choose to opt out of a notification group from Email Notifications section of their profile.
Email Notifications Actions List
Server sends email notifications for each of these actions once SMTP is set up. You can disable individual email notifications. Go to Enable or Disable Emails.
Workflow added to collection: Sent when a user adds a workflow to a collection.
Workflow updated in collection: Sent when a user updates a workflow in a collection.
Collection shared with user: Sent to the user when another user shares a collection with them.
Membership granted: Sent when a curator assigns the user a member role.
Artisanship granted: Sent when a curator assigns the user an artisan role.
Workflow shared in Public Server: Sent when a user shares a workflow to the Public section of My Workspace (homepage).
Curator created a new license owner account: Sent to the user when their account is created.
Curator created a new user account: Sent to the user when their account is created.
License created: Sent to the curator when they buy a license.
Membership expired: Sent to the user when their membership has expired.
Membership revoked: Sent to the user when their membership is revoked.
Validation email: Email with validation code that is sent to the user when they create an account.
Password changed: Sent to the user when their password is changed.
Password reset: Sent to the user when they request a password reset.
Pending user workflow added to collection: Sent to a pending collection user when a workflow is added to a collection that they are invited to view.
Pending user collection updated: Sent to pending user when a collection they are invited to view is updated.
Pending user invited to a collection: Sent to a pending user when they are invited to a collection.
Pending user granted membership: Sent to a pending user when they are granted membership.
Pending user granted artisanship: Sent to a pending user when they are granted artisanship.
Referral: Sent when a user wants to refer someone to the Server.
Workflow shared link: Sent to a user when a workflow has been shared with them.
License created notification: Message sent to Alteryx when a new license is created.
Curator created a new active user account: Sent when a curator adds an active account.
Collection sharing granted: Sent when sharing rights are granted to a user in a collection.
Collection sharing revoked: Sent when sharing rights are revoked to a user in a collection.
Collection cleanup error: Sent to Server admins when the collection cleanup background process has an error.
Welcome to Alteryx Server: Sent to user when their account is created via API.
Workflow ownership transferred to user: A user transferred a workflow to you. Notification is sent when you transfer workflows via both the Server UI and API.
Workflow ownership transferred from user: A user transferred workflow ownership away from you. Notification is sent when you transfer workflows via both the Server UI and API.
Collection ownership transferred from user: A user transferred a collection from you. Notification is sent when you transfer collections via both the Server UI and API.
Collection ownership transferred to user: A user transferred a collection to you. Notification is sent when you transfer collections via both the Server UI and API.
Schedule ownership transferred to user: A user transferred a schedule to you. Notification is sent when you transfer schedules via both the Server UI and API.
Schedule ownership transferred from user: A user transferred a schedule from you. Notification is sent when you transfer schedules via both the Server UI and API.
Use the Search field to search for the notification by a keyword.
Global Notifications
Both admins and users can access notifications from the menu bar in the upper right corner by selecting the bell. The Notifications dropdown summarizes the latest notifications, including their details, and allows you to quickly view them. In the case of a notification about an asset that has been updated, a link is available for you to select and be redirected to that asset. A red bubble displays for all unread notifications. To mark them as read, select individual notifications in the Notifications dropdown.
When you select the bell, you get a preview of the most recent notifications (up to 10). When you have more than 10 notifications, you can select View All Notifications to see a complete list of all notifications.
When you want to show only unread notifications, select the Only show unread toggle in the upper right corner of the Notifications dropdown.