Flows Page
The Flows page displays the flows to which you have access and lets you create, review, and manage them. A flow is an object for bringing together and organizing the datasets, recipes, and other objects that you use to generate your results.
Note
Access to the Flows page in the application and privileges on flows is governed by roles in your workspace. For more information, please contact your workspace administrator.
To create a new flow, clickCreate Flow. To rename the new flow, click the
Untitledvalue at the top of the page. SeeCreate Flow Page.
You can also access the flows that have been shared with you.
You can hover over the shared icon link next to the flow to view the name of shared users (up to three shared users) and the total number of shared users. Also, when you click the shared icon link, the share dialog is displayed.
You can organize your flows into folders. Afolderis simply a container for your flows. To create a folder, clickCreate. Then, selectCreate Folder. For more information, see "Flows" below.

Figure: Flows Page
All flows tab
This tab includes all flows accessible to the user, either as owner or collaborator.
Owned by me tab
This tab contains the flows that you have created.
Columns:
Name: The name of the flow.
Click the flow name to review the flow, its datasets, and its recipes. See Flow View Page.
Owner: Indicates the user who is the owner of the flow.
Contains: Count of datasets and recipes in the flow.
Last Updated: Timestamp for the last time that the flow was modified.
Actions:
Create: From the Create menu, choose to create a flow or afolderfor holding flows.
For more information on creating a flow, see Create Flow Page.
For more information on folders, see "Folders" below.
Import:From the context menu, selectImport Flowto import a flow into this instance. SeeImport Flow.
Tip
You can import multiple flows (ZIP files) through the file browser or through drag-and-drop. Press
CTRL/COMMAND+ click orSHIFT+ click to select multiple files for import.Search: To search flow names, enter a string in the search bar. Results are highlighted immediately in the Flows page.
Sort: Click a column header to sort the display by the column's entries.
Flow options:
The following options are available on the right side of a flow's entry:
Share: Enable other users to collaborate on your flows with you or create copies of your flow for their personal use. See Share Flow Dialog.
Rename: Change the name and description of the flow.
Schedule: To add a scheduled execution of the recipes in your flow:
Define the scheduled time and interval of execution at the flow level. See Add Schedule Dialog.
Define the scheduled destinations for each recipe through its output object. These destinations are targets for the scheduled job. See Flow View Page.
Email notifications: Configure types of jobs that generate success or failure emails and who receives the messages. See Manage Flow Notifications Dialog.
Duplicate:Create a copy of the flow. The copied flow is owned by the user who copied it.
Move: Move the flow to a new or existing folder. See "Folders" below.
Export:(Available to flow owner only)Export the flow fromDesigner Cloud Powered by Trifacta Enterprise Edition. For more information, seeExport Flow.
Transfer ownership: (Available to owner or admin only) Transfer ownership of this asset to another user. See Transfer Asset Ownership.
Delete: Delete the flow.
Warning
Deleting a flow removes all recipes and related objects contained in the flow. If copies of these objects exist in other flows, they are not touched. Imported datasets are not deleted by this action.
For flows that have been shared with you, this command removes your access to them. To regain access, the owner of the flow must share it with you again.
Folders
You can use folders to organize your flows. For example, you can use folders to group flows by project, by source of data, or by other meaningful grouping.
 |
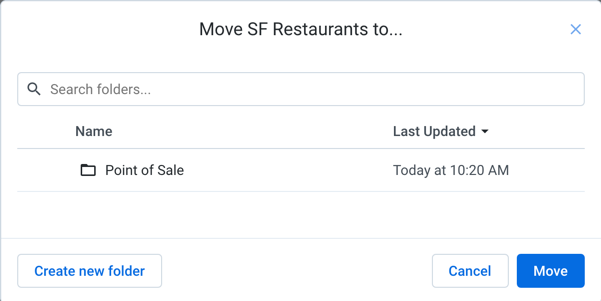
Figure: Moving a flow to a folder
Limitations:
Each flow in a folder is an independent object. Permissions can vary between flows in a folder and should be reviewed after adding them.
You can only move flows that you own.
You cannot create nested folders.
You cannot share folders or modify permissions at the folder level.
Folders cannot be exported and imported.
Actions:
To create a folder, click the Create button. Then, select Create Folder. Enter a name and description for the folder. These values appear in the application. Click Create.
Tip
When you move a flow, you can optionally choose to create a new folder for it.
To move a flow to a folder, select Move from the context menu on the right side of the screen for the flow.
To move the flow, select the name of the flow. Click Move.
To search folder names, enter your search string in the Search textbox.
To move the flow into a new folder, click Create new folder. Enter a meaningful name and description for the folder. Select Move to new folder.
To delete a folder, select Delete Folder from the context menu on the right side of the screen.
Warning
This step deletes the folder and all flows within it. This step cannot be undone.
Folder options:
For folders, the following options are available in the context menu.
Import flow: Import the exported flow to Designer Cloud Powered by Trifacta Enterprise Edition
Edit Folder name and description: Change the name and description of the folder.
Delete Folder: Delete the folder and all flows within it.
Warning
Deleting a folder also removes any flows within it. This action cannot be undone.