Parameterize Tables for Import
This section provides an overview on how to apply parameters to the tables that you import as datasets.
During import of database tables through relational connections, you can apply parameters to the SQL query that you use to define the imported dataset. In some scenarios, you may need to define the table to import using a variable parameter or to parameterize the time value associated with a table name. Using parameters, you can define the specific tables that you use to bring in data from a relational database.
Following are the type of parameters you can apply for relational sources:
Timestamps: Inserts a formatted timestamp when creating a custom SQL query.
Variables: Inserts a value for the variable. This variable has a default value that you assign.
Note
Pattern-based parameters are not supported for relational imports.
Import Parameterized Tables
While importing data, you parameterize relational tables by creating custom SQL statements to specify the dataset. By default, when you import a table from a relational source, the Designer Cloud Powered by Trifacta platform generates a SELECT * statement to import the entire table. The Custom SQL enables you to customize the query to pull the data from the source system.
The following are the prerequisites and procedures for parameterizing the relational sources table:
Prerequisites:
A connection must be created for your target database.
Verify that you have access to a read-only or read-write set of connections.
For more information, see Connect to Data.
Limitations:
The original table that is used as the default value in any custom SQL query remains the default table whenever the custom SQL dataset is used.
During job execution on a dataset of parameterized tables, if the parameterized SQL query returns data from a table from the default table, Designer Cloud Powered by Trifacta platform expects that the schema of the new table matches the schema of the original default table.
If the schemas do not match, schema mismatch errors may be reported.
Parameterizing the column project list in the
SELECTportion of a custom SQL statement is not supported.Schema refresh of a parameterized dataset using custom SQL is not supported.
You can create a custom SQL dataset through the Import Data page.
Steps:
In the Trifacta Application, click Library in the left nav bar.
In the Library page, click ImportData.
From the left side of the Import Data page, select the relational connection from which to import.
Depending on the type of relational connection, you may need to select the database or schema to browse.
Locate the tables to import. Take note of the table name or names.
Click Create Dataset with SQL. The Create Dataset with SQL window is displayed.
In this window, you specify the SELECT statement to retrieve the data from a table or tables that you specify.
Note
When specifying a SQL statement for your database, you are constructing a direct query of the database. You must use the syntax required by the database vendor.
For more information on creating datasets with SQL, see Create Dataset with SQL.
A variable parameter enables you to insert variable into the query statement used to define your dataset. You can replace or highlight elements of the query to add parameters.
How to use variables:
When a job is executed, the currently specified variable value is passed to the running environment. By default, the value that you specify as part of the dataset creation process is provided.
You can override this value:
You can specify an override for a variable parameter through Flow View.
For any specific job run, you can specify an override value through the Run Job page.
In this manner, you can specify the exact data that you wish to retrieve at the flow- or job-level.
Steps:
Create a custom dataset using SQL. For more information, see Create a Custom SQL Dataset above.
In the Create Dataset with SQL window, enter a
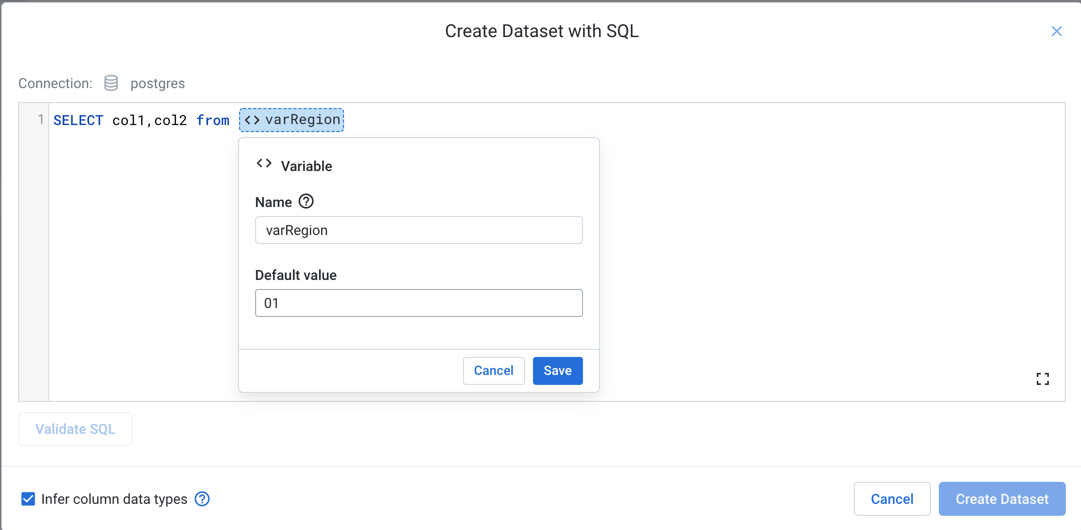
SELECT*statement to retrieve data from the specified table. Click Validate SQL to verify that the query is properly specified.Now, highlight the part of the query that you wish to parameterize. Click the Variable icon.

Figure: Define Variable Parameter
In the Variable dialog, enter the following details:
Tip
Type
env.to see the environment parameters that can be applied. These parameters are available for use by each user in the environment.Name: Enter a display name for the variable.
Default value: Enter a default value for the parameter.
ClickSave to save the parameter.
To verify that your SQL is still valid, click Validate SQL.
If the SQL is valid, click Create Dataset.
Timestamp parameters can be helpful when you want to filter datasets based on date and time format, time zone, or exact and relative start time. You can apply timestamp parameters based on the specific region or time zone for which the data is generated.
Steps:
Create a custom dataset using SQL. For more information, see Create a Custom SQL Dataset above.
In the Create Dataset with SQL window, enter a
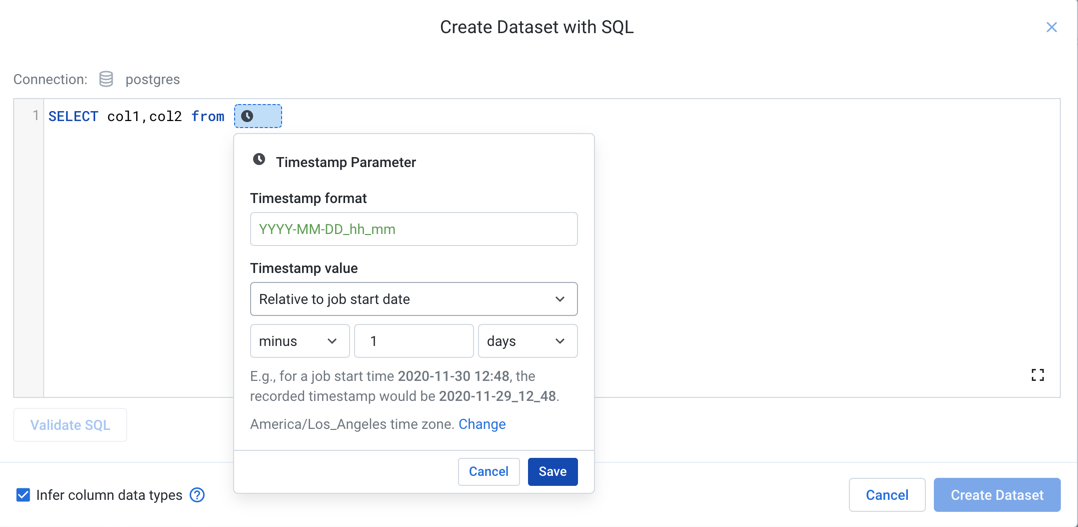
SELECT*statement to retrieve data from the specified table. Click Validate SQL to verify that the query is properly specified.Now, highlight the part of the query that you wish to parameterize. Click the Timestamp icon.

Figure: Define Timestamp Parameter
In the Timestamp Parameter dialog, enter the following details:
Timestamp format: Specify the format for timestamp values.
Example:
YYYY-MM-DD_hh_mm.Datetime values can be expressed as either date or time elements.
Timestamp value: Select the value to record in the path:
Exact job start date: recorded timestamp in path is the start time of the job.
Relative to the job start date: recorded timestamp in path is relative to the start time of the job according to the settings that you specify here.
Time zone: Click Change to change the time zone recorded in the timestamp.
Example:
America/Los AngelesorAsia/Calcutta.For more information on the available time zones, see Supported Time Zone Values.
Click Save to save the parameter.
To verify that your SQL is still valid, click Validate SQL.
If the SQL is valid, click Create Dataset.
Examples
In the following examples, you can see how dataset parameters can be used to pre-filter rows or parameterize the tables to include in your dataset.
Note
The syntax in these examples uses PostgreSQL syntax. The syntax that you use must match the requirements of the target database system.
Suppose you have a set of orders in a single table: myOrders. From this table, you want to be able to import a dataset that is pre-filtered for values in the customer identifier (custId) column. The following might be a query that you use for the customerOrders dataset to retrieve the orders for custId=0001 from the myOrders table in the transactions database:
SELECT "custId","ordDate","prodId","ordQty","unitPrice" FROM "transactions"."myOrders" WHERE "custId" = "0001"
Tip
This example uses a variable parameter.
Steps:
In this case, you can do the following:
In the Create Dataset with SQL window, specify the above query. Click Validate SQL to verify that it works.
Now, highlight the value
0001.Select the Variable icon.
Specify your variable:
Name:
myCustIdDefault Value:
0001
Click Save.
Before you create the dataset, validate the SQL.
Using the parameter:
When the job is executed, the
customerOrdersdataset is pre-filtered to retrieve the data forcustId=0001by default.You can override this variable value as needed:
At the flow level, you can define an override for the
myCustIdvariable. For example, you can set the variable value to:0002. Whenever a job is run on this imported dataset, the value0002is passed to the running environment, which retrieves only the rows in the table wherecustId=0002.When you run the job through the application, you can specify an override to the variable. This override takes precedence over the flow that was set at the flow level. So, for a specific run, you can set the value to
0003, generating results forcustId=0003only.Then, the next time that a job is run from the flow using the dataset, the flow override value (
0002) is used.
Suppose you have a database that captures log data into separate tables for each date. Each table is named according to the following pattern:
20201101-ServerLogs
20201102-ServerLogs
20201103-ServerLogs
20201104-ServerLogs
20201105-ServerLogs
Once per week, you want to run a job to ingest and process the log entries from the preceding week.
The following could be a query that you use to retrieve all columns from a single file:
SELECT * FROM "logs"."20201101-ServerLogs"
Tip
This example uses a timestamp parameter.
Steps:
In this case, you can do the following:
In the Create Dataset with SQL window, specify the above query. Click Validate SQL to verify that it works.
Now, highlight the value
20201101.Select the Timestamp icon.
Specify your variable:
Timestamp Format:
YYYYMMDDTimestamp Value:
Relative to job start dateSelect
minus,7,days.
Click Save.
Before you create the dataset, validate the SQL.
Using the parameter:
When the job is executed, the imported dataset includes all of the tables whose timestamp format is within 7 days of the time when the job was started.
You may need to modify the time zone setting on the Timestamp parameter if the log files were recorded using a different time zone.
Typically, jobs created on a dataset like this one are executed according to a schedule.
For scheduled jobs, the value that is used for the job start date is the timestamp for when the job was scheduled to execute. It's possible that delays in starting the job could create a difference in the timestamps.
For more information, see Schedule a Job.
You can turn the entire query of your custom SQL statement into a parameter. When you create your dataset with SQL, instead of entering any SQL in the window, create a variable parameter. For example, your parameter could be like the following:
Name: selectCustomersTable
Value:
SELECT * from "MDM"."customers"
If the SQL validates, then you can create the imported dataset using only this parameter.
How to use this parameter:
By default, when the dataset is imported, all of the columns from the
customerstable are imported.As needed, you can configure overrides at the flow- or job-level to, for example, import only select columns. In the override, you specify the list of columns to gather only the data required for your needs.
Tip
This example uses a variable parameter.