Add Server Users
Once you have set up the authentication method for your Server you can add Server users in the Server Admin interface.
The steps for adding Server users depend on the Server authentication type. Go to the Configure Server Authentication help page.
Steps for Adding Users for Built-In and SAML Galleries
Once Built-in or SAML authentication is set up, you can choose to add users yourself or allow users to register themselves. Select Add Users or Allow Users to Register for further instructions.
Creating the users yourself allows you to better control the new users' access and permissions upon their first login. When you manually create users you can assign each user a role or assign them to user groups with a specific role. Go to Understand Role Hierarchy for more details on how to fine-tune users' access and permissions.
Set a Default User Role
New Server users assume the default user role unless you assign them a group. Go to Understand Role Hierarchy. The default user role is set to Viewer by default. Go to the User Roles and Permissions help page to learn about the permissions each user role includes. You can change the default role using the Default Role drop-down menu on the Server Configuration page. Go to the Server Configuration help page for more info.
Create a New User
On the Users tab of the User Management page, select New User to add a new user.

Enter the user's first name in the First Name field.
Enter the user's last name in the Last Name field.
Enter a valid email address in the Email field.
Select a Role.
Enter a password for the user in the New Password and the Confirm New Password fields.
Check the Schedule Jobs box to allow the user to schedule workflows to run at a scheduled time. Note, you have to also enable workflow scheduling on the Jobs page for a user to be able to schedule jobs.
Check the Prioritize Jobs box to allow the user to prioritize a job. When there are multiple jobs in the queue, the job with the highest priority runs first.
Check the Tag Jobs box to allow the user to assign a specific worker to run a workflow.
Check the Create New Collections box to allow the user to create Collections.
Check the API Access box to allow the user to access the Server API. Go to the Server API Overview to learn more.
Select Create.
If you set up an SMTP server to send email notifications, the user receives an email with the link to the Server and instructions for activating their account. Go to the Configure SMTP for Server Notifications and Notifications help pages for more info.
Set Up Groups and Assign Group Roles
If you want to have users assume a role other than the default user role you can assign them to a group and assign that group a role. Or, you can assign a specific role for each user.
Create a New Group
On the Groups tab of the User Management page, select New Group to add a new group.
Enter a name for your group in Group Name.
Select a Group Role to assign to all users in the group.
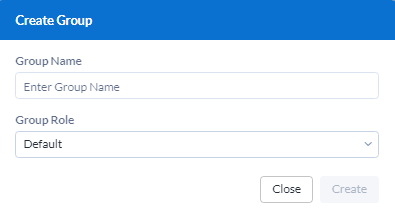
Select Create.
Add Users to a Group
Custom Groups allow you to choose the users that are part of the user group. Follow these steps to add a user to a group:
Select a group.
Select Add User.
Search for the user by username or email.
Select the user.
Select Add.
If you choose to register users, you can control users' initial access using the default user role. Once a user has registered, you can log in to create user groups or assign individual user roles.
First, ensure that you enabled the Users Can Register setting on the Server Configuration page. Next, customize the default user role to control users' access and permissions when users sign in.
Set a Default User Role
New Server users assume the default user role unless you add them to a group or assign a user role other than Default. Go to Understand Role Hierarchy. The default user role is set to Viewer by default. Go to the User Roles and Permissions help page to learn about the permissions each user role includes. You can change the default role using the Default Role dropdown on the Server Configuration page. Go to the Server Configuration help page for more info.
Now you are ready to invite users to register for an Alteryx Server account. Go to the Register for an Alteryx Server Account help page for more info. Once a user has registered, you can log in to create user groups or assign individual user roles. Go to the User and Group Management help pages for more info.
Steps for Adding Users in Integrated Windows Authentication Galleries
Once integrated Windows authentication is set up, all users on the domain can go to your Server URL and log in with their Active Directory credentials. Before inviting users to log in to Server, customize the default user role to control users' access and permissions when users sign in.
Set a Default User Role
New Server users assume the default user role unless you add them to a group or assign a user role other than Default. Go to Understand Role Hierarchy. The default user role is set to Viewer by default. Go to the User Roles and Permissions help page to learn about the permissions each user role includes. You can change the default role using the Default Role dropdown on the Server Configuration page. Go to the Server Configuration help page for more info.
Set Up Groups and Assign Group Roles
If you want to have users assume a role other than the default user role, you can add them to a group and assign that group a role. Or, after they have registered, you can change their user role.
Create a New Group
On the Groups tab of the User Management page, select New Group toadd a new group.
Select a Group Type.
Select Active Directory to add a group from your Active Directory as a user group.
Select Create Custom Group to create a user group you can manually add users to.
If you are adding a Custom Group, enter a name for your group in Group Name.
If you are adding an Active Directory group, search for the Active Directory group in Search Groups.
For both Custom Groups and Active Directory groups, select a Group Role to assign to all users in the group.
Select Create.
Add Users to a Group
If you added an Active Directory group the users in that group are assigned to that same group in Server and assume the role assigned to that group. Custom Groups allow you to choose the users that are part of the user group. Follow these steps to add a user to a group.
Select a group.
Select Add User.
Search for the user by username or email. This searches Active Directory for Active Directory users and groups.
Select the user.
Select Add.
Once you have configured your default role and created any custom and Active Directory groups you need, you can invite Server users to sign in using the Server URL. When users access the Server URL they are prompted to log in using the Active Directory credentials. Go to the Register for an Alteryx Server Account help page for more info.
Note
A user's role, and their resulting Server access, can come from 3 places, the user role, the group role, or the default role. Server evaluates roles in this order: user role, group role, default role. Users' access resolves to the most specific role assignment. So, if a user's role assignment is any role other than Default, that is their role and corresponding access. If a user's role is Default, then the Server looks to see if they are in a group. If the user is in a group, they assume the group role. If they are not in a group they assume the default role.