Important
If you are new to APIs visit the Get Started with APIs help page.
Important
Starting with the 22.1 release, we removed our legacy public OAuth1 API endpoints because they require non-FIPS compliant SHA1 hashing. This removal includes the legacy WCF (Windows Communication Framework) endpoints, Swagger for these legacy endpoints, and OAuth1 middleware. To replace the OAuth1 endpoints, you can use the OAuth2 versions of the legacy APIs released in 21.4 which are FIPS compliant. You will experience the same functionality with the OAuth2 APIs as you did with the OAuth1 APIs.
Subscription, V1, and V2 endpoints will continue to be supported under OAuth2.
To find out more about the conversion and its impact, visit the OAuth1 to OAuth2 Instructions help page or Conversion Instructions.
The Server API is made up of 5 APIs:
Subscription API: Endpoints for users to interact with subscriptions, workflows, and schedules (jobs).
User V2 API: Endpoints for users to interact with credentials, input files, and schedules (jobs).
Admin V1 API: Endpoints for admins to fetch resources from the Admin interface.
Admin V2 API: Version 2 of the endpoints for admins to fetch resources from the Admin interface.
Admin V3 API: Version 3 of the endpoints. This version uses OAuth 2.
Note
In addition to adding new functionality with V3 API endpoints, we’ve also made our V1, subscription, and V2 endpoints available for use with OAuth 2. The same endpoints you have used in the past are now available for OAuth 2 at a new base address.
The Web API Address can be set up only for V1, V2, and V3 using the OAuth 2. For the V1 and V2 API documentation using the OAuth 1, the address is http://{ServerHostname}/gallery/api-docs/.

The complete reference documentation for all Server API endpoints is available in Swagger.
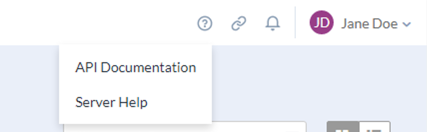
There are 2 places in the Server UI where you can access the Server API Reference documentation.
Select the question mark icon in the top toolbar and select API Documentation.
Select your username and select My Profile > Keys. You can find links to the API documentation next to the API keys.
You can also access the API reference documentation for the Server API using this URL: http(s)://serverhostname.domain/webapi/swagger
The Server API docs are interactive, allowing you to populate parameters and see the responses. To make use of the interactivity, you have to authenticate. To do so, follow these steps:
In the Server UI, select your username and select My Profile > Keys. Copy the API keys for the API you want to authenticate to and paste them in the API Key and Shared Secret fields. The keys will show as Saved.
Select the call you want to run, populate the parameters, and select Try it out.
Curator (Server admins) have to allow users access to the API. Visit Allow User Access to the Server API for more info. Once you have granted user access to the API, users can find their API keys on the Keys tab of the My Profile page. To access your API keys, select your username and select My Profile > Keys.

Users with the Curator role can use the API Access keys to access all APIs including the Subscription API, the User V2 API, V1 Admin V1 API, V2 Admin V2 API, and V3 API.
All non-Curator users can use the API Access keys to access the Subscription API and User V2 API.
See the Server API Configuration and Authorization article.
To construct an API endpoint use this schema: <hostname>/webapi/
In this section you'll find more information about the following endpoints:
Server tracks changes to these system entities:
AppInfo (Workflow)
Collection
Credential
Subscription
User
UserGroup
Any updates to these entities triggers the creation of an AuditEvent record. You can return these records via a public Admin API endpoint.
The endpoint for AuditEvents is GET /admin/v1/auditlog/
entity: (string) the audit log entity you want to query.page: (int) The page you want to return.pageSize: (int) The number of records you want to return on each page.
The response will be an array of Audit Event records:
[
  {
    "id": "",
    "entity": "",
    "entityId": "",
    "userId": "",
    "timestamp": "Date",
    "event": "",
    "oldValues": "",
    "newValues": ""
  }
]
The returned properties are defined below:
id: The Audit Event ID.entity: The name of the entity.entityId: The entity ID of the entity.userId: The ID of the user who modified the entity.timestamp: Date and Time of when the Audit Event record was created.event: The event which occurred (insert, update, delete).oldValues: The values of the updated properties prior to the update occurring.newValues: The values of the updated properties after the update has occurred.
To run workflows that use theFile Browse toolvia the API, use the/user/v2/inputfilesendpoint to upload the file.

Start by making a multipart/form-data POST request to the
/user/v2/inputfilesendpoint to publish a temporary file. The name of the required form-data section isinputFile.curl --location --request POST 'http:{yourhostname}/api/user/v2/inputfiles/' \ --form 'inputFile=@/file/path/filename.csv'Next, make a POST to the
/user/v2/workflows/{appId}/jobs/endpoint.Then include the
nameof the File Browse tool in the question object. If you are unsure of the File Browse tool's name, use the/v1/workflows/{appId}/questionsendpoint to get your File Browse tool's name.The
valueis the reference ID that your input file's call returned in the response.
curl --location --request POST 'http:{yourhostname}/api/user/v2/workflows/{appId}/jobs' \
--header 'Content-Type: text/plain' \
--header 'Authorization: OAuth oauth_consumer_key="{consumer key}",
                         oauth_signature_method="HMAC-SHA1",
                         oauth_timestamp="{timestamp}",
                         oauth_nonce="{nonce}",
                         oauth_signature="{signature}"' \
--data-raw '{
    "questions": [
        {
            "name": "File Browse",
            "value": "{reference ID}"
        }
    ]
    "priority": "Low"
}'
Use the migratable endpoint to migrate workflows across Server environments. You can use this to manage workflow deployments during development and testing phases.
To begin, you have to enable workflows for migration. Once you mark workflows for migration, follow these steps to publish them from the source environment into the appropriate subscription (studio) of a target environment.
Next, get a list of workflows ready to migrate using the following endpoint:
Environment: Source
Method: GET
Endpoint:
api/admin/v1/workflows/migratable/?subscriptionIds={subscriptionIds}/
Include a comma-separated list of subscriptionIds as a query parameter. Subscription IDs identify a specific studio.
The return is an array of workflows marked as ready to migrate under the specified subscription (studio). If you do not provide subscriptionsIds, the return includes all workflows marked as ready to migrate. The return includes 3 properties: appId, the currently published revisionId, and the subscriptionID the workflow belongs to.
The following endpoint downloads the workflow as a YXZP file.
Environment: Source
Method: GET
Endpoint:
api/admin/v1/{appID}/package/
Include an appID as a path parameter. The return will be a download of the entire workflow as a package.
The following endpoint publishes the downloaded workflow to the target environment.
Environment: Target
Method: POST
Endpoint:
api/admin/v1/workflows/
Parameters | |||
|---|---|---|---|
Parameter | Description | Type | Required |
| The filename of the new workflow. | String | True |
| The new workflow name. | String | True |
| The owner of the migrated workflow. The email address must exist in the target environment. | String | True |
| Flag to validate the workflow upon migrating to the target environment. | Boolean | True |
| Flag to set the workflow to public to show in “My Company’s Gallery” in the target environment. | Boolean | True |
| This is the Source environment appId of the to-be-migrated workflow. If a workflow with the same sourceId exists, this replaces that workflow in the target environment. Otherwise, a new workflow will be generated. (Send an empty string if you do not wish to specify an appID.) | String | True |
| Add a worker tag to the workflow to have a specific worker to run the workflow. (Send an empty string if you do not wish to specify worker.) | String | True |
| Flag to set the workflow as available for download by other users in the target environment. | Boolean | True |
If you want, you can use the migratable endpoint to toggle the This workflow is ready to be migrated setting on a workflow back to No in the source environment after workflow migration in the target environment.
Environment: Source
Method: PUT
Endpoint:
api/admin/v1/workflows/migratable/{appID}/
For more information about the Server API V3 endpoints and parameters, visit the Alteryx Server API V3 help page.