Data Bridges
Important
Data Bridges doesn’t support high availability (HA).
Alteryx Data Bridges enables workflows running in Workspace Execution to securely connect to customer-managed data sources. It establishes private connectivity so workflows can access private resources without exposing them to the public internet.
No changes to existing workflows are required. The Alteryx Engine connects to data sources using the same hostnames and ports it uses when running inside the network.
Data Bridges is designed for use with Workspace Execution on the Alteryx Data Plane. It is the only supported method for securely connecting those workflows to customer data sources without requiring public internet access.
Billing and Entitlements
Data Bridges is available on the Enterprise 2025 tier of the Alteryx One Platform. Earlier editions don’t include this capability.
Your right (“entitlement”) to use Data Bridges is tied to your Billing Account. Each Billing Account can create one or more Bridge Client resources.
To set up a Data Bridge in Account Admin > Data Bridges, you must be an Account Admin on the Billing Account associated with your Alteryx One subscription.
Terminology
Bridge Client: A lightweight Linux-based binary deployed in the customer cloud environment. It works with private connectivity services to provide a private, authenticated connection between Alteryx and customer data sources without using the public internet.
AWS PrivateLink: An AWS service that enables private connectivity between VPCs and AWS or third-party services (such as the Bridge Client) using private IP addresses. Traffic doesn’t traverse the public internet.
Google Cloud Private Service Connect (PSC): A Google Cloud service that enables private connectivity between VPC networks and supported Google Cloud, partner, or customer-managed services using internal IP addresses. Traffic doesn’t traverse the public internet.
Data Source: Any customer-managed database or service that is reachable over TCP.
Workspace Execution: Lets users build workflows in Designer Desktop, then save, schedule, and run them in Alteryx One using cloud-based compute and storage instead of a local machine.
Alteryx Data Plane: Alteryx's multi-tenant cloud execution environment, where cloud resources are securely shared across multiple customers.
System Architecture Overview
This diagram shows how Alteryx Data Bridges securely connects Workspace Execution workflows to customer-managed data sources while keeping all customer data on private networks.
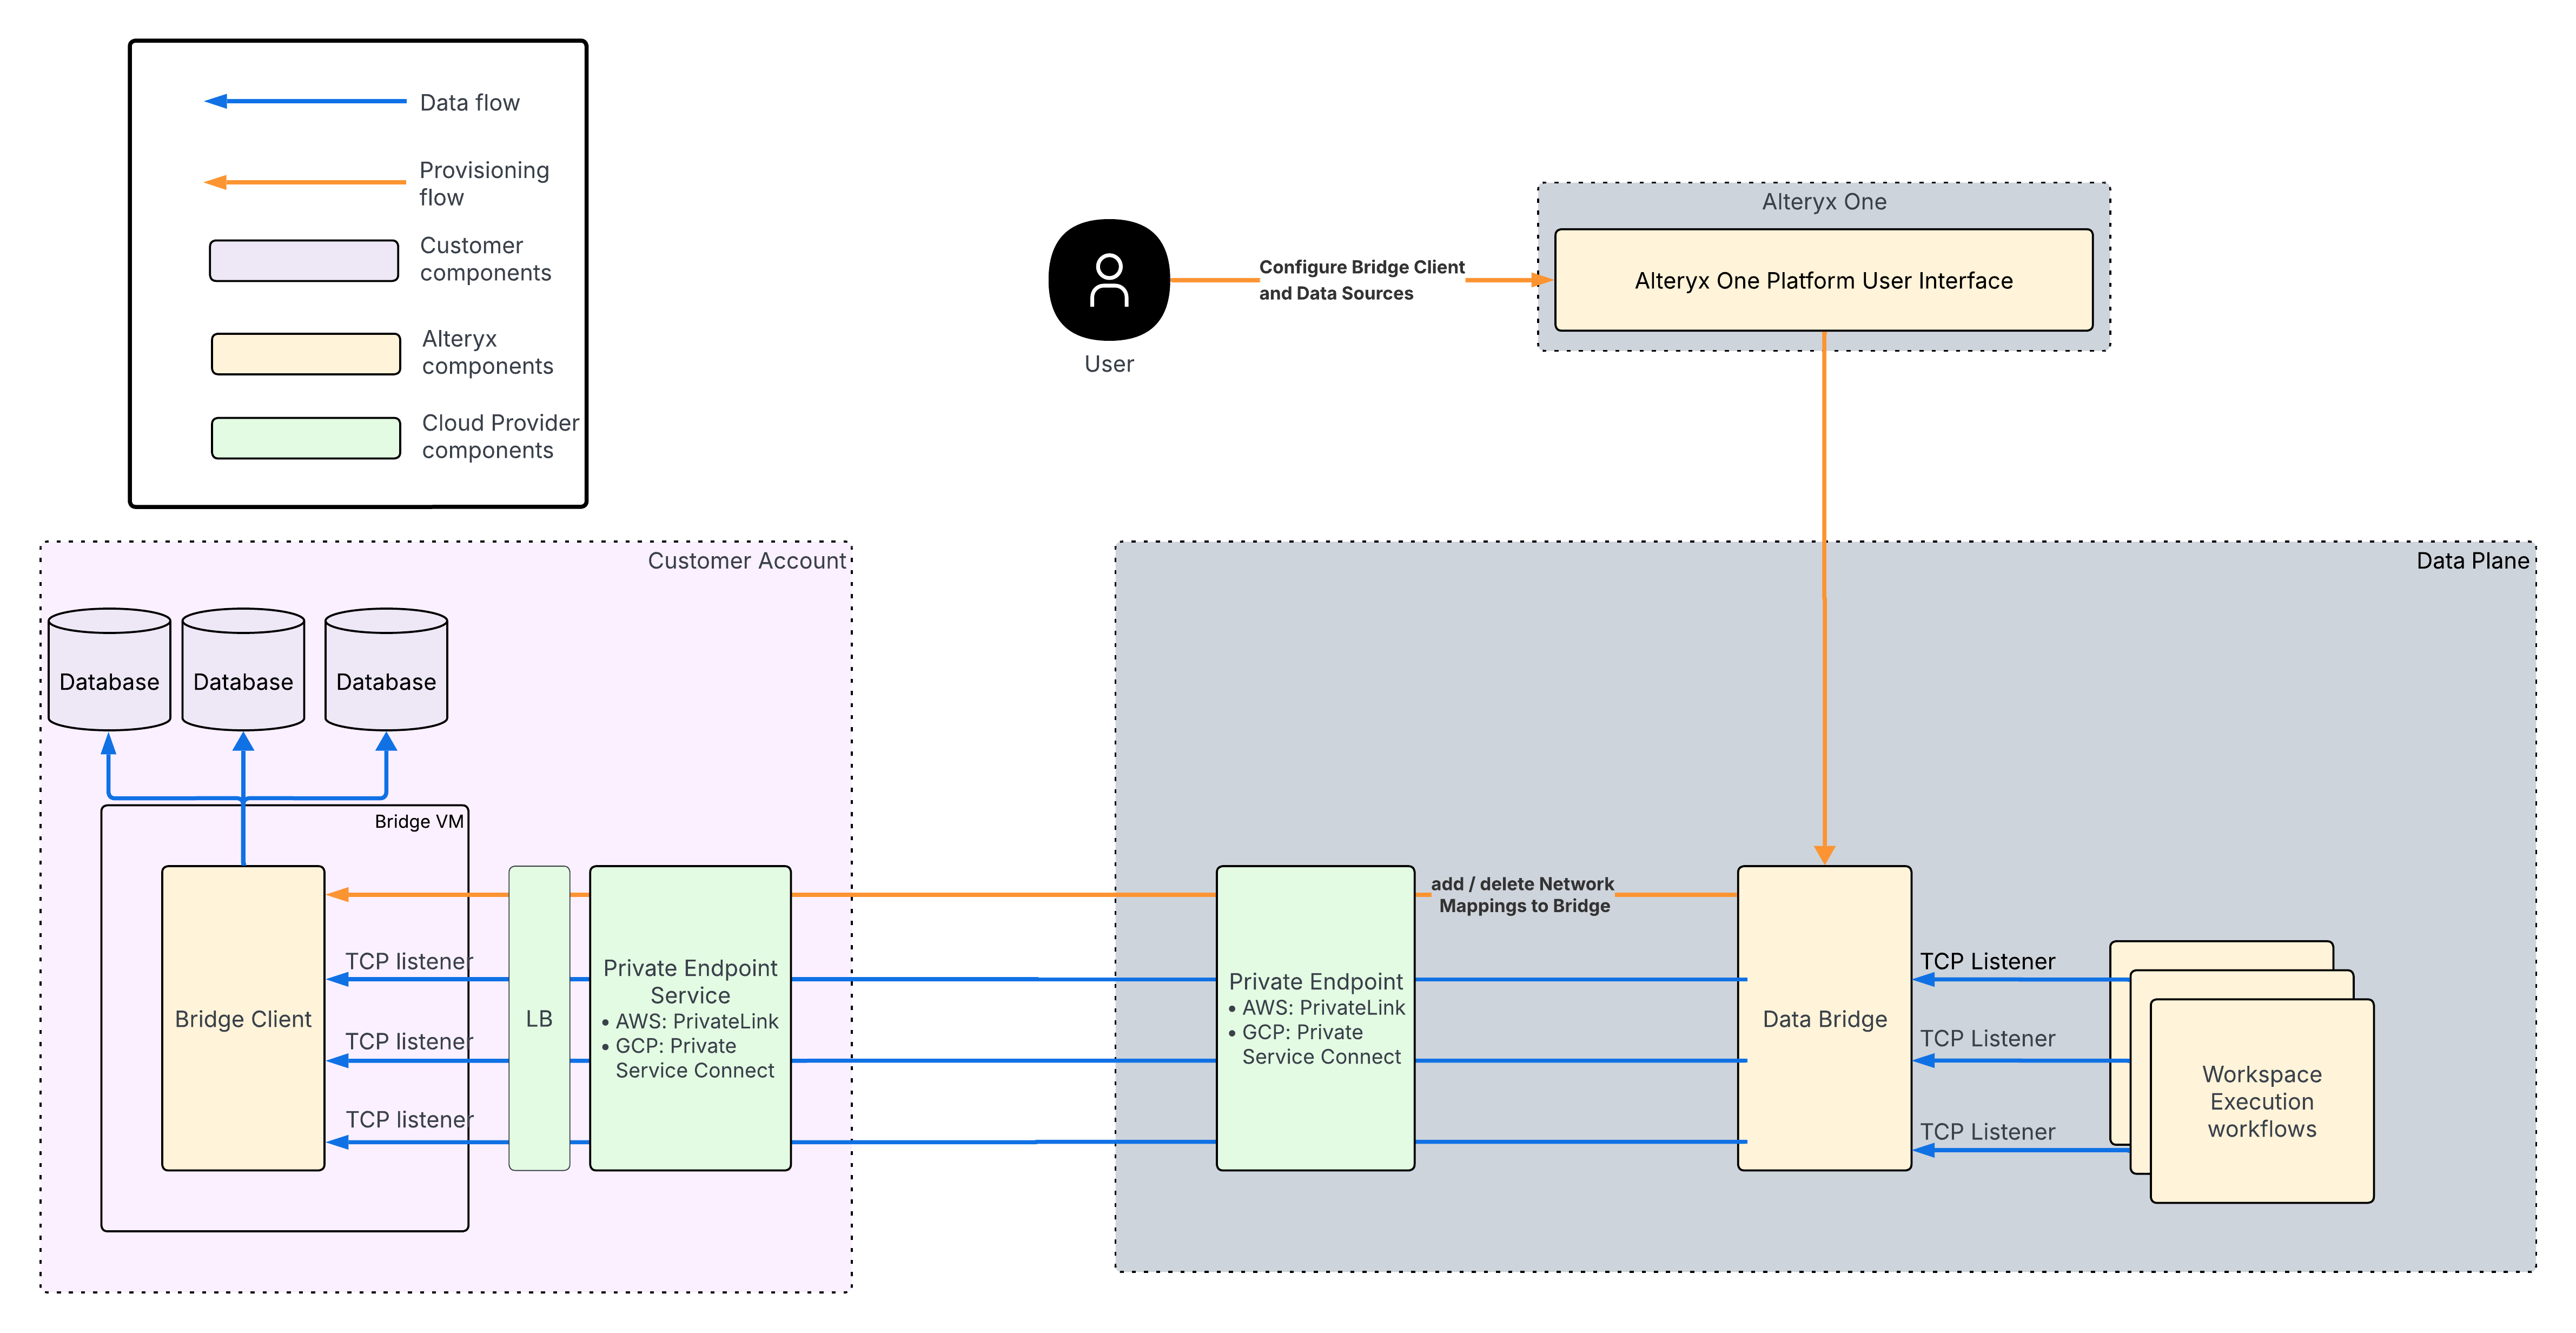
Data Flow (Blue Arrows)
Workflows running in Workspace Execution on the Alteryx Data Plane initiate connections to data sources using standard host names and ports.
Traffic flows privately over AWS PrivateLink or Google Cloud Private Service Connect into the customer cloud network.
The Bridge Client, running inside the customer network, forwards the traffic to the target data source (such as a database).
Data travels back along the same private path to the executing workflow.
Metadata and Control Flow (Orange Arrows)
The metadata and control flow manages configuration, provisioning, and lifecycle management, and never carries customer data:
The customer configures the Data Bridge and Network Mappings through the Alteryx One Platform user interface.
Configuration is transmitted to the Alteryx Data Plane and eventually the Bridge Client via AWS Private Link.
This separation ensures that control and orchestration traffic is isolated from customer data traffic, improving both security and reliability.
Data Bridge and Workspace Configuration Options
Each Data Bridge can be associated with one or more workspaces. Each workspace can also be associated with zero, one, or multiple Data Bridges.
If high isolation between workspaces is required, we recommend a 1-to-1 mapping between a Data Bridge and a workspace. For most common scenarios, a single Data Bridge connected to multiple workspaces is recommended for easier management.
Admins control which connections can use a Data Bridge during setup. This ensures connections are made only to admin-approved data sources.
Summary
Customer data flows only through private network paths between workflows at runtime and customer infrastructure.
Metadata, provisioning, and operational traffic are handled separately by Alteryx services.
No changes to workflows are required, and customer data sources don’t need to be publicly accessible.
This architecture allows customers to run desktop-authored workflows in the cloud while maintaining the same security posture as running inside their own network.
Customer Workflow
Prerequisites
Alteryx One Prerequisites
Your organization is on the Enterprise 2025 tier of the Alteryx One Platform. Earlier editions don’t include Data Bridge.
You have access to the Billing Account associated with your Alteryx One subscription.
You are an Account Admin on that Billing Account in order to create and manage Bridge Client resources.
Workspace Execution is enabled and running on the Alteryx Data Plane for the workspace that will use the Data Bridge.
You have the necessary internal approvals and credentials to access the private data sources you intend to connect via Data Bridge.
The data sources you want to access are not exposed on the public internet (for example, they are only reachable over private networks or VPN).
Bridge Client Download Access
Before you begin Data Bridge setup, confirm that the administrator who performs the setup can access the Bridge Client download:
In Alteryx One, select Download > Activate.
Confirm that the Data Bridge tab is available and that you can download the Bridge Client binary.
If the Data Bridge tab isn't available:
In Account Admin, go to Workspaces.
Find the workspace currently selected in Alteryx One, select its 3-dot menu, and select Manage Admins.
Add the user who will download the Bridge Client as a Workspace Admin, then select Invite.
In Account Admin > Settings > Capabilities, confirm that these capabilities are enabled:
Data Bridge
Download All On Prem Installers
Allow a few minutes for the access changes to take effect, then refresh Alteryx One or sign out and sign back in.
Return to Download > Activate. The Data Bridge tab should now be available.
Note
Workspace Admin is currently a reliable way to grant the download access required for Data Bridge because the role includes the Download All On Prem Installers capability. If the user already has this capability through another role, you don’t need to assign the Workspace Admin role.
If the Data Bridge tab is still unavailable after these checks, contact Alteryx Support.
Other Prerequisites
For additional prerequisites, refer to the relevant deployment section.
Set Up a Data Bridge on AWS
AWS Prerequisites
You have an AWS account that will host the Bridge Client.
The Bridge Client binary must be installed on a Linux-based virtual machine that runs one of these supported Linux distributions:
RHEL 9
Ubuntu 22
Amazon Linux 2023 (AL2023)
The data sources you want to access are reachable through at least one AWS VPC.
You have permissions in that AWS account to:
Create and manage EC2 instances (for hosting the Bridge Client)
Configure AWS PrivateLink endpoints (if applicable)
Manage network and security resources (VPC, Security Groups, etc.)
The AWS environment has network connectivity to the private data sources that will be accessed via Data Bridge.
Recommended EC2 Instance Sizes
The following are example starting points based on general AWS best practices, not a hard product requirement. Validate with your internal cloud or infra team and adjust as needed for your workloads.
Start with t3.small (2 vCPU, 2 GiB RAM) for development, testing, or very light usage.
Use t3.medium (2 vCPU, 4 GiB RAM) as the default for most production workloads.
Scale up (for example t3.large or m6i.large) if CPU or memory is consistently high or you expect heavy concurrent workloads.
Follow these steps to configure a Data Bridge on AWS. Once complete, Workspace Execution workflows in the associated workspaces will have access to the connected Data Sources.
Create a Data Bridge
In Alteryx One, go to Account Admin > Data Bridges. Then select Create Data Bridge. Enter:
Data Bridge Name
Cloud Provider: AWS
Network Transport: The selected cloud provider determines the private connectivity service. When you select AWS, Alteryx uses AWS PrivateLink. This value is populated automatically and can’t be edited.
Region: The region must match your VPC region and should default to the region you are currently in.
Availability Zone ID: The Availability Zone ID identifies the AWS availability zones where this endpoint is available.
Port: The port is used to connect the Data Bridge to Alteryx. The default is
9001.
Select Next.
On the next page, you are prompted to install and configure the Bridge Client binary in your VPC.
Download the Bridge Client binary file for your region:
Import Bridge Client to EC2 with AWS Secret Access:
In AWS, create an EC2 instance using the Amazon Linux 2023 AMI that can connect to your private data source and has permission to read or write secrets in AWS Secrets Manager. For more information on how to create an EC2 instance, refer to the AWS documentation Get started with Amazon EC2.
Then, import the Bridge Client into
/home/ec2-userdirectory at/.Note
The file will have a name with a version like
bridge-client-v1.0.0but should be renamed tobridge-clientto work with the following scripts.Make the binary executable. The Bridge Client binary must have executable permissions before it can be run.
chmod +x bridge-client
Save configuration snippet to a file:
Copy and paste the snippet into a configuration file named
bridge-client-config.jsoninside of the/home/ec2-userdirectory, which will be referenced by the Bridge Client.Example:
{
  "logging": {
    "logLevel": "info",
    "logFormat": "json"
  },
  "bootstrap" : {
    "storageType": "secretsManager",
    "secretName": "<Name of the AWS Secrets Manager secret where the Bridge Client will store its private key. The Bridge Client will create and populate this secret automatically.>"
  },
  "libp2pPort": 9001,
  "libp2pBindIP": "<Private IPv4 address of the EC2 Instance>",
  "resourceFile": "/home/ec2-user/resources.json"
}
Note
The
libp2pBindIPis going to be the Private IPv4 address of the EC2 Instance in which the Bridge Client is deployed in. Check the AWS Admin Console for that EC2 Instance.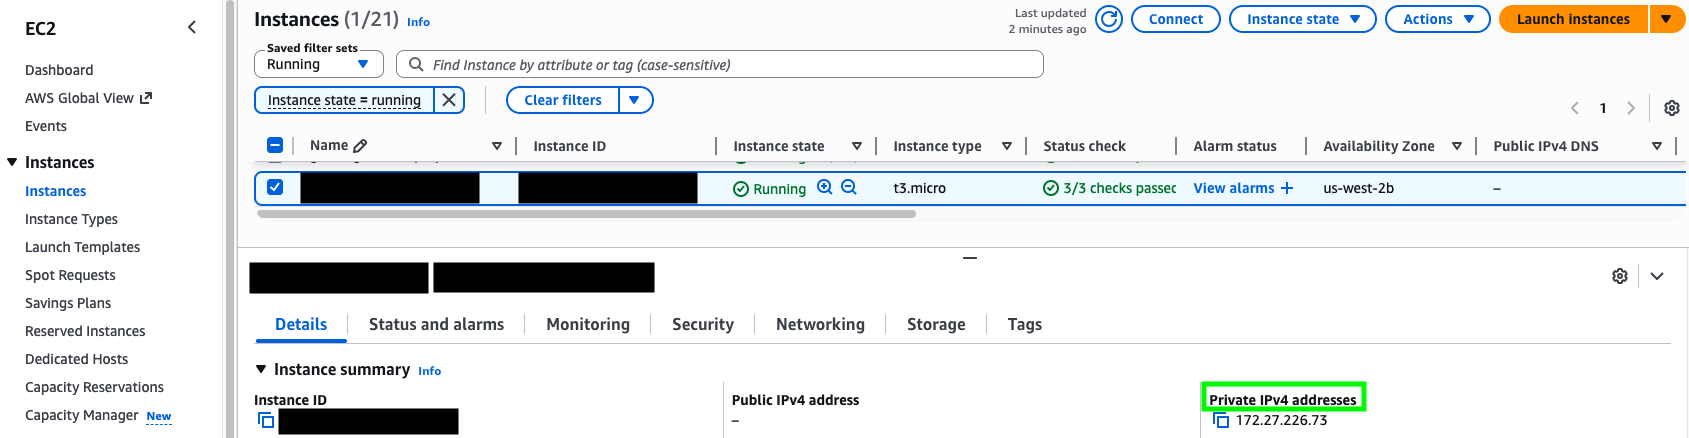
Optional: Add a Customer-Managed AWS KMS Key
If your organization requires Bridge Client secrets in AWS Secrets Manager to be encrypted with a customer-managed key, add an optional
awsobject underbootstrap configin thebridge-client-config.jsonfile. SetkmsKeyIDto your AWS KMS key ARN or alias ARN.If you omit this value or leave it empty, Bridge Client continues to use the default AWS Secrets Manager encryption behavior.
Example:
{
  ...
  "bootstrap": {
    "storageType": "aws",
    "secretName": "<Name of the AWS Secrets Manager secret where the Bridge Client will store its private key. The Bridge Client will create and populate this secret automatically.>",
    "aws": {
      "kmsKeyID": "arn:aws:kms:<region>:<account-id>:key/<key-id>"
    }
  }
  ...
}
Before you restart Bridge Client with
kmsKeyIDconfigured, make sure the EC2 instance role has permission to use the AWS KMS key through AWS Secrets Manager. If an existing secret uses a different AWS KMS key, Bridge Client updates the secret to use the configured key during startup.The EC2 instance role must include these AWS KMS permissions in addition to the existing Secrets Manager permissions:
{
  "Effect": "Allow",
  "Action": [
    "kms:Decrypt",
    "kms:Encrypt",
    "kms:GenerateDataKey",
    "kms:DescribeKey"
  ],
  "Resource": "arn:aws:kms:<region>:<account-id>:key/<key-id>",
  "Condition": {
    "StringEquals": {
      "kms:ViaService": "secretsmanager.<region>.amazonaws.com"
    }
  }
Create the
resources.jsonfile:Create a file named
resources.jsonin the/home/ec2-userdirectory. This file is required for the Bridge Client to start and manage resources at runtime.The file must contain an empty JSON object (
{}) and must not be blank.{}Run Bridge Client as a process:
Use
systemdto run the Bridge Client as a systemd service / long-running process.Copy the following content into a file and name it
bridge-client.servicein the directory/etc/systemd/system:[Unit] Description=Bridge Client [Service] # App Running ExecStart=/home/ec2-user/bridge-client -c /home/ec2-user/bridge-client-config.json Restart=always RestartSec=30s [Install] WantedBy=multi-user.target
Start the Bridge Client with the following command:
sudo systemctl start bridge-client
Enable Bridge Client to auto start on shutdown with the following command:
sudo systemctl enable bridge-client
Run the following command to check the health of the Bridge Client:
sudo systemctl status bridge-client
Ensure the process state is
Active: active (running). If it is not, there are likely issues with startup that should be troubleshooted via the logs.The logs of a
systemdservice can be accessed by running the following command where-uis the unit name and-ndescribes how many of the latest log lines to display.journalctl -u bridge-client -n 50
On successful startup, record the Bridge Client peer ID from
stdout.Convenience script for retrieving the peer ID:
sudo journalctl -u bridge-client -n 500 -r --no-pager \
| grep -m1 '"peerID"' \
| sed -E 's/.*"peerID":"([^"]+)".*/\1/'
Alternatively, manually look for a log line similar to the following:
{"level":"info","ts":"2025-10-18T01:17:27Z","caller":"bootstrap/bootstrap.go:47","msg":"peerID","name":"bridge_client","peerID":"QmA7kT2Yp8ZLxNwC4H6B5eVJg9sDoUScmRyb3FhXPaMq"}The
peerIDvalue is generated per private key and differs for each Bridge Client. Note that each Bridge Client should use or have its own private key. Private keys are and should not be reused between Bridge Clients.
Setup PrivateLink Endpoint Service:
Once the installation is complete, set up the PrivateLink Endpoint Service in your VPC.
Create and attach a target group that targets the specific EC2 instance where the Bridge Client lives. A health check should be configured on the target group to port 8081 pointing at the
/readyendpoint of the bridge client.Create a Network Load Balancer that forwards all TCP traffic on the port that
bridge-client-config.json’slibp2pPortis deployed on (default is 9001).Note
The Load Balancer used for the Endpoint Service must include two Availability Zone (AZ) IDs, and one of them must match the AZ where the Bridge Client is deployed.
Customers must allow inbound TCP traffic on the required service port. The default port is
9001.Allow traffic from the Alteryx-provided VPC CIDR ranges. This is required when the customer Network Load Balancer security group enforces inbound rules for PrivateLink traffic. Inbound rule enforcement is enabled by default.
To use the PrivateLink connection, add these IP ranges to the inbound rules of the Network Load Balancer security group with TCP access to port
9001:10.60.0.0/2110.60.8.0/2110.70.0.0/18
The security group of the backend instance must also allow traffic from the corresponding Network Load Balancer security group.
Create a PrivateLink Endpoint Service of type Interface for Internal services that is on the same VPC network as the EC2 instance.
Note
If choosing to create a cross-region PrivateLink, the Endpoint Service must choose both the target region as well as the region where the bridge-client EC2 instance is deployed as entries in the Supported Regions field.
Go back to Alteryx One > Account Admin > Data Bridges and select Next once the Endpoint Service is ready. Then enter:
The Endpoint Service Name
The Bridge Client peer ID recorded in step 2.
Select Create Data Bridge.
Now you can start adding Workspaces.
Add a Workspace
Once you’ve created a Data Bridge in Admin Console, you can add one or more Workspaces to this Data Bridge. The workspace association process typically takes 13–15 minutes to complete.
In Alteryx One > Admin Console > Data Bridges, select Add Workspace.
A window Add Workspace opens.
Select a Workspace from the dropdown. Only workspaces with Workspace Execution enabled are shown. Then select Next.
The IAM role is displayed. Copy and paste it to the Allow Principals list in your private VPC. For more information on configuring the AWS IAM Identity Center, refer to Getting started with IAM Identity Center or Configuring IAM Identity Center authentication with the AWS CLI.
Once done, select Confirm to trigger a creation of a PrivateLink Endpoint.
Go to the PrivateLink service in your AWS Console, then accept the private endpoint connection from the Alteryx account. Make sure the status is green before you continue.
Go to the 3-dot menu next to the workspace entry, then select Test Connection for that workspace. A toast message appears in the lower-left corner and shows the test status and result.
If the test fails, the setup might not be complete and the remaining steps won’t work.
After the connection test succeeds, you can create a new data source network mapping.
Set Up a Data Bridge on GCP
GCP Prerequisites
You have a Google Cloud project that will host the Bridge Client.
The Bridge Client binary must be installed on a Linux-based Compute Engine VM that runs a supported Linux distribution.
The data sources you want to access are reachable from the VPC network where the Bridge Client VM is deployed.
You have permissions in the Google Cloud project to:
Create and manage Compute Engine VMs.
Create and manage instance groups, health checks, backend services, forwarding rules, subnetworks, and firewall rules.
Create and manage Private Service Connect service attachments.
Create and manage Secret Manager secrets, if Bridge Client will create or store its private key in Google Cloud Secret Manager.
Required APIs are enabled in the producer project:
Compute Engine API
Secret Manager API
IAP API, if you use IAP for SSH or file transfer.
The VM service account has permission to read the configured Secret Manager secret. If the Bridge Client will create or update the secret during bootstrap, grant the additional Secret Manager permissions required by your organization.
The VM must have Cloud API access scopes that allow Secret Manager access. For example, use the cloud-platform scope when creating the VM.
The GCP environment has network connectivity to the private data sources that will be accessed through Data Bridge.
A dedicated PSC NAT subnet CIDR is available. The CIDR must not overlap existing subnets, peered ranges, VPN or interconnect ranges, or planned internal ranges.
Recommended Compute Engine Machine Types
These machine types are suggested starting points based on general Google Cloud best practices. They aren’t product requirements. Validate the machine type with your internal cloud or infrastructure team and adjust it as needed for your workloads.
Start with
e2-smallore2-mediumfor development, testing, or light usage.Use
e2-mediumor larger as the default for most production workloads.Scale up if CPU or memory is consistently high or you expect heavy concurrent workloads.
Follow these steps to configure a Data Bridge using Google Cloud Private Service Connect. Once complete, Workspace Execution workflows in the associated workspaces will have access to the connected data sources.
Create a Data Bridge
In Alteryx One, go to Account Admin > Data Bridges. Then select Create Data Bridge. Enter:
Data Bridge Name
Cloud Provider: Google Cloud, if shown.
Network Transport: The selected cloud provider determines the private connectivity service. When you select GCP, Alteryx uses Private Service Connect. This value is populated automatically and can’t be edited.
Region: The region must match the region where you will deploy the Bridge Client and Private Service Connect service attachment.
Availability Zone ID: The Availability Zone ID identifies the AWS availability zones where this endpoint is available.
Port: The port used to connect the Data Bridge to Alteryx. The default is
9001.
Select Next.
On the next page, install and configure the Bridge Client binary in your GCP VPC.
Download the Bridge Client binary file for your region:
Create a Compute Engine VM that can connect to your private data source. The VM should be deployed without a public IP address unless your organization explicitly requires one.
Attach a service account that can access the configured Google Cloud Secret Manager secret.
Make sure the VM has Cloud API access scopes that allow Secret Manager calls.
Import Bridge Client to the VM:
Import the Bridge Client binary to the VM, for example under
/etc/ayx/bridge-clientdirectory.Note
The file might have a versioned name with a version like
bridge-client-v1.0.0. Rename it tobridge-clientto work with the following examples.Make the binary executable. The Bridge Client binary must have executable permissions before it can be run.
sudo chmod +x /etc/ayx/bridge-client/bridge-client
Save configuration snippet to a file:
Copy and paste the snippet into a configuration file named
bridge-client-config.jsoninside of the/etc/ayx/bridge-clientdirectory.Example:
{
  "logging": {
    "logLevel": "info",
    "logFormat": "json"
  },
  "bootstrap": {
    "storageType": "gcp",
    "secretName": "<Name of the GCP Secret Manager secret where the Bridge Client will store its private key>",
    "gcp": {
      "projectID": "<GCP project ID that owns the Secret Manager secret>"
    }
  },
  "libp2pPort": 9001,
  "peerLibp2pPort": 9001,
  "libp2pBindIP": "<Internal TCP load balancer forwarding rule IP>",
  "resourceFile": "/etc/ayx/bridge-client/resources.json",
  "stateStorage": {
    "type": "file",
    "path": "/etc/ayx/bridge-client/resources.json"
  },
  "rest": {
    "port": "8081"
  }
}
Note
For GCP PSC deployments,
libp2pBindIPmust be the internal forwarding rule IP for the internal TCP load balancer that fronts the Bridge Client, not the VM public IP.Optional: Add a Customer-Managed GCP KMS Key
If your organization requires Bridge Client secrets in Google Cloud Secret Manager to be encrypted with a customer-managed key, add an optional
kmsKeyIDvalue under thegcpobject in thebootstrapconfig. SetkmsKeyIDto the full Cloud KMS CryptoKey resource name.If you omit this value or leave it empty, Bridge Client continues to use the default Google Cloud Secret Manager encryption behavior.
Example:
{
  ...
  "bootstrap": {
    "storageType": "gcp",
    "secretName": "<Name of the GCP Secret Manager secret where the Bridge Client will store its private key.>",
    "gcp": {
      "projectID": "<GCP project ID that owns the Secret Manager secret>",
      "kmsKeyID": "projects/<kms-project-id>/locations/<location>/keyRings/<key-ring>/cryptoKeys/<key-name>"
    }
  }
  ...
}
For Secret Manager secrets that use automatic replication, the Cloud KMS key must be in the global location. For user-managed replication, the key location must match the replica location.
Before you restart Bridge Client with
kmsKeyIDconfigured, make sure the Secret Manager service agent has permission to use the Cloud KMS key. Grant the Cloud KMS CryptoKey Encrypter/Decrypter role to the Secret Manager service agent:gcloud kms keys add-iam-policy-binding "<key-name>" \ --project "<kms-project-id>" \ --location "<location>" \ --keyring "<key-ring>" \ --member "serviceAccount:service-<secret-manager-project-number>@gcp-sa-secretmanager.iam.gserviceaccount.com" \ --role "roles/cloudkms.cryptoKeyEncrypterDecrypter"
The Bridge Client VM service account must still have the required Secret Manager permissions to read the configured secret. If Bridge Client creates or updates the secret during startup, grant the VM service account the additional Secret Manager permissions required by your organization.
If an existing Secret Manager secret uses a different Cloud KMS key, Bridge Client updates the secret to use the configured key during startup and adds a new secret version encrypted with that key.
Reference: Google Cloud’s Secret Manager CMEK docs note that CMEK uses Cloud KMS keys you manage, Secret Manager automatic replication requires a
globalkey, and the Secret Manager service agent needsroles/cloudkms.cryptoKeyEncrypterDecrypteron the key.Create the
resources.jsonfile:Create a file named
resources.jsonin the/etc/ayx/bridge-clientdirectory. This file is required for the Bridge Client to start and manage resources at runtime.The file must contain an empty JSON object (
{}) and must not be blank.{}Run Bridge Client as a process:
Use
systemdto run the Bridge Client as a long-running service.Copy the following content into
/etc/systemd/system/bridge-client.service:[Unit] Description=Bridge Client [Service] ExecStart=/etc/ayx/bridge-client/bridge-client -c /etc/ayx/bridge-client/bridge-client-config.json Restart=always RestartSec=30s [Install] WantedBy=multi-user.target
Start the Bridge Client with the following command:
sudo systemctl start bridge-client
Enable Bridge Client to start automatically after reboot:
sudo systemctl enable bridge-client
Check the health of the Bridge Client:
sudo systemctl status bridge-client
Ensure the process state is
Active: active (running). If it is not, review the logs.journalctl -u bridge-client -n 50
On successful startup, record the Bridge Client peer ID from
stdout.Convenience script for retrieving the peer ID:
sudo journalctl -u bridge-client -n 500 -r --no-pager \
| grep -m1 '"peerID"' \
| sed -E 's/.*"peerID":"([^"]+)".*/\1/'
Set up the internal TCP load balancer:
In Google Cloud, create these resources in the same region as the Bridge Client deployment.
A zonal unmanaged instance group that contains the Bridge Client VM.
A regional HTTP health check that checks port
8081and path/ready.A regional internal TCP backend service that uses the Bridge Client instance group as its backend.
An internal forwarding rule that forwards TCP traffic on port
9001to the backend service.
Configure firewall rules to allow:
TCP
9001from the PSC NAT subnet CIDR.TCP
8081from Google Cloud load balancer health check ranges:35.191.0.0/16and130.211.0.0/22. For more information, go to Firewall rules in Google Cloud Documentation.
Create a PSC NAT subnet:
Create a dedicated subnet in the producer VPC with purpose
PRIVATE_SERVICE_CONNECT.The PSC NAT subnet...
Must be in the same VPC and region as the service attachment.
Must be dedicated to Private Service Connect.
Must not overlap any existing subnet, peered range, VPN or interconnect range, or planned internal range.
Must not be reused across multiple service attachments.
Should be
/24or larger.
Create the Private Service Connect service attachment:
Create a PSC service attachment that points to the internal TCP load balancer forwarding rule.
Use the service attachment URI from the selected Google Cloud region. Example:
projects/PROJECT_ID/regions/REGION_ID/serviceAttachments/bridge-client-pscFor stricter access control, configure the service attachment to accept connections manually and add the Alteryx-provided consumer project, VPC network, or endpoint to the consumer accept list.
Note
Google Cloud supports automatic acceptance or explicit acceptance for selected consumers. Alteryx recommends explicit acceptance when your organization requires approval of each consumer connection.
Leave PROXY protocol disabled unless Alteryx explicitly instructs you to enable it for Bridge Client.
After the service attachment is created, record the service attachment URI.
Go back to Alteryx One > Account Admin > Data Bridges and select Next once the PSC service attachment is ready. Then enter:
The PSC service attachment URI
The Bridge Client peer ID recorded from the Bridge Client logs.
Select Create Data Bridge.
Now you can start adding Workspaces.
Add a Workspace
Once you’ve created a Data Bridge in Admin Console, you can add one or more Workspaces to this Data Bridge. The workspace association process typically takes 13–15 minutes to complete.
In Alteryx One > Account Admin > Data Bridges, select Add Workspace.
A window Add Workspace opens.
Select a Workspace from the dropdown. Only workspaces with Workspace Execution enabled are shown. Then select Next.
Copy the Alteryx-provided GCP consumer identifier. Depending on the configuration, this might be a consumer project, VPC network, or PSC endpoint identifier.
In Google Cloud, update the PSC service attachment consumer accept list or approve the pending connection request.
In Google Cloud, update the PSC service attachment consumer accept list or approve the pending connection request.
Return to Account Admin > Data Bridges, and select Confirm.
After the connection is ready, go to the 3-dot menu next to the workspace entry and select Test Connection.
If the test fails, the setup might not be complete and the remaining steps won’t work.
After the connection test succeeds, you can create a new data source network mapping.
Create a New Data Source Network Mapping
Create a network mapping to allow the Data Bridge to route traffic to a specific private data source. The network mapping typically takes 10–20 seconds to be created.
In Alteryx One > Account Admin > Data Bridges, select New Network Mapping.
A window New Network Mapping opens. Enter:
Name
Description
Host: Enter the exact fully qualified domain name (FQDN) that the data source connection uses in Connection Manager or Designer. For example,
sql01.example.comor an internal FQDN such assql01.example.local. Short hostnames, such assql01, and IP addresses, such as10.0.0.25, aren’t supported. The hostname and port must match the values used by the workflow connection.Port: The port number configured for your data source.
Then select Create.
Expand the Network mapping row and confirm that the workspace you added earlier is associated with the network mapping.
If the workspace isn’t associated, select the 3-dot menu next to the network mapping, then select Manage Workspaces to associate the workspace.
After the workspace is associated with the network mapping, expand the network mapping, select the 3-dot menu next to the workspace, then select Test Connection.
Note
Note: Test Connection verifies that the data source is reachable from Bridge Client and that the data plane can connect to Bridge Client for the network mapping.
Troubleshooting and FAQ
Data Bridge Doesn't Appear under Download & Activate
Symptom: You can create or manage Data Bridges in Account Admin, but the Data Bridge tab isn’t available under Download & Activate, so you can’t download the Bridge Client binary.
To resolve the issue:
Confirm that the Data Bridge and Download All On Prem Installers capabilities are enabled for the account.
Confirm that the user who downloads the Bridge Client has the required download access. Assigning the user the Workspace Admin role for the currently selected workspace grants the Download All On Prem Installers capability.
Allow a few minutes for the permission changes to take effect, then refresh Alteryx One or sign out and sign back in.
Return to Download & Activate > Data Bridge, then download the Bridge Client.
If the Data Bridge tab is still unavailable, contact Alteryx Support.
Common Installation and Configuration Issues
Connectivity or DNS Errors
If you experience connectivity failures, check for common DNS resolution issues.
Symptom: Bridge Client cannot connect to Alteryx Cloud or customer data sources.
Likely cause: Misconfigured VPC networking or incorrect DNS settings.
Next steps: Confirm VPC DNS settings, PrivateLink endpoint configurations, and firewall rules.
Private Endpoint Creation Fails
If Alteryx can't establish a connection to your VPC, check the service configuration for your cloud provider.
AWS: Verify that the endpoint service name is correct and that its allowed IAM principals and supported AWS Regions are configured correctly.
GCP: Verify that the service attachment URI is correct and that the accepted projects list is configured correctly.
Connection Limits
To provide DDoS (Distributed Denial-of-Service) protection, the Bridge Client limits incoming concurrent connections to 256 per data source. Contact Alteryx Support if you need to increase this limit.
Network Mapping and Connection Errors
When you run a workflow that uses a Data Bridge connection, you might encounter connection errors if the hostname or port defined in the workflow doesn't match the hostname or port configured in the Data Bridge network mapping.
Error messages vary depending on the connector or driver being used. Look for references to host, hostname, or port in the error details. For example:
1|3|Internal Error SQLDriverConnect: [Simba][MySQL] (1001) Error occurred while creating socket with message: This is usually a temporary error during hostname resolution and means that the local server did not receive a response from an authoritative server.
If you encounter this type of error, confirm with your administrator that the hostname and port used in the workflow match the values configured in the Data Bridge network mapping. In some cases, a workflow might run successfully on your local machine because it uses a valid alternative hostname that is not available through the Data Bridge configuration. Data Bridge requires a fully qualified domain name (FQDN) in the network mapping.
Metrics and Support
If you need help debugging the Bridge Client, call the /metrics.json endpoint to retrieve a JSON-formatted status report. Attach this output to your support ticket or message so the support team can review the issue.
The Bridge Client also exposes a Prometheus-style /metrics endpoint, which you can scrape to create dashboards or analyze the data independently.
Upgrade and Compatibility
Compatibility
Data Bridge is not supported in:
Private Data Processing deployments
Note
Data Bridge can coexist with Private Data Storage (PDS) in the same workspace. However, PDS doesn’t use Data Bridge.
Upgrades
Upgrades to the Bridge Client are typically required when new features or security updates are released.