Data Bridges
Importante
Data Bridges non supporta l'alta disponibilità (HA, High Availability).
Alteryx Data Bridges enables workflows running in Workspace Execution to securely connect to customer-managed data sources. It establishes private connectivity so workflows can access private resources without exposing them to the public internet.
Non è necessario apportare alcuna modifica ai flussi di lavoro esistenti. Alteryx Engine si connette alle origini dati utilizzando gli stessi nomi host e gli stessi numeri di porta che utilizza per l'esecuzione all'interno della rete.
Data Bridges è una soluzione progettata per essere utilizzata con Esecuzione spazio di lavoro nel piano dati Alteryx. È l'unico metodo supportato per connettere i flussi di lavoro in modo sicuro alle origini dati dei clienti senza richiedere l'accesso alla Internet pubblica.
Fatturazione e autorizzazioni
Data Bridges è disponibile nel livello Enterprise 2025 di Alteryx One Platform. Le edizioni precedenti non includono questa capacità.
Il tuo diritto ("autorizzazione") di utilizzare Data Bridges è legato al tuo Account di fatturazione. Ogni Account di fatturazione ha diritto a creare una o più risorse client bridge.
Possono configurare un data bridge in Console di amministrazione > Data Bridges solamente gli Amministratori dell'Account di fatturazione associato all'iscrizione a Alteryx One.
Terminologia
Bridge Client: A lightweight Linux-based binary deployed in the customer cloud environment. It works with private connectivity services to provide a private, authenticated connection between Alteryx and customer data sources without using the public internet.
AWS PrivateLink: servizio AWS che fornisce connettività privata fra i cloud privati virtuali e i servizi AWS o di terzi (come il client bridge), servendosi di indirizzi IP privati. Il traffico non attraversa la Internet pubblica.
Google Cloud Private Service Connect (PSC): A Google Cloud service that enables private connectivity between VPC networks and supported Google Cloud, partner, or customer-managed services using internal IP addresses. Traffic doesn’t traverse the public internet.
Origine dati: qualunque servizio o database gestito dal cliente, che sia raggiungibile tramite il protocollo TCP.
Esecuzione spazio di lavoro: permette agli utenti di creare flussi di lavoro in Designer Desktop, per poi salvarli, pianificarli ed eseguirli in Alteryx One utilizzando risorse di elaborazione e archiviazione basate su cloud, anziché una macchina locale.
Piano dati Alteryx: ambiente di esecuzione cloud multi-tenant di Alteryx, in cui le risorse cloud vengono condivise in modo sicuro fra i vari clienti.
Panoramica dell'architettura del sistema
Questo diagramma illustra la connessione sicura che viene stabilita da Alteryx Data Bridges tra i flussi di lavoro in Esecuzione spazio di lavoro e le origini dati gestite dal cliente, mantenendo tutti i dati di quest'ultimo all'interno delle sue reti private.
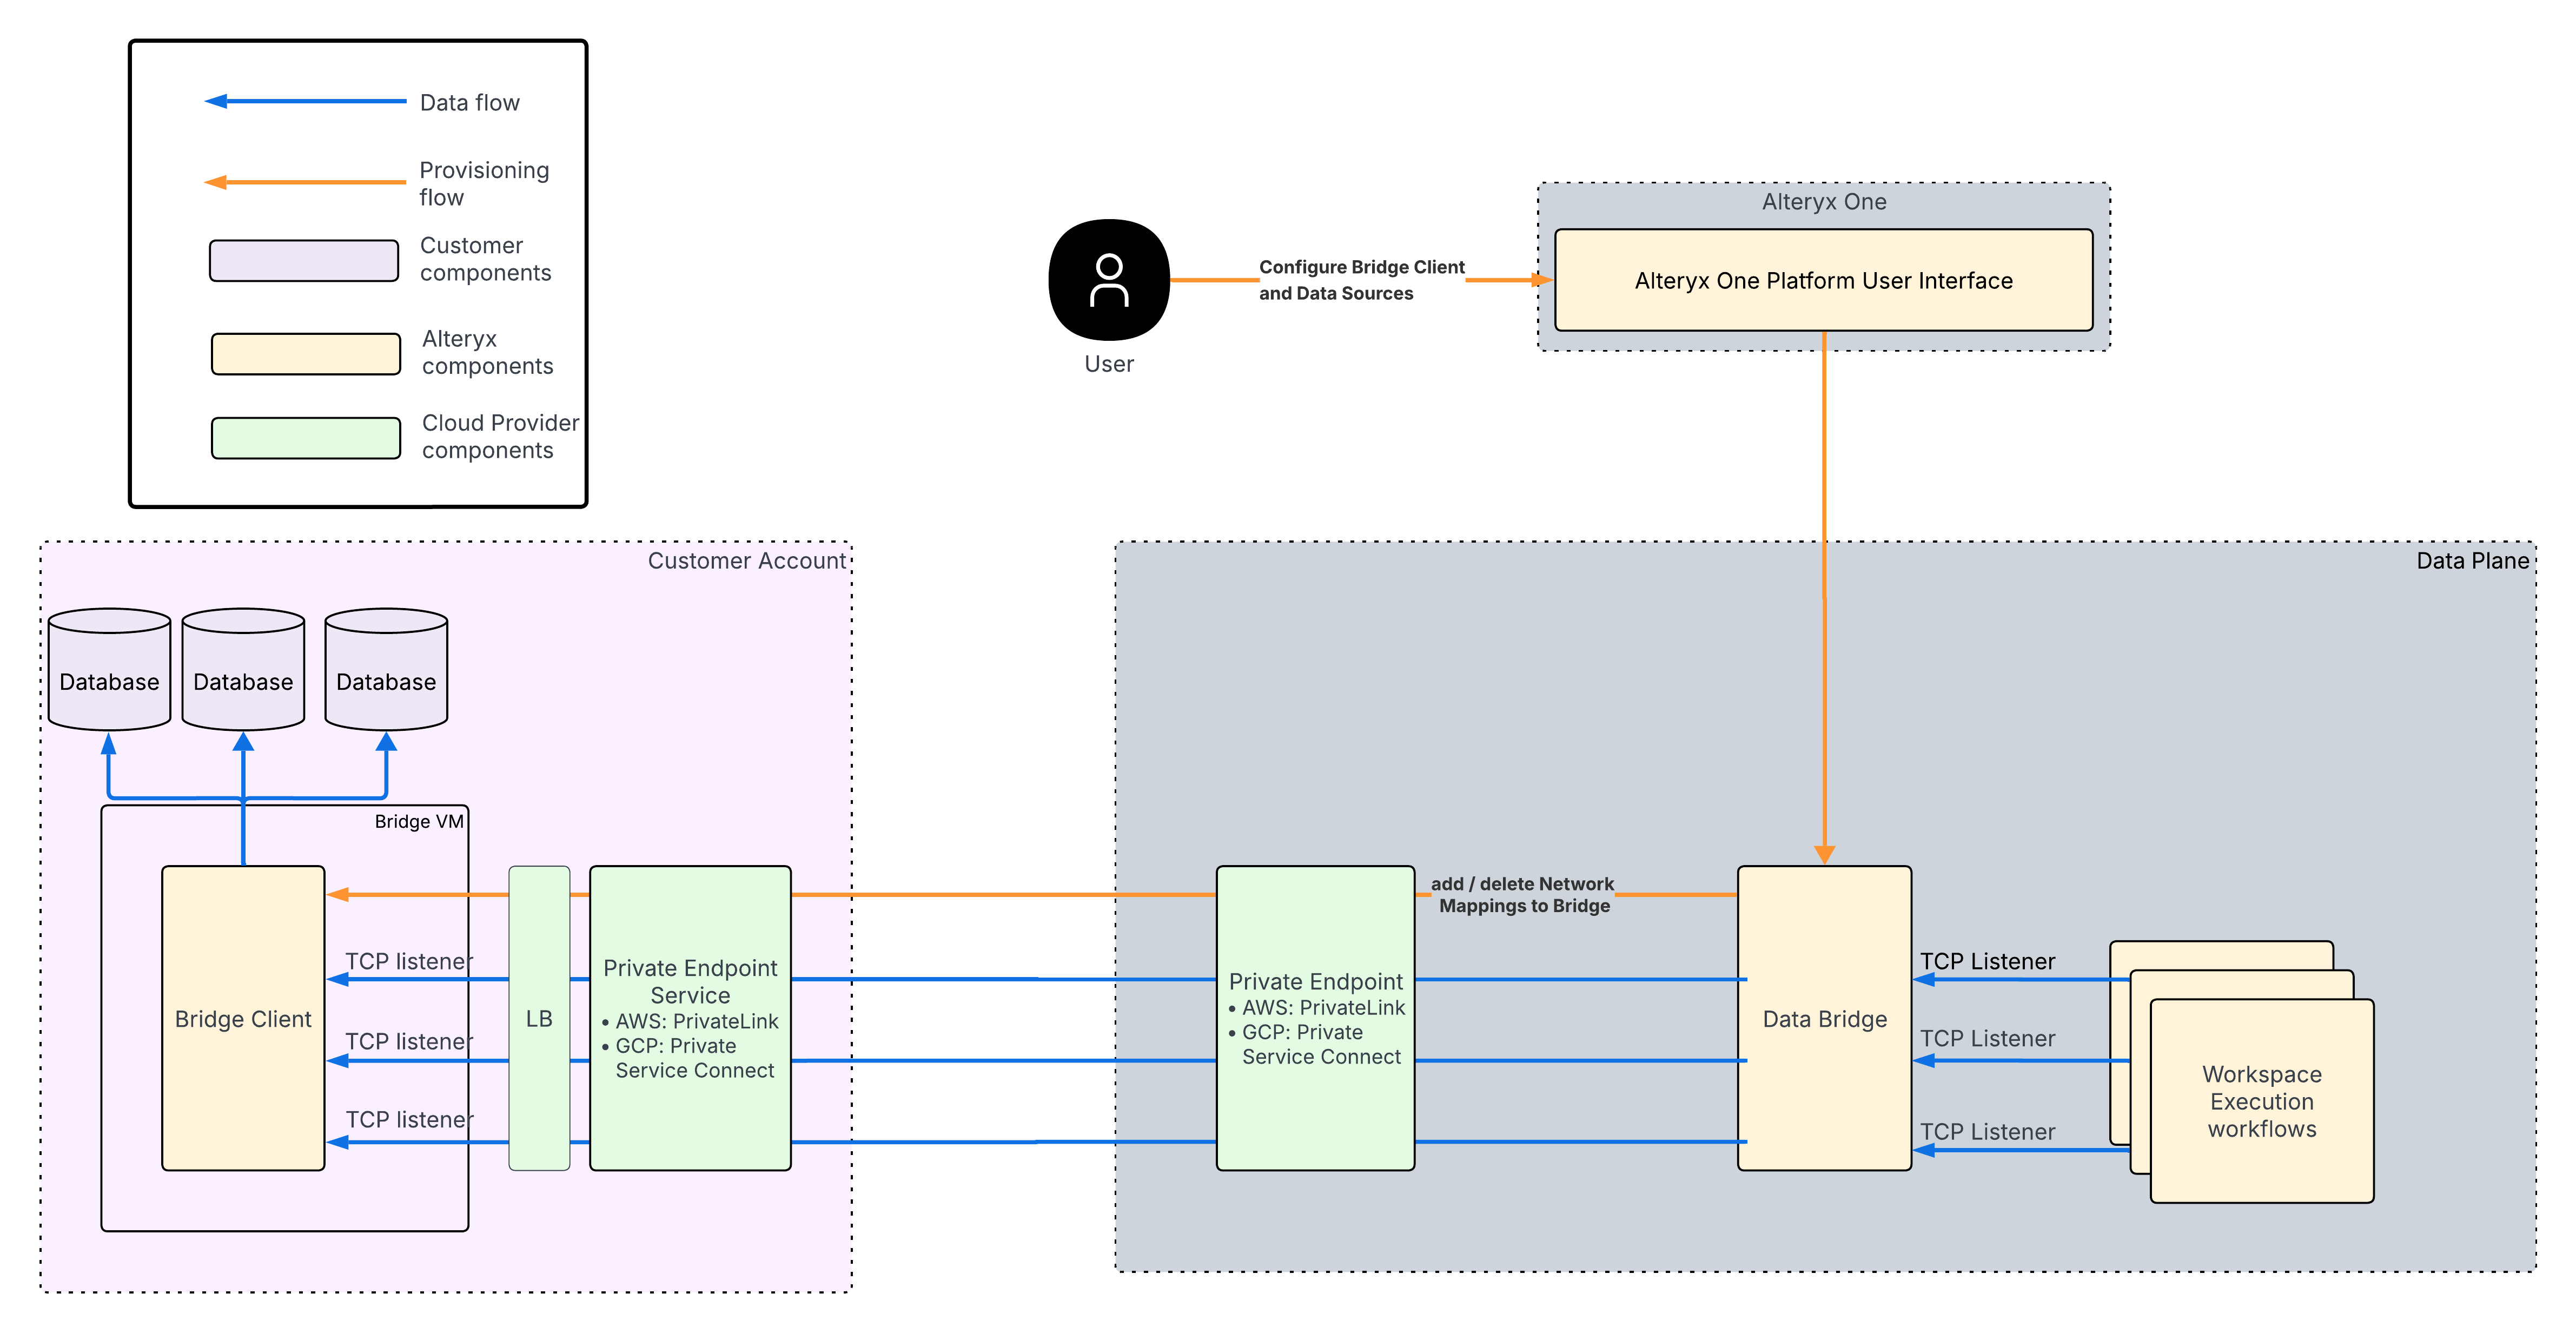
Flusso di dati (frecce blu)
I flussi di lavoro che vengono eseguiti in Esecuzione spazio di lavoro, nel piano dati Alteryx, si connettono alle origini dati utilizzando nomi host e numeri di porta standard.
Il traffico scorre privatamente su AWS PrivateLink, per arrivare al VPC AWS del cliente.
Il client bridge, che viene eseguito all'interno della rete del cliente, inoltra il traffico all'origine dati target (ad esempio, un database).
I dati vengono restituiti al flusso di lavoro in esecuzione, seguendo lo stesso percorso privato.
Flusso di metadati e comandi (frecce arancioni)
Il flusso di metadati e comandi gestisce la configurazione, il provisioning e il ciclo di vita, senza mai trasportare i dati del cliente:
Il cliente utilizza l'interfaccia utente di Alteryx One Platform per configurare il data bridge e le mappature di rete.
La configurazione viene trasmessa al piano dati Alteryx, e infine al client bridge, tramite AWS PrivateLink.
Questa separazione garantisce l'isolamento del traffico di orchestrazione e comandi da quello che trasporta i dati del cliente, aumentando i livelli di sicurezza e affidabilità.
Opzioni per la configurazione di data bridge e spazi di lavoro
Ciascun data bridge può essere associato a uno o più spazi di lavoro. A sua volta, ogni spazio di lavoro può essere associato a zero, uno o più data bridge.
Se è necessario garantire un isolamento completo fra gli spazi di lavoro, è consigliabile eseguire una mappatura 1-a-1 fra i data bridge e gli spazi di lavoro. Nella maggior parte degli scenari, è consigliabile connettere un singolo data bridge a più spazi di lavoro, per semplificare la gestione.
Durante la configurazione gli Amministratori indicano le connessioni che possono utilizzare ogni singolo data bridge, per garantire che le connessioni possano essere stabilite solo con le origini dati approvate dagli Amministratori.
Riepilogo
Al momento dell'esecuzione, i dati del cliente vengono trasmessi unicamente lungo i percorsi di rete privati, tra i flussi di lavoro e l'infrastruttura del cliente.
Il traffico generato da metadati, provisioning e operazioni viene gestito separatamente dai servizi Alteryx.
Non è necessario apportare alcuna modifica ai flussi di lavoro e le origini dati del cliente non devono essere accessibili al pubblico.
Grazie a questa architettura, i clienti possono eseguire nel cloud i flussi di lavoro creati nei computer desktop, applicando lo stesso profilo di sicurezza di quelli che vengono eseguiti all'interno della sua rete aziendale.
Flusso di lavoro del cliente
Prerequisiti
Prerequisiti di Alteryx One
L'organizzazione deve essere al livello Enterprise 2025 di Alteryx One Platform. Le edizioni precedenti non includono Data Bridges.
Devi avere accesso all'Account di fatturazione associato alla tua iscrizione a Alteryx One.
Per creare e gestire le risorse del client bridge, devi essere un Amministratore di tale Account di fatturazione.
Il servizio Esecuzione spazio di lavoro per lo spazio di lavoro che utilizza il data bridge deve essere abilitato e in esecuzione nel piano dati Alteryx.
Devi disporre delle credenziali e delle autorizzazioni interne necessarie per accedere alle origini dati private che intendi connettere tramite il data bridge.
Le origini dati a cui desideri accedere non devono essere esposte alla Internet pubblica (ad esempio, sono raggiungibili esclusivamente tramite una rete privata virtuale, o VPN).
Bridge Client Download Access
Before you begin Data Bridge setup, confirm that the administrator who performs the setup can access the Bridge Client download:
In Alteryx One, select Download > Activate.
Confirm that the Data Bridge tab is available and that you can download the Bridge Client binary.
If the Data Bridge tab isn't available:
In Account Admin, go to Workspaces.
Find the workspace currently selected in Alteryx One, select its 3-dot menu, and select Manage Admins.
Add the user who will download the Bridge Client as a Workspace Admin, then select Invite.
In Account Admin > Settings > Capabilities, confirm that these capabilities are enabled:
Data Bridge
Download All On Prem Installers
Allow a few minutes for the access changes to take effect, then refresh Alteryx One or sign out and sign back in.
Return to Download > Activate. The Data Bridge tab should now be available.
Nota
Workspace Admin is currently a reliable way to grant the download access required for Data Bridge because the role includes the Download All On Prem Installers capability. If the user already has this capability through another role, you don’t need to assign the Workspace Admin role.
If the Data Bridge tab is still unavailable after these checks, contact Alteryx Support.
Other Prerequisites
For additional prerequisites, refer to the relevant deployment section.
Configurazione di un data bridge
Prerequisiti di AWS
Devi disporre di un account AWS utilizzabile per ospitare il client bridge.
The Bridge Client binary must be installed on a Linux-based virtual machine that runs one of these supported Linux distributions:
RHEL 9
Ubuntu 22
Amazon Linux 2023 (AL2023)
Le origini dati a cui desideri accedere devono essere raggiungibili almeno tramite un VPC AWS.
Per l'account AWS in questione, devi disporre delle autorizzazioni necessarie per:
Creare e gestire istanze di EC2 (per l'hosting del client bridge)
Configurare endpoint AWS PrivateLink (se applicabile)
Gestire le risorse di rete e sicurezza (VPC, gruppi di sicurezza e così via)
L'ambiente AWS deve disporre di una connessione di rete alle origini dati private a cui verrà effettuato l'accesso tramite il data bridge.
Dimensioni consigliate per le istanze di EC2
Di seguito vengono riportati come esempio alcuni punti di partenza basati sulle best practice generali di AWS, che non costituiscono pertanto un requisito obbligatorio per il prodotto. Verifica questi dati con il team interno che si occupa del cloud o dell'infrastruttura e adattali come necessario per i tuoi carichi di lavoro.
Parti da t3.small (2 vCPU e 2 GiB di RAM), da utilizzare per scopi di sviluppo, test o attività molto leggere.
Usa t3.medium (2 vCPU e 4 GiB di RAM) come dimensione predefinita dell'istanza per la maggior parte dei carichi di lavoro di produzione.
Aumenta ulteriormente le dimensioni (ad esempio fino a t3.large o m6i.large) se l'utilizzo della CPU o della memoria è costantemente elevato o se prevedi carichi di lavoro simultanei molto pesanti.
Per configurare un data bridge, procedi come segue: Al termine, i flussi di lavoro in Esecuzione spazio di lavoro per gli spazi di lavoro associati avranno accesso alle origini dati connesse.
Creazione di un data bridge
In Alteryx One, vai a Console di amministrazione > Data Bridges, quindi seleziona Crea data bridge. Inserisci:
Il Nome del data bridge
Cloud Provider: AWS
Network Transport: The selected cloud provider determines the private connectivity service. When you select AWS, Alteryx uses AWS PrivateLink. This value is populated automatically and can’t be edited.
La Regione, che deve corrispondere alla regione di VPC e, per impostazione predefinita, a quella in cui ti trovi attualmente.
Il ID della zona di disponibilità, che identifica la zona di disponibilità AWS in cui è disponibile l'endpoint.
La Porta utilizzata per connettere il data bridge ad Alteryx. Il valore predefinito è 9001.
Seleziona Avanti.
Nella pagina successiva ti viene richiesto di installare e configurare il file binario del client bridge nel tuo VPC.
Scarica il file binario del client bridge dal Portale delle licenze.
Importa il client bridge in EC2 con accesso al segreto AWS:
In AWS, utilizza Amazon Linux AMI per creare un'istanza di EC2 in grado di connettersi alla tua origine dati privata e autorizzata a leggere o scrivere segreti in AWS Secrets Manager. Per ulteriori informazioni su come creare un'istanza di EC2, consulta l'articolo Inizia a usare Amazon EC2 nella documentazione di AWS.
Importa quindi il client bridge nella directory
/home/ec2-user, sotto/.Nota
The file will have a name with a version like
bridge-client-v1.0.0but should be renamed tobridge-clientto work with the following scripts.Make the binary executable. The Bridge Client binary must have executable permissions before it can be run.
chmod +x bridge-client
Salva il frammento di configurazione in un file:
Copia il frammento e incollalo in un file di configurazione denominato
bridge-client-config.json, disponibile nella directory/home/ec2-user, che verrà referenziato dal client bridge.Esempio:
{
  "logging": {
    "logLevel": "info",
    "logFormat": "json"
  },
  "bootstrap" : {
    "storageType": "secretsManager",
    "secretName": "<Name of the AWS Secrets Manager secret where the Bridge Client will store its private key. The Bridge Client will create and populate this secret automatically.>"
  },
  "libp2pPort": 9001,
  "libp2pBindIP": "<Private IPv4 address of the EC2 Instance>",
  "resourceFile": "/home/ec2-user/resources.json"
}
Nota
Il client bridge verrà implementato nell'indirizzo IPv4 privato
libp2pBindIPdell'istanza EC2. Controlla tale istanza nella Console di amministrazione di AWS.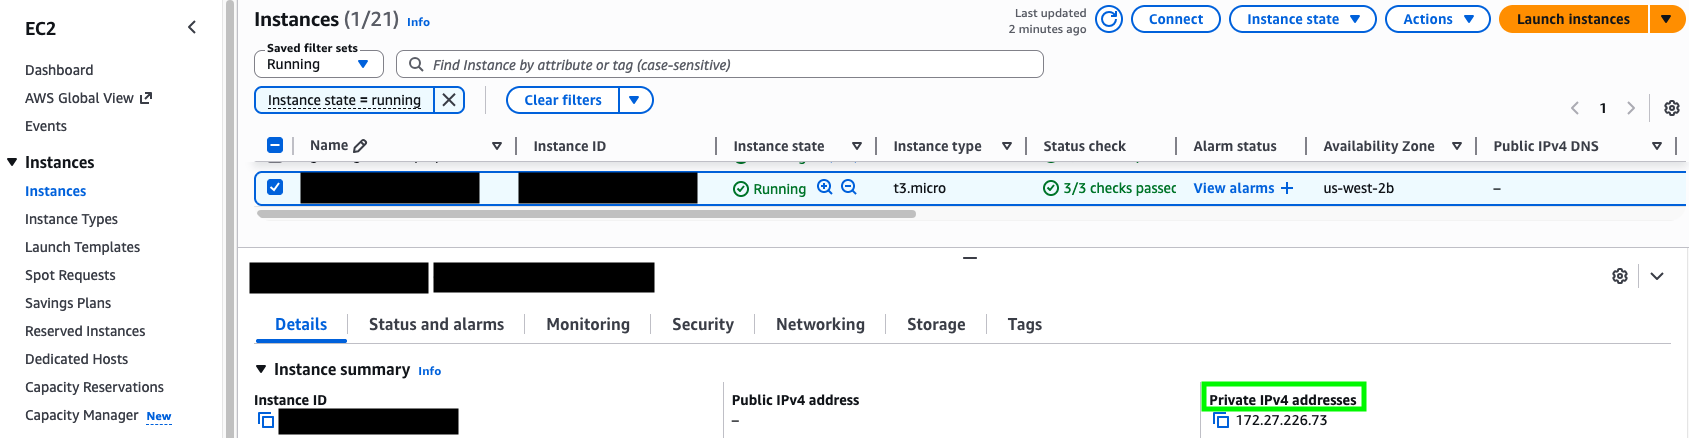
Optional: Add a Customer-Managed AWS KMS Key
If your organization requires Bridge Client secrets in AWS Secrets Manager to be encrypted with a customer-managed key, add an optional
awsobject underbootstrap configin thebridge-client-config.jsonfile. SetkmsKeyIDto your AWS KMS key ARN or alias ARN.If you omit this value or leave it empty, Bridge Client continues to use the default AWS Secrets Manager encryption behavior.
Example:
{
  ...
  "bootstrap": {
    "storageType": "aws",
    "secretName": "<Name of the AWS Secrets Manager secret where the Bridge Client will store its private key. The Bridge Client will create and populate this secret automatically.>",
    "aws": {
      "kmsKeyID": "arn:aws:kms:<region>:<account-id>:key/<key-id>"
    }
  }
  ...
}
Before you restart Bridge Client with
kmsKeyIDconfigured, make sure the EC2 instance role has permission to use the AWS KMS key through AWS Secrets Manager. If an existing secret uses a different AWS KMS key, Bridge Client updates the secret to use the configured key during startup.The EC2 instance role must include these AWS KMS permissions in addition to the existing Secrets Manager permissions:
{
  "Effect": "Allow",
  "Action": [
    "kms:Decrypt",
    "kms:Encrypt",
    "kms:GenerateDataKey",
    "kms:DescribeKey"
  ],
  "Resource": "arn:aws:kms:<region>:<account-id>:key/<key-id>",
  "Condition": {
    "StringEquals": {
      "kms:ViaService": "secretsmanager.<region>.amazonaws.com"
    }
  }
Crea il file
resources.json:Crea un file di nome
resources.jsonnella directory/home/ec2-user. Questo file è necessario per consentire al client bridge di avviarsi e gestire le risorse al momento dell'esecuzione.Il file deve contenere un oggetto JSON (
{}) vuoto.{}Esegui il client bridge come processo:
Usa
systemdper eseguire il client bridge come servizio systemd o processo di lunga durata.Copia il contenuto seguente in un file e di nome
bridge-client.service, nella directory/etc/systemd/system:[Unit] Description=Bridge Client [Service] # App Running ExecStart=/home/ec2-user/bridge-client -c /home/ec2-user/bridge-client-config.json Restart=always RestartSec=30s [Install] WantedBy=multi-user.target
Usa il comando seguente per avviare il client bridge:
sudo systemctl start bridge-client
Usa il comando seguente per abilitare l'avvio automatico del client bridge allo spegnimento del sistema:
sudo systemctl enable bridge-client
Usa il comando seguente per verificare lo stato del client bridge:
sudo systemctl status bridge-client
Assicurati che il processo abbia stato
Attivo: attivo (in esecuzione). In caso contrario, probabilmente si sono verificati problemi di avvio, che dovrebbero essere risolti analizzando i log.Per accedere ai log di un servizio
systemdpuoi utilizzare il comando seguente, dove-uè il nome dell'unità e-nindica il numero delle righe di log da visualizzare, a partire dal fondo.journalctl -u bridge-client -n 50
Dopo un avvio eseguito correttamente, registra l'ID peer del client bridge restituito da
stdout.Per agevolare il recupero dell'ID peer, puoi utilizzare questo script:
sudo journalctl -u bridge-client -n 500 -r --no-pager \
| grep -m1 '"peerID"' \
| sed -E 's/.*"peerID":"([^"]+)".*/\1/'
In alternativa, cerca manualmente una riga simile alla seguente nel file di log:
{"level":"info","ts":"2025-10-18T01:17:27Z","caller":"bootstrap/bootstrap.go:47","msg":"peerID","name":"bridge_client","peerID":"QmA7kT2Yp8ZLxNwC4H6B5eVJg9sDoUScmRyb3FhXPaMq"}Il valore di
peerIDviene generato in base alla chiave privata ed è diverso per ciascun client bridge. Ricorda che ogni client bridge deve usare o avere una propria chiave privata. Non puoi utilizzare la chiave privata di un client bridge con un altro client bridge.
Configura il servizio endpoint PrivateLink:
Al termine dell'installazione, configura il servizio endpoint PrivateLink nel tuo VPC.
Crea e associa un gruppo target per l'istanza EC2 specifica in cui risiede il client bridge. È necessario configurare una verifica dello stato per il gruppo target sulla porta 8081, che punta all'endpoint
/readydel client bridge.Crea un servizio di bilanciamento del carico di rete che inoltra tutto il traffico TCP sulla porta su cui è implementato il
libp2pPortdibridge-client-config.json(che per impostazione predefinita è la porta 9001).Nota
Il servizio di bilanciamento del carico utilizzato per il servizio endpoint deve includere gli ID di due zone di disponibilità (AZ, Availability Zone), uno dei quali deve corrispondere alla zona di disponibilità in cui è implementato il client bridge.
Customers must allow inbound TCP traffic on the required service port. The default port is
9001.Allow traffic from the Alteryx-provided VPC CIDR ranges. This is required when the customer Network Load Balancer security group enforces inbound rules for PrivateLink traffic. Inbound rule enforcement is enabled by default.
To use the PrivateLink connection, add these IP ranges to the inbound rules of the Network Load Balancer security group with TCP access to port
9001:10.60.0.0/2110.60.8.0/2110.70.0.0/18
The security group of the backend instance must also allow traffic from the corresponding Network Load Balancer security group.
Crea un servizio endpoint PrivateLink di tipo Interfaccia per i Servizi interni, sulla stessa rete VPC dell'istanza EC2.
Nota
Se scegli di creare un PrivateLink multiregionale, il servizio endpoint deve specificare sia la regione target, sia la regione in cui è implementata l'istanza EC2 del client bridge, come voci nel campo Regioni supportate.
Torna a Alteryx One > Console di amministrazione > Data Bridges e, quando il servizio Endpoint è pronto, seleziona Avanti. A questo punto inserisci:
Il Nome del servizio endpoint.
L'ID peer del client bridge registrato nel Passaggio 2.
Seleziona Crea data bridge.
Ora puoi cominciare ad aggiungere gli spazi di lavoro.
Aggiunta di uno spazio di lavoro
Dopo aver creato un data bridge nella Console di amministrazione, puoi aggiungervi uno o più spazi di lavoro. Il processo di associazione degli spazi di lavoro richiede solitamente 13-15 minuti.
In Alteryx One > Console di amministrazione > Data Bridges, seleziona Aggiungi spazio di lavoro.
Viene visualizzata la finestra Aggiungi spazio di lavoro.
Seleziona uno spazio di lavoro dal menu a tendina. Vengono visualizzati solo gli spazi di lavoro per cui è abilitato Esecuzione spazio di lavoro. Successivamente, seleziona Avanti.
Viene visualizzato il ruolo IAM. Copialo e incollalo nell'elenco Entità di servizio consentite del tuo VPC privato. Per ulteriori informazioni sulla configurazione di AWS IAM Identity Center, consulta l'articolo Nozioni di base sul Centro identità IAM o Configurazione dell'autenticazione IAM Identity Center con AWS CLI.
Al termine, seleziona Avanti.
Go to the PrivateLink service in your AWS Console, then accept the private endpoint connection from the Alteryx account. Make sure the status is green before you continue.
Go to the 3-dot menu next to the workspace entry, then select Test Connection for that workspace. A toast message appears in the lower-left corner and shows the test status and result.
If the test fails, the setup might not be complete and the remaining steps won’t work.
After the connection test succeeds, you can create a new data source network mapping.
Set Up a Data Bridge on GCP
GCP Prerequisites
You have a Google Cloud project that will host the Bridge Client.
The Bridge Client binary must be installed on a Linux-based Compute Engine VM that runs a supported Linux distribution.
The data sources you want to access are reachable from the VPC network where the Bridge Client VM is deployed.
You have permissions in the Google Cloud project to:
Create and manage Compute Engine VMs.
Create and manage instance groups, health checks, backend services, forwarding rules, subnetworks, and firewall rules.
Create and manage Private Service Connect service attachments.
Create and manage Secret Manager secrets, if Bridge Client will create or store its private key in Google Cloud Secret Manager.
Required APIs are enabled in the producer project:
Compute Engine API
Secret Manager API
IAP API, if you use IAP for SSH or file transfer.
The VM service account has permission to read the configured Secret Manager secret. If the Bridge Client will create or update the secret during bootstrap, grant the additional Secret Manager permissions required by your organization.
The VM must have Cloud API access scopes that allow Secret Manager access. For example, use the cloud-platform scope when creating the VM.
The GCP environment has network connectivity to the private data sources that will be accessed through Data Bridge.
A dedicated PSC NAT subnet CIDR is available. The CIDR must not overlap existing subnets, peered ranges, VPN or interconnect ranges, or planned internal ranges.
Recommended Compute Engine Machine Types
These machine types are suggested starting points based on general Google Cloud best practices. They aren’t product requirements. Validate the machine type with your internal cloud or infrastructure team and adjust it as needed for your workloads.
Start with
e2-smallore2-mediumfor development, testing, or light usage.Use
e2-mediumor larger as the default for most production workloads.Scale up if CPU or memory is consistently high or you expect heavy concurrent workloads.
Follow these steps to configure a Data Bridge using Google Cloud Private Service Connect. Once complete, Workspace Execution workflows in the associated workspaces will have access to the connected data sources.
Create a Data Bridge
In Alteryx One, go to Account Admin > Data Bridges. Then select Create Data Bridge. Enter:
Data Bridge Name
Cloud Provider: Google Cloud, if shown.
Network Transport: The selected cloud provider determines the private connectivity service. When you select GCP, Alteryx uses Private Service Connect. This value is populated automatically and can’t be edited.
Region: The region must match the region where you will deploy the Bridge Client and Private Service Connect service attachment.
Availability Zone ID: The Availability Zone ID identifies the AWS availability zones where this endpoint is available.
Port: The port used to connect the Data Bridge to Alteryx. The default is
9001.
Select Next.
On the next page, install and configure the Bridge Client binary in your GCP VPC.
Download the Bridge Client binary file for your region:
Create a Compute Engine VM that can connect to your private data source. The VM should be deployed without a public IP address unless your organization explicitly requires one.
Attach a service account that can access the configured Google Cloud Secret Manager secret.
Make sure the VM has Cloud API access scopes that allow Secret Manager calls.
Import Bridge Client to the VM:
Import the Bridge Client binary to the VM, for example under
/etc/ayx/bridge-clientdirectory.Nota
The file might have a versioned name with a version like
bridge-client-v1.0.0. Rename it tobridge-clientto work with the following examples.Make the binary executable. The Bridge Client binary must have executable permissions before it can be run.
sudo chmod +x /etc/ayx/bridge-client/bridge-client
Save configuration snippet to a file:
Copy and paste the snippet into a configuration file named
bridge-client-config.jsoninside of the/etc/ayx/bridge-clientdirectory.Example:
{
  "logging": {
    "logLevel": "info",
    "logFormat": "json"
  },
  "bootstrap": {
    "storageType": "gcp",
    "secretName": "<Name of the GCP Secret Manager secret where the Bridge Client will store its private key>",
    "gcp": {
      "projectID": "<GCP project ID that owns the Secret Manager secret>"
    }
  },
  "libp2pPort": 9001,
  "peerLibp2pPort": 9001,
  "libp2pBindIP": "<Internal TCP load balancer forwarding rule IP>",
  "resourceFile": "/etc/ayx/bridge-client/resources.json",
  "stateStorage": {
    "type": "file",
    "path": "/etc/ayx/bridge-client/resources.json"
  },
  "rest": {
    "port": "8081"
  }
}
Nota
For GCP PSC deployments,
libp2pBindIPmust be the internal forwarding rule IP for the internal TCP load balancer that fronts the Bridge Client, not the VM public IP.Optional: Add a Customer-Managed GCP KMS Key
If your organization requires Bridge Client secrets in Google Cloud Secret Manager to be encrypted with a customer-managed key, add an optional
kmsKeyIDvalue under thegcpobject in thebootstrapconfig. SetkmsKeyIDto the full Cloud KMS CryptoKey resource name.If you omit this value or leave it empty, Bridge Client continues to use the default Google Cloud Secret Manager encryption behavior.
Example:
{
  ...
  "bootstrap": {
    "storageType": "gcp",
    "secretName": "<Name of the GCP Secret Manager secret where the Bridge Client will store its private key.>",
    "gcp": {
      "projectID": "<GCP project ID that owns the Secret Manager secret>",
      "kmsKeyID": "projects/<kms-project-id>/locations/<location>/keyRings/<key-ring>/cryptoKeys/<key-name>"
    }
  }
  ...
}
For Secret Manager secrets that use automatic replication, the Cloud KMS key must be in the global location. For user-managed replication, the key location must match the replica location.
Before you restart Bridge Client with
kmsKeyIDconfigured, make sure the Secret Manager service agent has permission to use the Cloud KMS key. Grant the Cloud KMS CryptoKey Encrypter/Decrypter role to the Secret Manager service agent:gcloud kms keys add-iam-policy-binding "<key-name>" \ --project "<kms-project-id>" \ --location "<location>" \ --keyring "<key-ring>" \ --member "serviceAccount:service-<secret-manager-project-number>@gcp-sa-secretmanager.iam.gserviceaccount.com" \ --role "roles/cloudkms.cryptoKeyEncrypterDecrypter"
The Bridge Client VM service account must still have the required Secret Manager permissions to read the configured secret. If Bridge Client creates or updates the secret during startup, grant the VM service account the additional Secret Manager permissions required by your organization.
If an existing Secret Manager secret uses a different Cloud KMS key, Bridge Client updates the secret to use the configured key during startup and adds a new secret version encrypted with that key.
Reference: Google Cloud’s Secret Manager CMEK docs note that CMEK uses Cloud KMS keys you manage, Secret Manager automatic replication requires a
globalkey, and the Secret Manager service agent needsroles/cloudkms.cryptoKeyEncrypterDecrypteron the key.Create the
resources.jsonfile:Create a file named
resources.jsonin the/etc/ayx/bridge-clientdirectory. This file is required for the Bridge Client to start and manage resources at runtime.The file must contain an empty JSON object (
{}) and must not be blank.{}Run Bridge Client as a process:
Use
systemdto run the Bridge Client as a long-running service.Copy the following content into
/etc/systemd/system/bridge-client.service:[Unit] Description=Bridge Client [Service] ExecStart=/etc/ayx/bridge-client/bridge-client -c /etc/ayx/bridge-client/bridge-client-config.json Restart=always RestartSec=30s [Install] WantedBy=multi-user.target
Start the Bridge Client with the following command:
sudo systemctl start bridge-client
Enable Bridge Client to start automatically after reboot:
sudo systemctl enable bridge-client
Check the health of the Bridge Client:
sudo systemctl status bridge-client
Ensure the process state is
Active: active (running). If it is not, review the logs.journalctl -u bridge-client -n 50
On successful startup, record the Bridge Client peer ID from
stdout.Convenience script for retrieving the peer ID:
sudo journalctl -u bridge-client -n 500 -r --no-pager \
| grep -m1 '"peerID"' \
| sed -E 's/.*"peerID":"([^"]+)".*/\1/'
Set up the internal TCP load balancer:
In Google Cloud, create these resources in the same region as the Bridge Client deployment.
A zonal unmanaged instance group that contains the Bridge Client VM.
A regional HTTP health check that checks port
8081and path/ready.A regional internal TCP backend service that uses the Bridge Client instance group as its backend.
An internal forwarding rule that forwards TCP traffic on port
9001to the backend service.
Configure firewall rules to allow:
TCP
9001from the PSC NAT subnet CIDR.TCP
8081from Google Cloud load balancer health check ranges:35.191.0.0/16and130.211.0.0/22. For more information, go to Firewall rules in Google Cloud Documentation.
Create a PSC NAT subnet:
Create a dedicated subnet in the producer VPC with purpose
PRIVATE_SERVICE_CONNECT.The PSC NAT subnet...
Must be in the same VPC and region as the service attachment.
Must be dedicated to Private Service Connect.
Must not overlap any existing subnet, peered range, VPN or interconnect range, or planned internal range.
Must not be reused across multiple service attachments.
Should be
/24or larger.
Create the Private Service Connect service attachment:
Create a PSC service attachment that points to the internal TCP load balancer forwarding rule.
Use the service attachment URI from the selected Google Cloud region. Example:
projects/PROJECT_ID/regions/REGION_ID/serviceAttachments/bridge-client-pscFor stricter access control, configure the service attachment to accept connections manually and add the Alteryx-provided consumer project, VPC network, or endpoint to the consumer accept list.
Nota
Google Cloud supports automatic acceptance or explicit acceptance for selected consumers. Alteryx recommends explicit acceptance when your organization requires approval of each consumer connection.
Leave PROXY protocol disabled unless Alteryx explicitly instructs you to enable it for Bridge Client.
After the service attachment is created, record the service attachment URI.
Go back to Alteryx One > Account Admin > Data Bridges and select Next once the PSC service attachment is ready. Then enter:
The PSC service attachment URI
The Bridge Client peer ID recorded from the Bridge Client logs.
Select Create Data Bridge.
Now you can start adding Workspaces.
Add a Workspace
Once you’ve created a Data Bridge in Admin Console, you can add one or more Workspaces to this Data Bridge. The workspace association process typically takes 13–15 minutes to complete.
In Alteryx One > Account Admin > Data Bridges, select Add Workspace.
A window Add Workspace opens.
Select a Workspace from the dropdown. Only workspaces with Workspace Execution enabled are shown. Then select Next.
Copy the Alteryx-provided GCP consumer identifier. Depending on the configuration, this might be a consumer project, VPC network, or PSC endpoint identifier.
In Google Cloud, update the PSC service attachment consumer accept list or approve the pending connection request.
In Google Cloud, update the PSC service attachment consumer accept list or approve the pending connection request.
Return to Account Admin > Data Bridges, and select Confirm.
After the connection is ready, go to the 3-dot menu next to the workspace entry and select Test Connection.
If the test fails, the setup might not be complete and the remaining steps won’t work.
After the connection test succeeds, you can create a new data source network mapping.
Creazione di una nuova mappatura di rete per un'origine dati
Per consentire al data bridge di instradare il traffico verso una specifica origine dati privata, devi creare una mappatura di rete. In genere questa operazione richiede 10-20 secondi.
In Alteryx One > Console di amministrazione > Data Bridges, seleziona Nuova mappatura di rete.
Viene visualizzata la finestra Nuova mappatura di rete. Inserisci:
Nome
Descrizione
Host: è il nome host o l'indirizzo IP della connessione all'origine dati, esattamente come indicato in Connection Manager o Designer.
Porta: è il numero di porta configurato per l'origine dati.
A questo punto, seleziona Crea.
Expand the Network mapping row and confirm that the workspace you added earlier is associated with the network mapping.
If the workspace isn’t associated, select the 3-dot menu next to the network mapping, then select Manage Workspaces to associate the workspace.
After the workspace is associated with the network mapping, expand the network mapping, select the 3-dot menu next to the workspace, then select Test Connection.
Nota
Note: Test Connection verifies that the data source is reachable from Bridge Client and that the data plane can connect to Bridge Client for the network mapping.
Risoluzione dei problemi e domande frequenti
Data Bridge Doesn't Appear under Download & Activate
Symptom: You can create or manage Data Bridges in Account Admin, but the Data Bridge tab isn’t available under Download & Activate, so you can’t download the Bridge Client binary.
To resolve the issue:
Confirm that the Data Bridge and Download All On Prem Installers capabilities are enabled for the account.
Confirm that the user who downloads the Bridge Client has the required download access. Assigning the user the Workspace Admin role for the currently selected workspace grants the Download All On Prem Installers capability.
Allow a few minutes for the permission changes to take effect, then refresh Alteryx One or sign out and sign back in.
Return to Download & Activate > Data Bridge, then download the Bridge Client.
If the Data Bridge tab is still unavailable, contact Alteryx Support.
Problemi comuni di installazione e configurazione
Errori di connettività o del DNS
Se riscontri problemi di connettività, consulta le sezione dedicata alla risoluzione dei problemi comuni con il DNS.
Sintomo: il client bridge non riesce a connettersi ad Alteryx Cloud o all'origini dati del cliente.
Probabile causa: errore di configurazione della connettività al VPC o impostazioni DNS non corrette.
Passaggi successivi: verifica le impostazioni DNS del VPC, la configurazione degli endpoint PrivateLink e le regole del firewall.
Private Endpoint Creation Fails
If Alteryx can't establish a connection to your VPC, check the service configuration for your cloud provider.
AWS: Verify that the endpoint service name is correct and that its allowed IAM principals and supported AWS Regions are configured correctly.
GCP: Verify that the service attachment URI is correct and that the accepted projects list is configured correctly.
Numero massimo di connessioni
Come misura di protezione dagli attacchi DDoS (Distributed Denial-of-Service), il client bridge consente al massimo 256 connessioni simultanee in entrata per ogni origine dati. Se hai l'esigenza di innalzare questo limite, contatta il Supporto Alteryx.
Network Mapping and Connection Errors
When you run a workflow that uses a Data Bridge connection, you might encounter connection errors if the hostname or port defined in the workflow doesn't match the hostname or port configured in the Data Bridge network mapping.
Error messages vary depending on the connector or driver being used. Look for references to host, hostname, or port in the error details. For example:
1|3|Internal Error SQLDriverConnect: [Simba][MySQL] (1001) Error occurred while creating socket with message: This is usually a temporary error during hostname resolution and means that the local server did not receive a response from an authoritative server.
If you encounter this type of error, confirm with your administrator that the hostname and port used in the workflow match the values configured in the Data Bridge network mapping. In some cases, a workflow might run successfully on your local machine because it uses a valid alternative hostname that is not available through the Data Bridge configuration. Data Bridge requires a fully qualified domain name (FQDN) in the network mapping.
Metriche e supporto
Se hai bisogno di assistenza per il debug del client bridge, chiama l'endpoint /metrics.json per recuperare un report di stato in formato JSON, quindi allega tale output al ticket o al messaggio per il supporto tecnico, che in questo modo potrà esaminare il problema.
Il client bridge espone anche l'endpoint /metrics, in stile Prometheus, che può essere utilizzato per creare dashboard o analizzare autonomamente i dati.
Upgrade e compatibilità
Compatibilità
Data Bridges non è supportato in:
Implementazioni dell'elaborazione privata dei dati
Nota
Data Bridge can coexist with Private Data Storage (PDS) in the same workspace. However, PDS doesn’t use Data Bridge.
Aggiornamenti
Upgrades to the Bridge Client are typically required when new features or security updates are released.