 Select Tool
 Select Tool
User Role Requirements
User Role* | Tool/Feature Access |
|---|---|
Full User | ✓ |
Basic User | ✓ |
*Applies to Alteryx One Professional and Enterprise Edition customers on Designer versions 2025.1+.
Use Select to include, exclude, and reorder the columns of data that pass through your workflow. Excluding columns can limit the data that passes through a workflow and improve performance. You can also use the Select tool to modify the type and size of data, rename a column, add a description, and more.
Other tools that include the functionality found in the Select tool are Append Fields, Find Nearest, Join, Join Multiple, Select In-DB, and Spatial Match.
One Tool Example
This tool has a One Tool Example. Go to Sample Workflows to learn how to access this and many other examples directly in Designer.
Configure the Tool
Use the table in the Configuration window to modify the incoming data stream. Each row in the table represents a column (field) in your data. The column labeled Column in the table identifies the name of each column in the data and auto-sizes to fit column names without cutting off any text (up to 40 characters).
Search Columns
Before you start updating your columns (fields), you might want to limit your list so that you can perform updates on only a subset of the columns. This is also really helpful if your dataset contains many columns.
To do this, you can use the Search box at the top of the Configuration window. Enter a keyword to search the Column, Rename, and Description columns to return matches. The search is not case-sensitive.
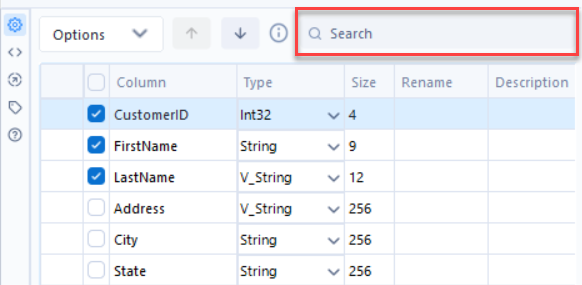
You can then perform various actions (like select, deselect, rename, etc.) on only the columns that were returned via your search. Think of the Search box as a way to filter your list of columns so that you can update only a subset of your data.
To view your entire list of columns again, use the "x" icon to clear out the Search box.
Note
After you perform a search, only a subset of your data columns (fields) display. Note that depending on what action you chose in the Options menu...
Some actions might apply to only the columns shown.
Some actions might apply to all columns, regardless of which ones are shown
Some actions might only apply to the specific columns that are selected (highlighted) in the list of columns.
Because of this, please use caution when you perform actions on a subset of columns and double-check the results to make sure they are what you expect.
Select, Deselect, Sort, and Reorder Columns
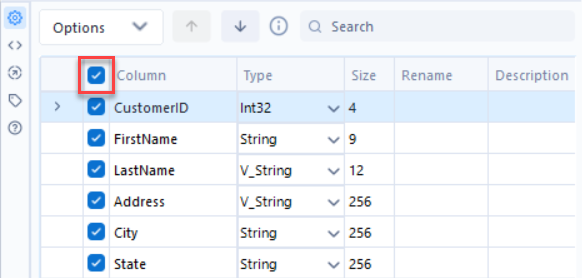
Select and Deselect Columns/Fields
To include a column in the dataset, select the checkbox to the left of the column name. Deselect the checkbox to exclude the column. You can also use the select and deselect all checkbox at the top of the table to quickly select and deselect all visible columns.
Sort Columns
To sort the columns of data based on the column name...
Click on the column name to sort in ascending order.
Click on the column name a second time to sort in descending order.
Sort Method
Depending on the language of your Designer instance, a different default sort order might be used. Consult the Language and Region User Settings to read more about the default Sort Method.
Reorder Columns
To reorder the columns of data...
Select to highlight a row, or select and drag to highlight multiple rows.
Use the Move Up or Move Down arrows, or right-click and drag, to move the rows to a new location.
The Unknown column is selected by default. It allows new columns in the data. Move the column to the location where you want a new column to be.
Modify Data Type and Size
Data Type
Use the Type dropdown to change the data type of a column in your dataset.
Data Size
To change the supported length (characters for string, date-time, time, and numeric fixed decimal types) or measurement (bytes for other numeric types) of data in a column, select Size and enter a number. Size varies by data type and you can edit it for fixed decimal numeric types, date-time and time types, and all string types.
Use the [data type]: Forced option to ensure a column always contains the expected data type. This is helpful when you create macros.
Rename a Column or Add a Description
To change the name of a column, select the Rename field and enter the new name.
To add a description, select the Description field and enter a description.
View More Options
After you select or highlight rows (columns of data) in the table, select the Options dropdown above the table to view more configuration options:
Save/Load: Save Column Configuration as a YXFT file. The Alteryx Field Type File is a text file that can be used in other workflows using the Load Column Names or Load Column Names & Types options.
Select: Select or deselect all or highlight columns. Options include Select All and Deselect All.
Change Column Type of Highlighted Columns: Change the data type of all highlighted columns at once.
Sort: Sort the column order in ascending or descending order. Options include Sort on Column Name, Sort on New Column Name, and Sort on Column Type, or Revert to Incoming Column Order. Depending on the language of your Designer instance, a different default sort order might be used. Consult the Language and Region User Settings to read more about the default Sort Method.
Move: Move highlighted columns to the top or bottom of the list.
Add Prefix to Column Names: Add a prefix to the selected or highlighted column name.
Add Suffix to Column Names: Add a suffix to the selected or highlighted column name.
Remove Prefix or Suffix: Remove the prefix or suffix from the selected or highlighted column name.
Clear All Renames: Remove the new name for all columns.
Clear Highlighted Renames: Remove the new name for all highlighted columns.
Revert All to Original Type & Size: Undo all changes to type and size in all columns and use the original values.
Revert Highlighted to Original Type & Size: Undo changes to type and size in the selected or highlighted columns and use the original values.
Forget All Missing Columns: Remove all columns that are no longer included in the data.
Forget Highlighted Missing Columns: Remove all highlighted columns that are no longer included in the data.
Deselect Duplicate Columns: Deselect the second column when duplicate column names exist. This option is only available with multiple inputs.
Use commas as decimal separators: For string and numeric data type conversions only, select this option to use commas as decimal separators instead of periods. For example:
1776,45 read as a String data type and converted to a Double outputs 1776.45 with this option selected.
1776.45 read as a Double data type and converted to a String outputs 1776,45 with this option selected.