Create HTTP Task
Note
This feature may not be available in all product editions. For more information on available features, see Compare Editions.
During the execution of your plan, you can create a task to send HTTP requests to a third-party application endpoint. For example, when a preceding task successfully executes, you can send an HTTP message to a designated endpoint with information from that task.
An HTTP task is a request between the Dataprep by Trifacta platform and another application. These requests are delivered using over HTTP and can be interpreted by the receiving application to take action.
Note
Your receiving application may require that you whitelist the host and port number or IP address of the platform. Please refer to the documentation for your application.
An HTTP task is one of the task types available in a plan. For more information, see Plan View Page.
Limitations
Custom security certificates cannot be used.
HTTP-based requests have a 30-second timeout limit.
Prerequisites
Requirements for receiving application
To send an HTTP request to a target application, the application must be configured to receive the request:
Requests from outside of the application domain must be enabled.
Note
Your receiving application may require that you whitelist the host and port number or IP address of the platform. Please refer to the documentation for your application.
You must acquire the URL of the endpoint to which to send the HTTP request.
You must acquire any HTTP headers that must be inserted with each HTTP request.
If the request must be signed, additional configuration is required. Details are below.
Create Task
Open your plan in Plan View. In your sequence of tasks. Click a Plus sign icon to create a new task.
In the right panel, select HTTP task. The HTTP task panel is displayed.
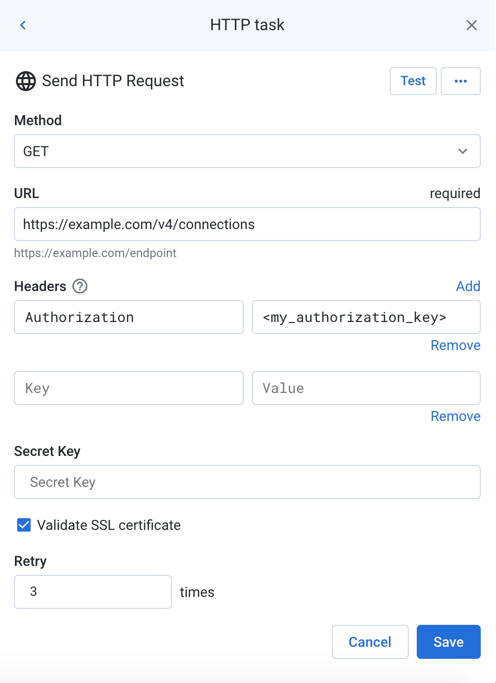
Figure: HTTP task
Configure task
Set the required parameters. For more information on parameters, see Plan View for HTTP Tasks.
You can specify plan metadata information in the header values and request body of your request. For more information, see Plan Metadata References.
To test the connection, click Test. A success message is displayed.
Tip
A status code of
200indicates that the test was successful.Tip
You can use the GET method for testing purposes. A GET request does not change any data on the target platform but may permit you to specify elements in the request body.
To add the task, click Save.
Rename Task
To rename the task, click More menu > Edit in the right panel.
Tip
Good naming may include the target platform endpoint and method, as well as the purposes of the task in your plan.
Delete Task
To delete the task, click More menu > Delete. Confirm that you wish to delete the task.
Warning
This step cannot be undone.
Plan Metadata References
Within the message of your other tasks, you can reference metadata about the plan, its tasks, and their execution. For more information, see Plan Metadata References.
Examples
Run another job
You can create a task to run another job on the successful execution of this one.
Tip
Use this method to create conditional sequences of job executions.
As needed, you can specify task overrides as part of launching a job via API. For more information, see API Task - Run Job.
You must acquire the recipe identifier for the next job to execute.
Open the flow containing the next recipe.
In Flow View, click the recipe whose outputs you wish to generate.
Review the URL for the recipe object. In the example below, the recipe Id value is
4:http://www.example.com:3005/flows/1?recipe=4&tab=recipe
Retain this value for below.
Parameter | Description |
|---|---|
Name | This name appears in the Trifacta Application only. |
Url | Specify the URL as follows, replacing the example values with your own: http://www.example.com:3005/v4/jobGroups/ |
Headers | Insert the following two headers: key: Content-Type value: application/json key: Authorization value: Bearer <paste your access token here> Note The token value must be preceded by the string: |
Body | In the body, insert the recipe Id for the value for {
"wrangledDataset": {
"id": 4
}
} |
Method | Select the |
Run the plan for which the HTTP task was created.
When the plan successfully completes, open the flow containing the other job to execute.
When you select the target recipe, a new job should be queued, in-progress, or completed.
Slack channel message
Tip
Slack tasks are now a supported product feature. For more information, see Create Slack Task.
You can create an HTTP task to deliver a text message to a Slack channel of your choice.
Set up your Slack installation to receive HTTP messages:
If needed, create a Slack channel to receive your messages.
Create an app.
Activate incoming HTTP messages for your app.
Specify the channel to receive your incoming messages.
Copy the URL for the incoming HTTP request from the cURL statement.
Parameter | Description |
|---|---|
Name | This name appears in the Trifacta Application only. |
Method | Select the |
Url | Paste the URL that you copied from Slack. |
Headers | Copy the content headers from the Slack cURL command: key: Content-Type value: application/json |
Body | {"text":"Your job has completed."} |
Click Test to validate that this task will work.
Run a job and check the Slack channel for a message.
Plan metadata examples
You can reference metadata information from the plan definition and the current plan run as part of the request of your HTTP task.
Notes:
You can only insert metadata references for tasks that have already occurred in the plan run before the HTTP task begins.
Each task in the current run is referenced using a two-letter code. Example:
{{$http_xx.name}}
A plan metadata reference is constructed using the following syntax. In the appropriate textbox, enter one of the following values:
Tip
Start by typing $, which provides access to a menu tree of metadata references for each of the metadata reference types. The final syntax is noted above.
Plans:
Metadata information from the plan definition or the current plan run:
{{$planFlows:
Metadata information for the flow tasks executed in the current plan run.
{{$flow_Flow task:
Metadata information for the outputs generated by the specific flow task.
{{$flow_7p.['My Output Name'].In this example:
flow_7pis a reference to the specific flow task.'My Output Name'is the display name for the underlying output.
The following request body contains references to the Plan name, plan run identifier, and the flow that was just executed:
{"text":"Plan: {{$plan.name}}
RunId: {{$plan.runId}}
Flow: {{$flow_7p.name}}
Success."}The following request body contains plan execution information using timestamps:
{"text":"Plan: {{$plan.name}}
RunId: {{$plan.runId}}
- plan start: {{$plan.startTime}}
Running time: {{$plan.duration}}

Times:
- last task start: {{$flow_7p.startTime}}
- last task end: {{$flow_7p.endTime}}
"}You can reference information from an HTTP task that has already occurred:
{"text":"{{$http_qg.name}} returned {{$http_qg.statusCode}}."} The following request body references information from a flow task in the plan:
{"text":"{{$flow_7p.name}} execution:
Duration: {{$flow_7p.duration}}
Status: {{$flow_7p.status}}


For more information, see jobIds: {{$flow_7p.jobIds}}
"}The following request body references information from the underlying output for the above flow task:
{"text":"Flow reference information:
Name: {{$flow_7p['2013 POS'].name}}
Favorite column: {{$flow_7p['2013 POS'].columns.Store_Nbr.name}}
Least favorite data source: {{$flow_7p['2013 POS'].sources['POS-r01.txt'].name}}
For more information, see jobIds: {{$flow_7p.jobIds}}
"}
Notes:
You can reference columns from the generated results using the
.columns.reference.Tip
If you have defined any data quality rules on the column, they are listed, too. For more information, see Data Quality Rules Reference.
You can reference information from datasources using the
.sourcesreference.
For more information, see Plan Metadata References.
Feed metadata inputs to cloud function
This example demonstrates how you can use an HTTP task to deliver plan metadata to AWS lambda functions. A similar approach could be used for Google Cloud functions.
In this case, the rowCount value from the flow task execution is delivered via HTTP task to an AWS lambda function.
General steps:
Define your plan.
Flow task: Run the flow to generate the outputs needed for your Lamda function.
HTTP task: generates an HTTP request whose body includes a reference to the rowCount metadata variable. Request body:
{
 "rowCount": "{{$flow_7p['My Flow Name'].output['My output name'].rowCount}}"
}
AWS Lambda functions: The following is pseudo-code for Lambda:
import json
def lambda_handler(event, context):
  httpTaskBody = json.loads(event["body"])
  rowCount = httpTaskBody["rowCount"]

  return {
    'statusCode': 200,
    'body': json.dumps(rowCount)
  }
Google Cloud functions: The following is pseudo-code for Google Cloud functions:
def get_row_count(request):
  request_json = request.get_json()
  if request_json and 'rowCount' in request_json:
        rowCount = request_json['rowCount']
    return rowCount
  return 'No rowCount attribute provided'
Verify Signatures
Warning
Depending on the target application, implementing signature verification may require developer skills.
Optionally, you can configure the platform to sign the HTTP requests. Signed requests guarantee that the requests are sent from the platform, instead of a third party.
Below, you can review how the signature is created, so that you can configure the receiving application to properly process the signature and its related request.
Signature Header
HTTP requests are signed by inserting the X-Webhook-Signature header in the request. These signatures are in the following form:
X-Webhook-Signature: t=<timestamp>,sha256=<signature>
where:
<timestamp>- Timestamp when the signature was sent. Value is in UNIX time.<signature>- SHA256 signature. The platform generates this signature using a hash-based message authentication code (HMAC) with SHA-256.
More information on these values is available below.
Example:
X-Webhook-Signature: t=1568818215724,sha256=55fa71b2e391cd3ccba8413fb51ad16984a38edb3cccfe81f381c4b8197ee07a
Check Application Tools
Depending on the application, you may need to complete one of the following sets of tasks to verify the task signatures:
Note
You may need to whitelist the platform in your application. See the application's documentation for details.
You may be required to create some custom coding for your application. Below, you can review details on how to do so, including a JavaScript example.
Process Signed Requests
The timestamp value (t=<timestamp>) appears at the beginning of the header value to prevent replay attacks, where an attacker could intercept a valid payload and its signature and re-transmit them.
To avoid such attacks, a timestamp is included in the signature header and is also embedded as part of the signed payload.
Since the timestamp is part of the signed payload, an attacker cannot change the timestamp value without invalidating the signature.
If the signature is valid but the timestamp is too old, you can then choose to reject the request.
For example, if you receive a request with a timestamp that corresponds to a date from one hour ago, you should probably reject the request.
For more information on replay attacks, see https://en.wikipedia.org/wiki/Replay_attack.
The task signature includes as part of its hashed value:
The secret key (entered above)
The timestamp value
Request data:
(POST/PUT/PATCH) - the body of the request
(GET/DELETE) - URL of the request
Split the X-Webhook-Signature header:
Split values using the , character as a separator.
Split each of the parts using the = character.
Extract the values for the timestamp and signature. From the above example:
timestamp:
1568818215724signature:
55fa71b2e391cd3ccba8413fb51ad16984a38edb3cccfe81f381c4b8197ee07a
In the receiving application, you can recompute the signature to verify that the request was sent from the platform.
Concatenate the timestamp, the dot character . and the request body (POST/PUT/PATCH methods) or the url (GET/DELETE methods).
Suppose the above example is the signature for a
POSTrequest, and the request body istest. The concatenated value is the following:1568818215724.test
You can now compute the HMAC authentication code in your receiving application. In the following JavaScript example, the secret key value is
mySecret:const crypto = require('crypto'); const message = '1568818215724.test'; // as defined above const hmac = crypto.createHmac('sha256', 'mySecret'); hmac.update(message) const expectedSignature = hmac.digest('hex');
The value returned by your code and the value included as the signature in the X-Webhook-Signature header should be compared:
If the values do not match, reject the request.
If the values do match, compute the difference between the current timestamp and the timestamp in the header. If the difference is outside of your permitted limit, reject the request.
Otherwise, process the request normally in your application.