Important
If you’re running a version of Server listed in the table below, the process in this guide is not required and the Server Host Recovery Guide can be followed for disaster recovery if a copy of your host’s RuntimeSettings.xml and MongoDB are available.
Alteryx Server Versions to use Server Host Recovery Guide |
|---|
2021.4.2.47792 (Patch 4) or earlier versions or patches |
2022.1.1.42590 (Patches 1 and 2) |
Due to recent changes in encryption methods (TGAL-6764), users must now proactively prepare for a disaster recovery scenario where the original Alteryx Server Controller node is no longer available. This guide will walk you through the procedure to prepare the RuntimeSettings.xml file on a backup controller node to be used for disaster recovery.
Note
This guide does not cover creating a backup of the Persistence layer required for disaster recovery. For more information about:
Server backup and recovery for embedded MongoDB, see the Server Backup & Restore Best Practices: Part 1 and Part 2. For user-managed MongoDB or SQL Server instances, please contact your MongoDB or SQL Server administrator.
Other critical files, see Critical Server Files and Settings to Backup.
Note
This guide does not cover creating a backup of the Persistence layer required for disaster recovery. For more information on Server backup and recovery for embedded MongoDB, please see the Server Backup & Restore Best Practices: Part 1 and Part 2. For user-managed MongoDB instances, please contact your MongoDB administrator.
Important
Throughout this document, 2 hosts will be referenced:
Original: The current host running Alteryx Server.
Target: The backup host to be used for disaster recovery. This host does not require an Alteryx Server license to be used as a backup host.
Prerequisites
Administrator access to original and target hosts.
Original host must be operational and Alteryx Service must be running.
Original Host | Compatible Target Hosts |
|---|---|
2021.4.2.47792 (Patch 5) or newer patch | 2021.4.2.47884 (Patch 11) or newer patch of 2021.4 version |
2022.1.1.42590 (Patch 3) or newer patch | 2022.1.1.42691 (Patch 9) or newer patch of 2022.1 version |
2022.3.1.430 (Server GA) or newer patch | 2022.3.1.553 (Patch 6) or newer patch of 2022.3 version |
2023.1.1.123 (Server GA) or newer patch | 2023.1.1.247 (Patch 2) or newer patch of 2023.1 version |
All newer and future versions of Alteryx Server | Any GA or patch release as long as the original host and target host are on the same version and patch. |
# | Step | Details |
|---|---|---|
1.1 | Can you upgrade or install the latest version and patch of Alteryx Server on your original and target hosts? | YES: Upgrade or install the latest version and patch of Alteryx Server on your original and target hosts. Configure your original host as normal. Go to step 2.1. Note You do not need to configure Alteryx Server post installation on your target host as this process does not require it to be licensed. |
NO: Continue to step 1.2. | ||
1.2 | Can you upgrade your original and target hosts to the latest patch for that version? | YES: Patch your original host with the newest patch for its major version and install the latest matching version and patch on your target host. For example, if you’re on 2022.3 Patch 3, install the newest patch that’s available for 2022.3. Go to step 2.1. Note You do not need to configure Alteryx Server post installation as this process does not require it to be licensed. |
NO: Continue to step 1.3. | ||
1.3 | Is the version of Alteryx Server on your original host listed in the Compatible Target Hosts list in the Prerequisites section? | YES: Install or upgrade the target host to the exact same major and patch version that exists on the original host. Use the full install file opposed to the patch install. If needed, please contact fulfillment@alteryx.com to request the needed install file. Go to step 2.1. Note You do not need to configure Alteryx Server post installation as this process does not require it to be licensed. |
NO: Continue to step 1.4 | ||
1.4 | Install the newest patch version of Alteryx Server on target host. | Install or upgrade the target host to the newest patch available for the major version the original host is on (for example, if original host is on 2022.3 Patch 3, install the newest patch of 2022.3 on the target host). Go to step 2.1. Note You do not need to configure Alteryx Server post installation as this process does not require it to be licensed. |
# | Step | Details |
|---|---|---|
2.1 | Find Controller Token length on the original host. | In Alteryx System Settings > Controller > General, select View. Record the length of the Controller Token. Note In some versions, the Controller Token is partially obscured. Double-click on the Token to highlight it in its entirety, then copy/paste into a text document to determine its length. |
2.2 | Is your Controller Token 40 characters long? | YES: Go to Alteryx System Settings > Controller > General > select Regenerate. |
NO: Go to step 2.5. | ||
2.3 | Restart AlteryxService. | Browse through the rest of Alteryx System Settings and select Finish. This will restart the AlteryxService. |
2.4 | Reconnect additional nodes (if applicable). | If you have a multi-node setup, use the newly regenerated Controller Token to reconnect all your nodes to your Controller node. |
2.5 | Save and copy Controller Token from the original host. | For Controller Token, go to Alteryx System Settings > Controller > General > Token > View. Copy and save the Controller Token to a text document. Then copy the text document to a location of your choice on your target host. Note In some versions, the Controller Token is partially obscured. Double-click on the Token to highlight it in its entirety, then copy/paste into a text document. |
2.6 | Copy RuntimeSettings.xml from the original host. | Copy the RuntimeSettings.xml file from %ProgramData%\Alteryx on your original host to a location of your choice on your target host. Important Do not copy the file to %ProgramData%\Alteryx on the target host and do not modify the file. |
# | Step | Details |
|---|---|---|
3.1 | Open Command Prompt to bin folder on the target host. | Open a Command Prompt as an Administrator and navigate to the Alteryx\bin install folder. The commands in this section all need to be run from this folder. Note If you’re unsure of the location of this folder, check the properties of the ‘Alteryx System Settings’ shortcut, as the file it points to is in the desired folder. Default location: C:\Program Files\Alteryx\bin. |
3.2 | Stop AlteryxService. | Enter the command:
If the AlteryxService was running, on success you should see "The AlteryxService service was stopped successfully." If the AlteryxService was stopped, you should see “The AlteryxService service is not started.” Leave this window open. |
3.3 | Backup existing RuntimeSettings.xml on the target host. | Rename the target host %ProgramData%\Alteryx\RuntimeSettings.xml to RuntimeSettings_BACKUP.xml as a backup. If RuntimeSettings.xml doesn’t exist, go to step 3.4. |
3.4 | Restore RuntimeSettings.xml. | Copy/paste the RuntimeSettings.xml file copied from your original host in step 2.6 to %ProgramData%\Alteryx on your target host. Note Make sure to copy file. Do not move/cut it as the file will be needed in its original state throughout this guide. |
3.5 | Clear Controller Token. | Edit %ProgramData%\Alteryx\RuntimeSettings.xml on your target host. Delete everything between the <ServerSecretEncrypted> tags, leaving just the tags as shown below:  |
3.6 | Save RuntimeSettings.xml. | Save RuntimeSettings.xml on your target host. |
3.7 | Restore Controller Token. | Back in the Command Prompt opened in step 3.1, enter the following command using the Controller Token from your original host gathered in step 2.5:
Troubleshooting: Version 2021.3+ can error on this step with: "Set server secret failed: Error in CryptImportKey(3): Bad Data. (-2146893819)". To correct this, see steps 3.5 - 3.6 to ensure you removed the value from between the tags. |
3.8 | Clear Storage Keys. | Edit %ProgramData%\Alteryx\RuntimeSettings.xml located on your target host again. Delete everything between the <StorageKeysEncrypted> tags, leaving just the tags as shown below: 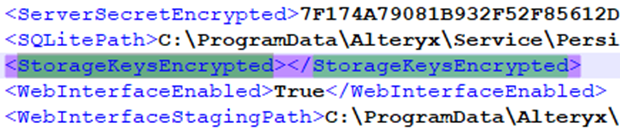 |
3.9 | Restore Storage Keys. | Copy the <StorageKeysEncrypted> value from the RuntimeSettings.xml from step 2.6 and paste it between the <StorageKeysEncrypted> tags in RuntimeSettings.xml on your target host. The length of this value varies by version. See examples below: 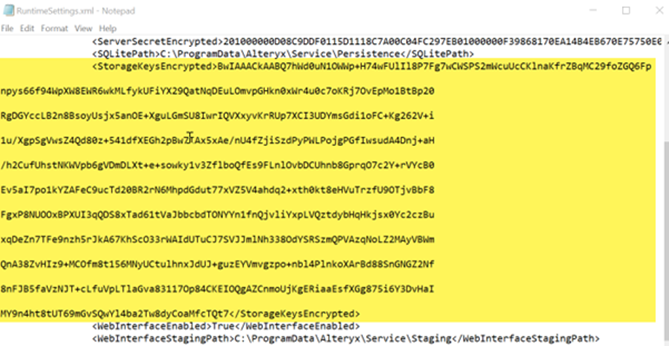 |
3.10 | Save RuntimeSettings.xml. | Save RuntimeSettings.xml on your target host. |
3.11 | Restore Run As User. | If you had a Run As User on the original Server, enter the following command, otherwise skip this step:
|
3.12 | Restore SMTP Password. | If you had filled in Alteryx System Settings > Server UI > SMTP > Password (even if the SMTP checkbox was unchecked), enter the following command, otherwise skip this step:
|
3.13 | Restore Encryption Key. | Important This requires the AlteryxService to be running on your original Server Controller node and your new Server will need to be able to access it over the network. The steps in Encryption Key Transfer Process will allow you to transfer the encryption key from your original host to your target host. Note that the last step in Encryption Key Transfer Process requires you to restart the Service which is not possible in some cases where the target host is not licensed. |
Done! The RuntimeSettings.xml file on the target host can now be used in a disaster recovery scenario where the original host is no longer available. Keep in mind that RuntimeSettings.xml that was prepared in step 3 will only work on your target host using a MongoDB that was used on your original host.
After this process, as you upgrade your original host to newer versions of Server, you will also need to upgrade your target host to the same version and patch to ensure the best results in a disaster recovery scenario.
If you change the controller token on your original host, you will need to re-do steps 2 and onward to ensure the target host and original host controller tokens match.