Alteryx Server supports a majority of identity provider (IdP) connections that adhere to the SAML 2.0 Standard and allows for single sign on to the Alteryx Server. This article covers the configuration and setup for both Microsoft Entra ID and Alteryx Server.
Alteryx Server (version 2022.3 or later)
Alteryx Server access with permissions to configure Alteryx System Settings
SSL Enabled for Server URL (HTTPS)
Microsoft Entra ID portal
Access (typically Admin) to create and edit enterprise applications within Microsoft Entra ID.
Go to Microsoft Entra ID portal and select Microsoft Entra ID > Enterprise Applications. Then select + New Application and then select + Create your own application.
Under Create your own application, choose a name for the application (we recommend AlteryxServer). Then select Integrate any other application you don’t find in the gallery (Non-gallery) and select Create.
This will open a page with your new application that will be used for the SAML configuration. Under Getting Started, select Set up single sign on, then select SAML. This will bring up the configuration page for the SAML information. The fields that are required and instructions on how to set them up are listed below.
Select Edit.
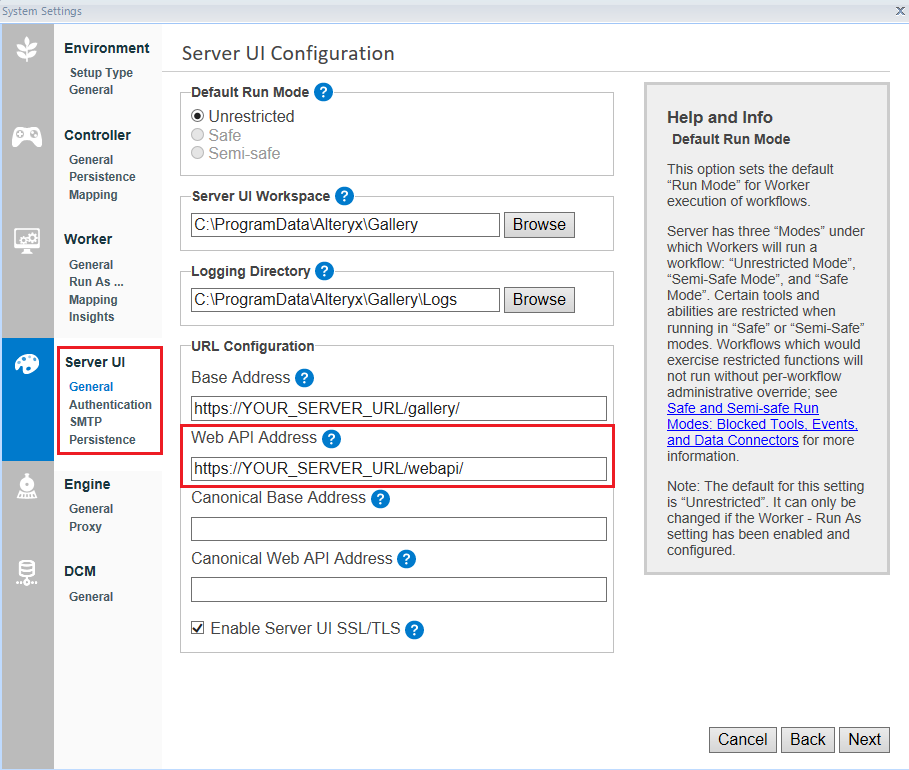
To get information needed for the SAML configuration, go to Alteryx System Settings > Server UI > General > URL Configuration.
Identifier (Entity ID): You will get the URL for the Identifier (Entity ID) in the Web API Address field under the URL Configuration in System Settings. Insert the WebAPI URL and add /Saml2 at the end: [WEBAPIURL]/Saml2. See step 1 in Alteryx System Settings Configuration.
Reply URL (Assertion Consumer Service URL): You will get the URL for the Reply URL in the Web API Address field under the URL Configuration in System Settings. Insert the WebAPI URL and add /Saml2/acs at the end: [WEBAPIURL]/Saml2/acs. See step 1 in Alteryx System Settings Configuration.
Close the Basic SAML Configuration box.
Note
These fields will accept only HTTPS URL.
To update Attributes & Claims, select Edit.
Required claim: Select the claim you want to edit. The required claim is there by default.
Unique User Identifier(Name ID) = Email address
Name identifier format = Email address
Source = Attribute
Source attribute = user.userprincipalname
Note
We recommend using user.userprincipalname, but you might choose a different attribute that is unique and works best for your organization.
Additional claims: To add additional claims, select + Add new claim.
Email Address
Name = emailaddress
Note
We also support the following claims: email, user.email, mail, emailaddress, and http://schedmas.xmlsoap.org//ws/2005/05/identityclaims/emailaddress.
Namespace= http://schemas.xmlsoap.org/ws/2005/05/identity/claims
Source= Attribute
Source attribute= user.mail
First Name
Name = givenname
Note
We also support the following claims: firstName, User.Firstname, givenName, and http://schedmas.xmlsoap.org//ws/2005/05/identityclaims/givenname.
Namespace= http://schemas.xmlsoap.org/ws/2005/05/identity/claims
Source= Attribute
Source attribute= user.givenname
Last Name
Name = surname
Note
We also support the following claims: lastName, last_name, User.LastName, surName, sn, and http://schedmas.xmlsoap.org//ws/2005/05/identityclaims/surname.
Namespace= http://schemas.xmlsoap.org/ws/2005/05/identity/claims
Source= Attribute
Source attribute= user.surname
Note
Remove the Namespaces that auto populate for all additional claims only and make sure firstName and lastName are in camel case.
This portion will be pre-populated and you don’t need to make any further changes.
App Federation Metadata Url: You will need this URL to set up IDP Metadata URL in Alteryx System Settings.
Note
This is where you can manually download the X509 certificate.
This portion will be pre-populated and you don't need to make any further changes.
Microsoft Entra Identifier: You will need this URL to set up IDP URL in Alteryx System Settings.
Login URL: You will need this URL to set up IDP SSO URL in Alteryx System Settings if you select X509 Certificate and IDP SSO URL under Select and option for obtaining metadata required by the IDP.
In Alteryx System Settings, go to Server UI > General . The Web API Address here is what you will enter into the Basic SAML Configuration section in the Microsoft Entra ID SSO page. Select Enable Server UI SSL/TLS to make sure SSL is enabled. You must have a certificate installed on the Server; for more information go to Configuring Alteryx Server for SSL: Obtaining and Installing Certificates.
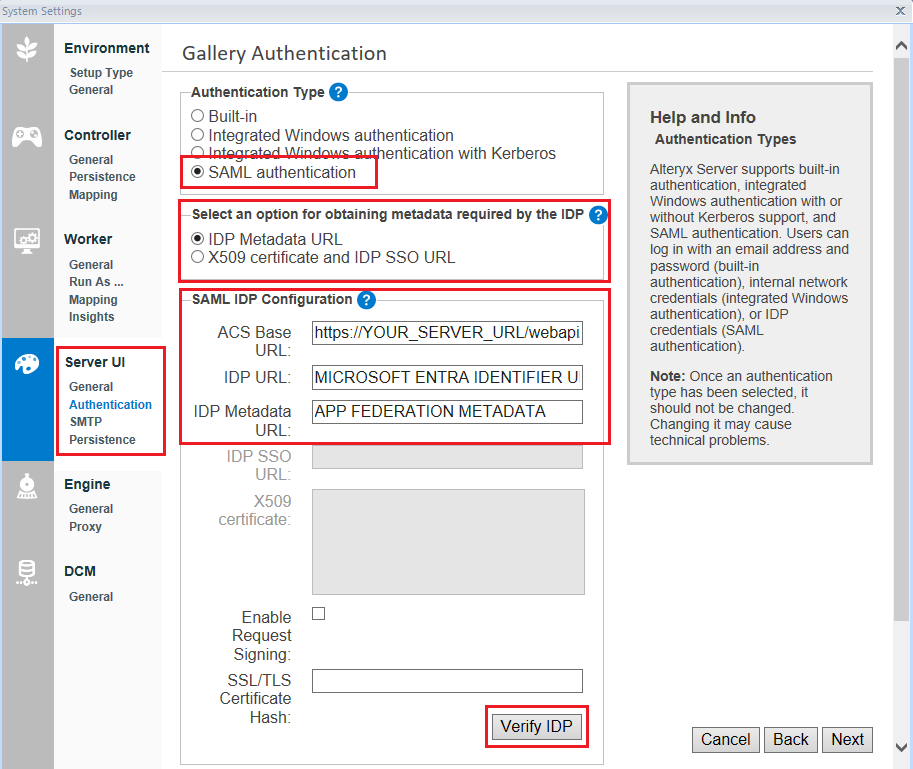
Go to Alteryx System Settings > Server UI > Authentication. Select SAML authentication as the Authentication Type.
There are 2 options how to configure SAML in Server. In Select an option for obtaining metadata required by the IDP, select 1 from these options: IDP Metadata URL or X509 certificate and IDP SSO URL.
If you selected IDP Metadata URL, enter these 3 URLs:
ACS Base URL: This field will auto-populate and will be configured with HTTPS.
IDP URL: This is the Microsoft Entra Identifier URL from the Microsoft Entra ID SSO page.
IDP Metadata URL: This is the App Federation Metadata URL from the Microsoft Entra ID SSO page.
If you selected X509 certificate and IDP SSO URL, enter the following information:
ACS Base URL: This field will auto-populate and will be configured with HTTPS.
IDP URL: This is the Microsoft Entra Identifier URL from the Microsoft Entra ID SSO page.
IDP SSO URL:This is the Login URL from the Microsoft Entra ID SSO page.
X509 certificate:To obtain the X509 certificate, go to the SAML Certificates section on the Microsoft Entra ID SSO page.
Select Download for Federation Metadata XML.
Open the downloaded XML file.
In the XML file, search for "X509Certificate".
Copy the whole X509 certificate. The X509 certificate is the text in-between <X509certicicate> and </X509certicicate> in the XML file (without the XML tags).
Paste the certificate to the X509 certificate field in Alteryx System Settings.
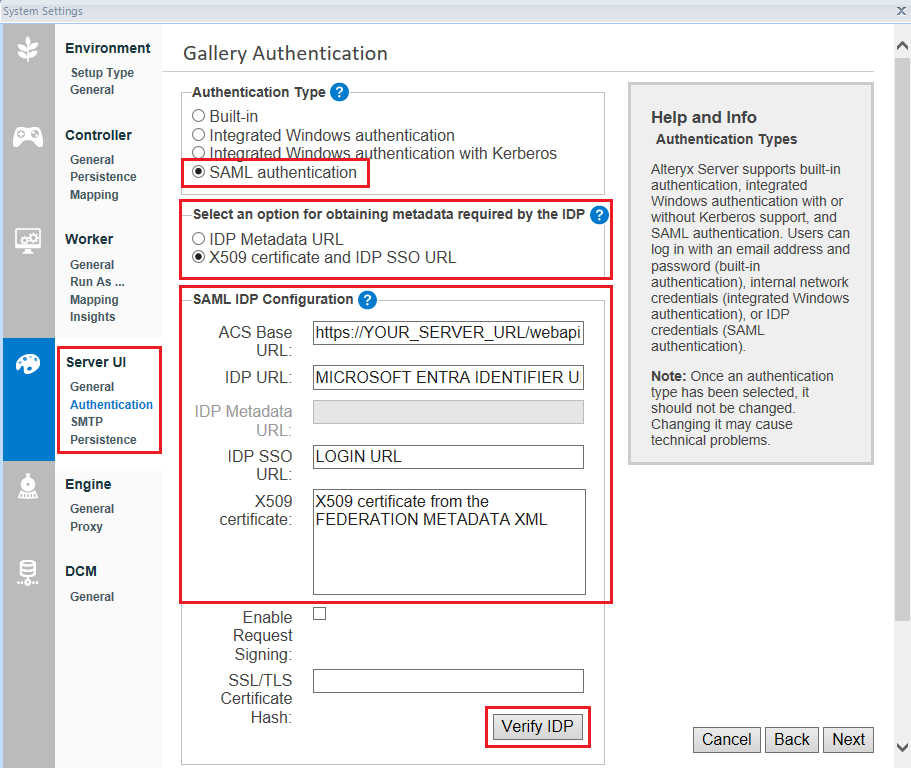
Once you have entered these URLs, select Verify IDP to test the connection.
Note
You can also test the connection from the Microsoft Entra ID portal. To do this, go to the Test single sign-on section at the bottom of the SAML-based Sign-on page and select Test, then select Test sign in. To test the connection from the Microsoft Entra ID portal, Server must be running.
Enter your Microsoft Credentials and sign in. If the sign in is successful, you will receive a success message in System Settings. To successfully verify the IDP, the Microsoft Credentials you use must have access to the non-gallery application you just created.
To save the configuration, select Next through the rest of the settings.
Once everything is saved, navigate to Server UI in a browser and select Log In where you will be prompted with a Microsoft Entra ID sign-in page.