我们提供了多种实用程序,可以通过 MongoDB 的嵌入式版本从 Alteryx Server 部署中备份和还原数据。使用此备份功能从系统故障或数据损坏或丢失中恢复。您还可以使用恢复选项回滚到过去的数据。
AlteryxService 可执行文件 AlteryxService.exe 提供了多种命令行实用程序,可以用来备份和还原数据。因为数据库备份过程需要关闭 Server(禁用计划和 Server 功能几分钟),所以请在非高峰时间执行备份。
停止 AlteryxService。按顺序关闭多台计算机 - Server UI 节点、工作程序和控制器。
通过命令行找到 Alteryx Server 安装文件夹(例如,
D:\Program Files\Alteryx\bin)。运行此命令将数据库备份保存在指定的文件夹(必须为空文件夹):
alteryxservice emongodump=path_to_backup_location\Program Files\Alteryx\bin\AlteryxService.exe emongodump=c:\temp\dumpOutput重新启动 AlteryxService。以相反顺序重新启动多台计算机 - 依次重新启动控制器、工作程序和 Server UI 节点。
停止 AlteryxService。
通过命令行找到 Alteryx Server 安装文件夹(例如,
D:\Program Files\Alteryx\bin)。根据您的 Server 版本运行下表中的命令模板之一,以将数据库的备份保存在指定的文件夹中(必须是空文件夹):
Server 版本
命令
2022.3.1.10.615(补丁 10)及更高版本
2023.1.1.7.392(补丁 7)及更高版本
2023.2.1.4.173(补丁 4)及更高版本
2024.1.1.17(初始版本)及更高版本
alteryxservice emongorestore=path_to_backup_location,path_to_mongo_folder2022.3.1.9.597(补丁 9)及更低版本
2023.1.1.6.361(补丁 6)及更低版本
2023.2.1.3.133(补丁 3)及更低版本
alteryxservice emongorestore=path_to_backup_location,path_to_mongo_folder,10注意
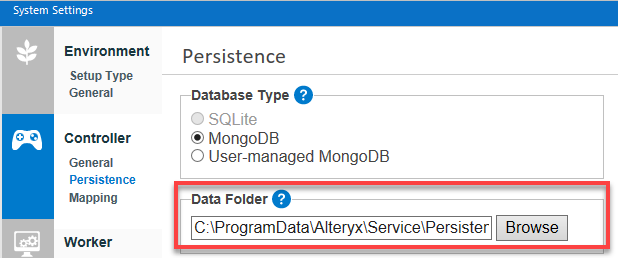
如果将 MongoDB 还原到具有不同名称的新文件夹,则必须更新 Alteryx 系统设置 > Controller > Persistence 中的 Data Folder,以允许 AlteryxService 从刚恢复的 MongoDB 文件夹启动。如需详细了解控制器配置,请转至控制器帮助页面。

确认恢复成功。
小心
这是必要步骤,因为还原失败不会在上一步中报告,并可能导致您 Server上的数据丢失。为此,请找到已恢复数据的 MongoDB 文件夹,查看 mongoRestore.log 文件。打开 mongoRestore.log 并执行以下步骤:
确认最后一行报告#### document(s) restored successfully, 0 document(s) failed(文档已成功恢复,并且所有文档均成功)恢复。
搜索error(错误)、critical(严重)、fatal(致命)和failed(失败)。如果您正在寻找failed,请确保结果与上一点中的句子不同,其中包含 0 document(s) failed(0 个失败的文档)。
如果恢复失败,或者在搜索上面列出的关键字时找到任何结果,请联系支持部门并提供您收集的所有信息。
如果 MongoDB 恢复失败,请勿继续操作。
如果恢复成功,请重新启动 AlteryxService。
打开System Settings(系统设置)。
转至 Controller > Persistence。
在Data Folder(数据文件夹)字段中,浏览至备份文件夹。
选择 Next,完成“系统设置”窗口后续步骤,然后重新启动服务。当服务启动时,它将从还原的文件夹中运行。