Historically, when you imported or opened a workflow with an existing macro, if that macro was missing from the workflow (due to a name change, moved location, incorrect packaging, etc.), the macro presented a question mark icon ( ) on the workflow canvas.
You then had to go through a painful process of manually re-adding the macro and reconfiguring the workflow to get things working correctly.
Now, you have the option to identify the correct macro locations before the workflow opens and avoid the missing macro error altogether!
When you attempt to open a workflow (YXMD, YXMC, or YXWZ file) with a missing macro, a pop-up Update Missing Macros window appears in Designer to alert you of the issue.

The Update Missing Macros window communicates that the workflow references at least 1 macro that is missing or inaccessible. The message provides details for these macros. Note that the window lists a maximum of 3 missing macros (though more might be missing).
You have 2 options:
Update: Select Update to update the file paths for the missing macros. This opens the original workflow where you can make changes. However, Designer doesn't automatically save the workflow. After you make updates, you can use File > Save As or the Ctrl+S (Save) keyboard shortcut to save a new version of the workflow or overwrite the original workflow if needed. Note that you need access to the missing macro files and be able to browse to their locations. If you received the workflow from someone who failed to include the macros, you will likely need to reach out to them and ask them to provide you with the files. If you elect not to update the file paths here, the workflow will open with the missing tool icons.
Close (don't update): Select Close. This opens the original workflow without the updated macros. The macros will have the missing tool icon (
), and if you want to fix these missing macros later, you will need to add the macros and reconfigure them manually.
To update the macros, follow these steps:
On the Update Missing Macros window, select Update.
This opens an Update Missing Macros window, similar to the Workflow Dependencies experience. Here, you can edit each missing macro's file path and update its location. Note that you can't edit non-macro dependencies via this window.
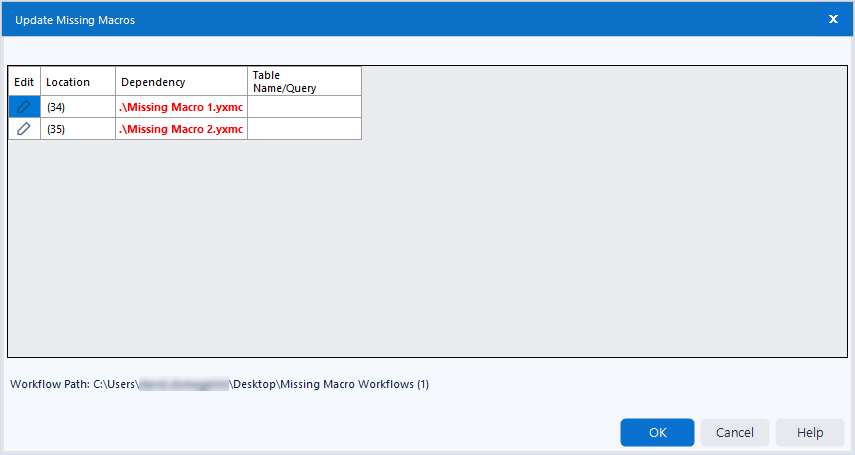
Select the edit pencil icon associated with a missing macro. This opens File Explorer where you can browse to the correct macro location. Select the macro and then Designer updates the macro path and changes the path's color to green.
Do this for any additional macros and select OK when you finish. You can also select Cancel at this point, which opens the original workflow with broken file paths (missing tool question mark icons).
If you updated macro paths and selected OK in the previous step, your workflow opens with the updated macros and no missing tool icons.
If the macro is the same and the number of input and output connections from the new macro paths matches the number in the workflow, Designer attempts to make the connections automatically. However, in some cases (for example, if you connect a different macro with the same number of inputs and outputs), Designer isn't able to make the connections. If this is the case, you need to manually review and configure them.
Important
When you use the Update Missing Macros feature, Designer updates the original workflow, however the workflow isn't automatically saved. You can use File > Save As or the Ctrl+S (Save) keyboard shortcut to save a new version of the workflow or overwrite the original workflow if needed. If you close the workflow without saving, your updates will be lost.
If you want to open the workflow and not update the macros, follow these steps:
When you attempt to open a workflow with missing macros, the Update Missing Macros window displays.
To open the workflow without updating the macro locations, select Close.
Your workflow opens, and the missing macros display the missing tool icon (
). If you want to update the missing macros, you need to add the macros and reconfigure them manually.
If you attempt to import an Alteryx Workflow Package (YXZP) with a missing macro, the process is very similar to the above. You first need to go through the import process, including the selection of a Destination Directory.
If during the import process Designer detects missing macros, a pop-up message appears to let you know that:
There was an error loading a macro: Can't find the macro '.\Example-Macro.yxmc'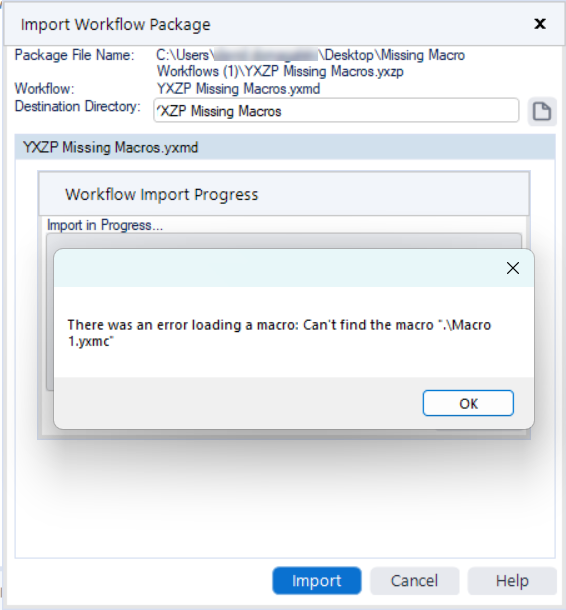
Select OK to continue and follow the prompts to finish the import process.
At this point, the Update Missing Macros window opens, and you can follow the above process to fix the macro file paths.
You can also update missing macros when the missing macro is a nested macro. When you open a workflow with a missing nested macro, the canvas and Results window display an error:
Cannot find macro "\Example-Macro.yxmc"
To resolve this, on the workflow canvas right-click on the tool icon with the error. Next, select Open Macro... from the menu. This immediately triggers the Update Missing Macros window where you can follow the above process.