Create Outputs
An output is defined as a set of files or tables, formats, and locations where results are written after a job run on the recipe has completed. To run a job from a flow, you must create an output object that defines where results are delivered after a job is successfully executed.
Every flow requires an output in order to publish results. An output object is composed of one or more publishing actions. A publishing action defines the output type, format, location, and other settings where results from a recipe are delivered.
You can create publishing actions in multiple formats and publish those to different databases and file storage formats. The following are the output types:
File-based outputs such as CSV.
Table-based outputs such as Oracle or PostgreSQL.
Create an Output
You can use either of the following methods to create an output object and its related publishing action.
From Flow View:
In Flow View, an output object extends from a recipe, indicating the results of the recipe are delivered to the output object.
Open your flow in Flow View.
In Flow View, you can:
Right-click a recipe. Select Add Output to run.
If an output already exists, select it.
The output is displayed in the Details panel on the right-side.
In the Details column under Manual Settings, click Edit.
In the Publishing Settings page, click Add Publishing Action.
Tip
For scheduled runs of your flow, you must specify Scheduled Settings to automatically generate the output when the flow is executed by a schedule. For more information on scheduling, see Overview of Scheduling.
From Run Job page:
For an existing output, you can create new destinations from the Run Job page.
In Flow View, click Run Job.
In the Run Job page, click Add Action to add a new destination.
Create a File-Based Output
You can create a file-based output by performing the following steps.
For more information on creating an output from Flow View and Run Job page, see above sections.
Steps:
In the Publishing action page, select the connection where you wish to write file from the left panel. In the following example, the
HDFSconnection has been selected: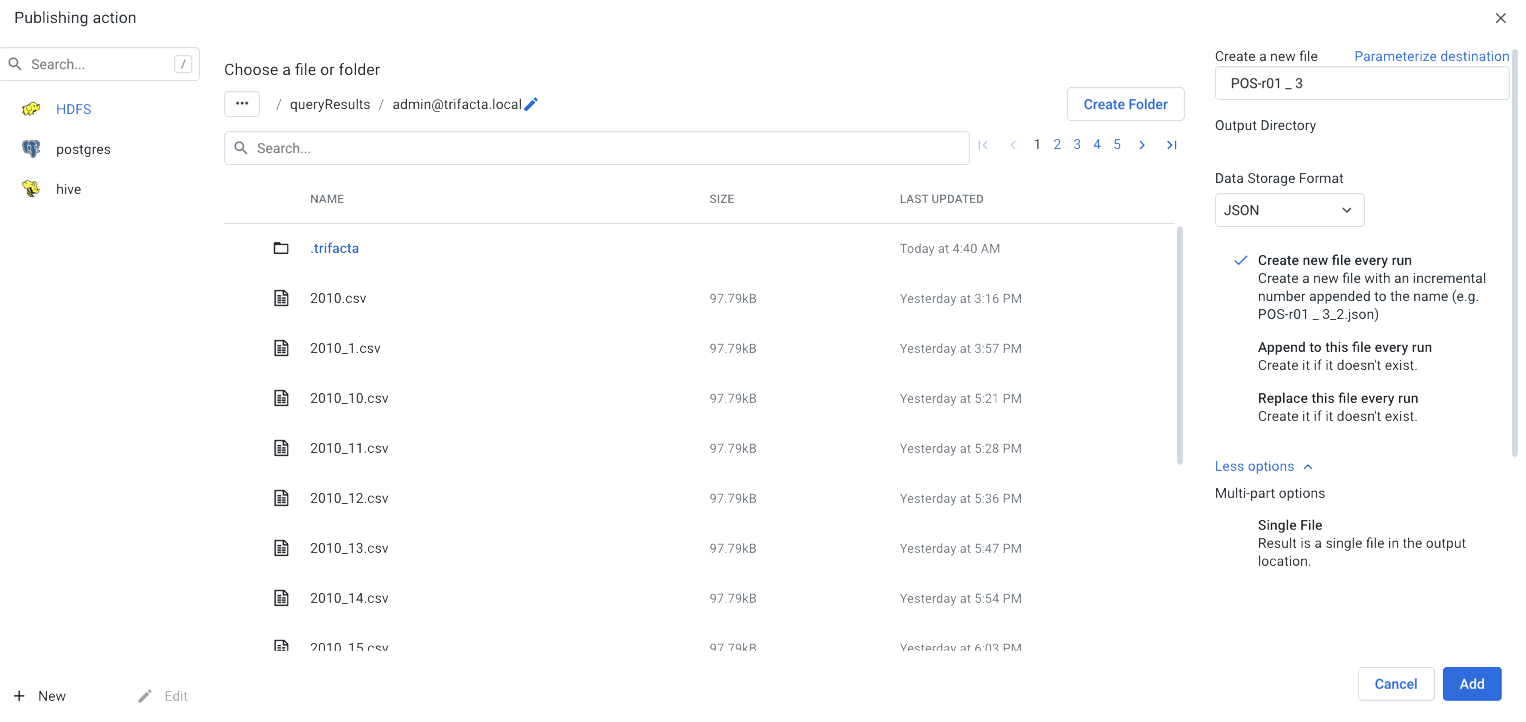
Figure: Publishing action page for file output
Select the file. You can select the existing file from the search list or click a Create a new file in the right panel.
Enter a file name in the Create a new file field.
To create output parameters, click the Parameterize destination link. See "Create an Output with Parameters" below.
From the Data Storage Format drop-down list, select the output format for the file.
The publishing actions vary based on the options selected. Select the required publishing actions below the drop-down list. For more information, see File Settings.
Update the Delimiter field, if required.
You can choose to generate the file as a Single File or as Multiple Files.
To apply compression to the file, select the compression type from the Compression drop-down list.
Click Add.
Tip
You can define SQL scripts that are executed before or after generation of your output objects. For more information, see Create Output SQL Scripts.
Create a Table-Based Output
You can create output objects for publishing to tables by performing the following steps:
For more information on creating an output from Flow View and Run Job page, see above sections.
Steps:
In the Publishing action page, select the connection to the database where you wish to store the table from the left panel. In the following example, the
postgresconnection is selected: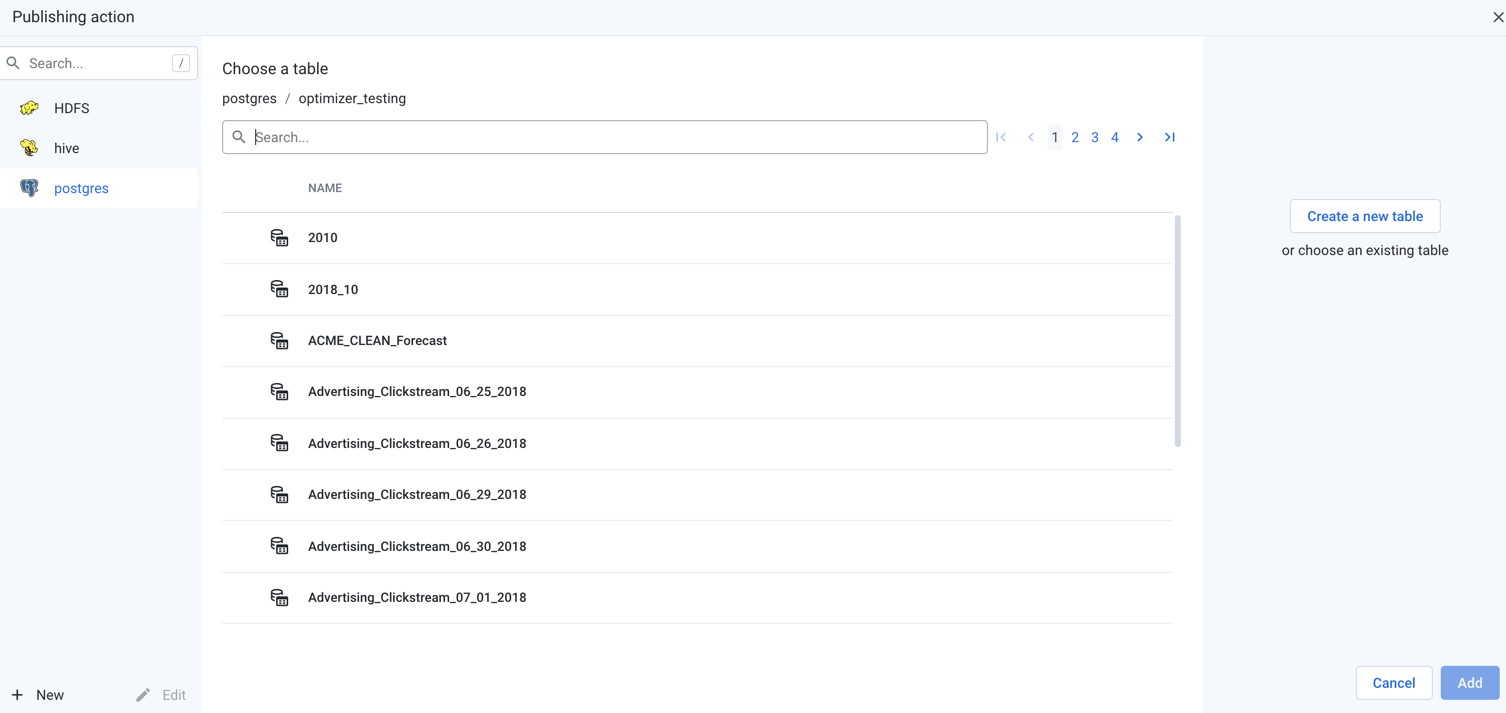
Figure: Publishing action for a table output
Search the table. You can select an existing table from the list or click Create a new table in the right panel.
Enter a table name in the Create a new table field.
To create output parameters, click the Parameterize destination link. See "Create an Output with Parameters" below.
Select the required publishing actions below the drop-down list. For more information, see Relational Table Settings.
Click Add.
Tip
You can define SQL scripts that are executed before or after generation of your output objects. For more information, see Create Output SQL Scripts.
Create an Output With Parameters
For any outputs, you can parameterize elements of the output path. You can parameterize your path with the following options.
Tip
You can define multiple parameters per output.
Timestamps: Inserts a formatted timestamp as part of the output path or filename
Variables: Inserts a value for the variable.
This variable has a default value that you assign.
Whenever you execute a job through the Run Job page, you can pass in the default value or an override value for the variable.
For more information on parameters,see Overview of Parameterization.
Parameterize path or bucket name with a variable
For file- or table-based publishing actions, you can replace the bucket name (if applicable) or elements of the output path with variable values. When you define the output, you replace an element of the output path with the variable name. At runtime, the variable name is replaced by the appropriate value.
Tip
You can use environment parameters to parameterize bucket names across your environment. For more information, see Environment Parameters Page.
In the Publishing action page, click the Parameterize destination link. The Define Parameterized destination dialog is displayed.
On the listed output path, highlight the part that you wish to parameterize. You can select part of the path or bucket name.
Then, select Add Variable.
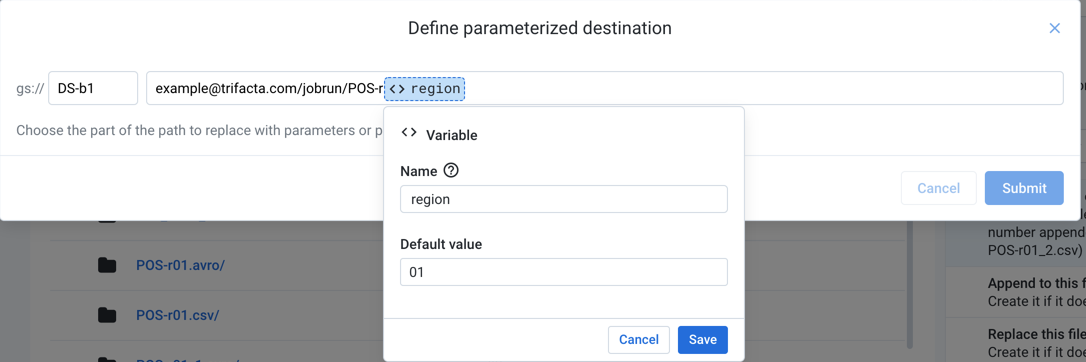
Figure: Define parameterized destination
Name: Enter a display name for the variable.
Tip
Type
env.to see the environment parameters that can be applied. These parameters are available for use by each user in the environment.Note
If multiple variables within a flow (or its dependent flows) have the same name then they are treated as the same variable.
Default value: Enter a default value for the parameter.
Click Save.
To save the parameters for the output path, click Submit.
The created parameter is displayed in the right context menu of the publishing action page.
Tip
If you created a variable parameter, you can apply override values to the variable when you are running a job. For example, you can modify a variable called baseFileName to generate an output with a different base filename for your job run.
Parameterize path with a timestamp
Timestamp parameters can be helpful when you want to create outputs based on date and time format, time zone, or exact and relative start time. For file- or table-based publishing actions, you can create outputs based on the specific region or time zone for which the data is generated. When you define the output, you can replace an element of the output path with the timestamp parameters.
Steps:
In the Publishing action page, click the Parameterize destination link. The Define Parameterized destination dialog is displayed. See example above.
On the listed output path, highlight the part that you wish to parameterize. Then, select Add Timestamp Parameter.
In the Timestamp Parameter dialog, enter the following details:
Timestamp format: Specify the format for timestamp values.
Example:
YYYY-MM-DD_hh_mm.Values can express both date and time elements. For more information on the available tokens for formatting date and time values, see Datetime Data Type.
Timestamp value: Select the value to record in the path:
Exact job start date: recorded timestamp in path is the start time of the job.
Relative to the job start date: recorded timestamp in path is relative to the start time of the job according to the settings that you specify here.
Time zone: Click Change to change the time zone recorded in the timestamp.
Example:
America/Los AngelesorAsia/Calcutta.For more information on the available time zones, see Supported Time Zone Values.
Click Save.
To save the specified parameter for the output path, click Submit.
The created parameter is displayed in the right context menu of the publishing action page.
Edit an Output
From Flow View page:
Right-click an output object. The object details are displayed in the context panel.
In the context panel, select the Manual Settings tab. Then, click Edit. The Publishing Actions page is displayed.
Make changes as needed in the Publishing Actions page. To save your changes, click Update.
From Run Job page:
In the Run Job page, hover over the publishing action to modify. Click Edit.
Delete an Output
You can delete the output object from the Flow View and from Run Job page:
Flow View page:
In the Flow View, select the output.
In the right panel, select Delete Output from the context menu.
Run Job page:
In the Run Job page, you can delete publishing actions. From the context menu for a publishing action, select Delete.