Dieser Leitfaden enthält Anweisungen zur Migration Ihrer Datenbank von Mongo zu SQL.
Laden Sie das Migrationspaket aus dem Alteryx Lizenzierungsportal herunter. Dieses Paket enthält auch eine JSON-Datei, die Sie für Teil 4 der Migrationsanleitung benötigen.
Sichern Sie Ihre MongoDB (eine Anleitung hierzu finden Sie unter Alteryx Server-Sicherung und -Wiederherstellung, Teil 2: Verfahren ).
Wichtig
Wenn Sie von MongoDB zum benutzerverwalteten MSSQL migrieren, ist ein Downgrade zu einer Version vor 2024.1 NICHT möglich, da SQL in diesen Versionen nicht unterstützt wird. Um ein Downgrade von einer benutzerverwalteten SQL-Umgebung durchführen zu können, müssen Sie zunächst zurück zur letzten Version von MongoDB wechseln, die Sie vor Ihrer Migration zu SQL verwendet haben.
Wenn Sie vor der Migration eine Sicherung Ihrer MongoDB gemacht haben, können Sie Ihre aktuelle SQL-Datenbank durch diese ersetzen. Aktualisieren Sie hierzu die Verbindungszeichenfolgen in den Alteryx Systemeinstellungen für Controller und Server-Benutzeroberfläche, sodass sie wieder auf die alte MongoDB verweisen. Weitere Details zur Sicherung finden Sie in diesem Artikel der Wissensdatenbank zur Wiederherstellung von Server-Sicherungen. Auf diese Weise kehren Sie zur MongoDB zurück, wie sie zum Zeitpunkt der Migration bestand. Sämtliche Änderungen an der Umgebung, die Sie nach der Migration zu SQL vorgenommen haben, sind in Ihrer alten MongoDB nicht vorhanden.
Sie müssen über eine gehostete MSSQL-Serverinstanz verfügen, auf die von Ihren Alteryx Server-Controllern über das Netzwerk zugegriffen werden kann.
Derzeit sind MSSQL Server 2019 und 2022 die einzigen offiziell unterstützten Versionen von SQL.
Wir empfehlen, eine separate SQL-Datenbank für den Zugriff durch AlteryxGallery/AlteryxService zu verwenden.
Benutzer:innen für den Datenbankzugriff müssen über Administratorberechtigungen verfügen, um Datenbanken zu erstellen und zu verwenden, die Alteryx Server erfordert.
Wir empfehlen, dass die SQL-DB doppelt so groß ist wie die vorhandene MongoDB. Weitere Informationen finden Sie unter Häufig gestellte Fragen von Kunden zur Server-SQL-DB.
Die Server-Version, von der Sie eine Aktualisierung auf 2024.1 durchführen, muss 2022.1 oder höher sein.
Wenn Sie eine Server-Version vor 2022.1 verwenden, empfehlen wir ein Upgrade auf 2022.1, 2022.3, 2023.1 oder 2023.2 und anschließend ein Upgrade auf 2024.1.
Wenn Sie die integrierte Authentifizierung verwenden und eine Aktualisierung bei einer älteren Version als 2022.1 durchführen, müssen Sie Ihr Kennwort aufgrund der verbesserten Sicherheit zurücksetzen. Wenn Sie Ihr Kennwort in Version 2022.1 nicht zurückgesetzt haben, müssen Sie SMTP aktivieren. Dadurch können Benutzer ihr Kennwort über die Funktion „Kennwort vergessen“ zurücksetzen oder ein Administrator kann das Zurücksetzen von Kennwörtern für alle Benutzer über die Benutzeroberfläche oder API auslösen. Weitere Informationen zum Zurücksetzen Ihres Server-Kennworts nach der Aktualisierung auf 2022.1 finden Sie auf der Hilfeseite Benutzer-Kennwort für Server zurücksetzen.
Installieren Sie SQL Server-Treiber.
Weitere Informationen finden Sie auf der Microsoft-Supportseite.
Installieren Sie den Simba MongoDB ODBC-Treiber.
Gehen Sie zum Alteryx Lizenzierungsportal.
Wählen Sie Herunterladen neben Treiber aus.
Wählen Sie MongoDB aus.
Wählen Sie Weiter > Herunterladen neben Simba MongoDB 2.3.22.1024 64-Bit aus.
Führen Sie nach Abschluss des Downloads die Installation aus.
Optional: Zugriff auf SQL Server Management Studio. Auf diese Weise können Sie Datenbankdaten manuell anzeigen/darauf zugreifen, sodass Sie den Status Ihrer Daten überprüfen und validieren können, ohne auf Ihren Server zugreifen zu müssen.
Bevor Sie beginnen
In dieser Anleitung sehen Sie Instanzen, in denen Sie Ihre AlteryxGallery- und die AlteryxService-Datenbanknamen eingeben müssen. Sie werden als „AlteryxGallery“ und „AlteryxService“ angezeigt. Sie können anstelle von „AlteryxGallery“ und „AlteryxService“ Ihre eigenen Datenbanknamen eingeben. AlteryxGallery bezieht sich auf die Server-Benutzeroberflächen-Datenbank und AlteryxService auf die Controller-Datenbank.
Der Alteryx Server Migrator erstellt automatisch die für Alteryx Server erforderlichen Datenbanken und Tabellen in Ihrer SQL Server-Instanz. Um eine nahtlose Einrichtung und eine ordnungsgemäße DB-Initialisierung zu gewährleisten, empfehlen wir dringend, diese Funktion zu verwenden, statt die Datenbanken und Tabellen manuell zu erstellen.
Laden Sie den Alteryx Server Build 2024.1 oder höher im Alteryx Lizenzierungsportal herunter.
Fahren Sie mit dem Upgrade auf 2024.1 fort, wie Sie es normalerweise ohne Persistenzänderungen tun würden.
Versuchen Sie dabei nicht, eine Verbindung zu einer SQL-Datenbank herzustellen oder den MongoDB-zu-MSSQL-Migrator-Workflow auszuführen. Diese Schritte folgen an späterer Stelle.
Führen Sie das Installationsprogramm aus, um die Installation abzuschließen.
Wenn Sie dazu aufgefordert werden, geben Sie den Lizenzschlüssel für den neuen Build ein. Wenn die Lizenzabfrage nicht sofort geladen wird, können Sie in Designer unter Optionen > Lizenzen verwalten > Neue Lizenz aktivieren darauf zugreifen.
Konfigurieren Sie die Alteryx Systemeinstellungen wie üblich – NICHT mit SQL Server – und wählen Sie Fertig stellen aus.
Starten Sie AlteryxService, um die erforderliche MongoDB-Schema-Migration auf die neue Version abzuschließen. Bestätigen Sie dann, dass AlteryxService wie erwartet ausgeführt wird.
Erstellen Sie die erforderlichen Datenbanken und Tabellen in Ihrer SQL Server-Instanz. Öffnen Sie dazu eine Windows PowerShell-Eingabeaufforderung als Administrator und führen Sie Folgendes aus. Notieren Sie die SQL-DB-Verbindungszeichenfolgen zur zukünftigen Verwendung. Ersetzen Sie den [fettgedruckten roten Text] durch Ihre eigenen Verbindungszeichenfolgenwerte aus Ihren SQL-Instanzdetails (Klammern sind für diese Teile der Zeichenfolge nicht erforderlich).
Informationen zum Formatieren dieser Verbindungszeichenfolgen finden Sie unter Erweiterte SQL-DB-Verbindungszeichenfolgen. Die Verbindungszeichenfolge für den Controller unterscheidet sich von der Verbindungszeichenfolge für die Server-Benutzeroberfläche.
If you’re using SQL Server authentication, run the following command:
. "C:\Program Files\Alteryx\bin\AlteryxServerMigrator.exe" --logfolder "C:\ProgramData\Alteryx\Service" --serversqldbconnectionstring "[Insert Server UI Connection String]" --servicesqldbconnectionstring "[Insert Controller Connection String]"
Stoppen Sie im Taskmanager die Ausführung von AlteryxService auf allen Knoten in Ihrer Umgebung, einschließlich Controller-, Server-Benutzeroberflächen- und Worker-Knoten.
Stellen Sie sicher, dass MongoDB ausgeführt wird.
a. Wenn Sie von einer benutzerverwalteten MongoDB zu SQL migrieren, überspringen Sie Schritt 2b und fahren Sie mit Teil 4 fort.
b. Wenn Sie von einer eingebetteten MongoDB zu SQL migrieren, führen Sie die folgenden zusätzlichen Schritte aus, um die eingebettete MongoDB-Instanz manuell zu starten, ohne dass AlteryxService ausgeführt wird:
Öffnen Sie Windows PowerShell als Administrator.
Führen Sie das folgende Skript aus und ersetzen Sie (C:\Programme\Alteryx\bin\) durch Ihren Installationsort und (C:\ProgramData\Alteryx\Service\Persistence\MongoDB) durch Ihren MongoDB-Persistenzspeicherort.
. "C:\Programme\Alteryx\bin\mongod.exe" -dbpath "C:/ProgramData/Alteryx/Service/Persistence/MongoDB" -port 27018 --auth --bind_ip_all
Wichtig
Wenn Sie eine eingebettete MongoDB verwenden, hosten Sie Ihre AlteryxService- und AlteryxGallery-Datenbanken auf separaten Servern oder verwenden Sie andere Anmeldedaten. Führen Sie dann die folgenden Schritte (1–13) für beide Datenbanken aus.
Um die Suche nach ODBC-Datenquellen (64 Bit) zu starten, tippen Sie auf das Windows-Symbol oder drücken Sie die Windows-Taste.
Öffnen Sie den ODBC-Datenquellen-Administrator.
Wählen Sie die Registerkarte System-DSN und dann Hinzufügen... aus.
Wählen Sie im Fenster Neue Datenquelle erstellen den ODBC-Treiber und dann Fertig stellen aus.
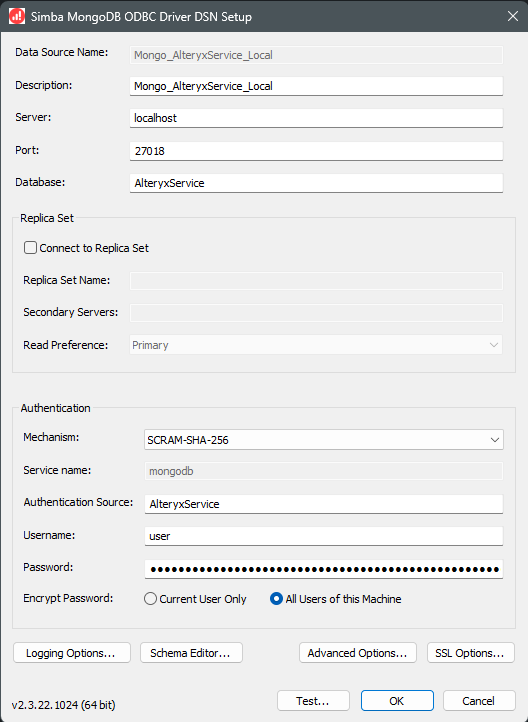
Geben Sie im Fenster Simba MongoDB ODBC Driver DSN Setup (DSN-Einrichtung des Simba MongoDB ODBC-Treibers) die folgenden Eingabeaufforderungen ein:
a. Datenquellenname: {wählen Sie Ihren eigenen Datenquellennamen}
Beispiel: Mongo_AlteryxService oder Mongo_AlteryxGallery. Auf diesen Namen wird später Bezug genommen, um diese DSN-Verbindung in DCM zu identifizieren.
Auf diesen Datenquellennamen wird später Bezug genommen, um diese DSN-Verbindung in DCM in Teil 7, Schritt 3a für AlteryxService und Teil 8, Schritt 3a für AlteryxGallery zu identifizieren, falls zutreffend.
b. Beschreibung: {wählen Sie Ihre eigene Beschreibung}
Beispiel: Mongo_AlteryxService oder Mongo_AlteryxGallery.
c. Server: {Ihre Server-IP-Adresse}
Verwenden Sie localhost, wenn Sie sich auf dem Rechner befinden, auf dem Alteryx Server ausgeführt wird.
Die spezifische Host-IP-Adresse finden Sie in den Alteryx Systemeinstellungen unter:
AlteryxService-Einrichtung: Controller > Persistenz > Datenbank > Host
AlteryxGallery-Einrichtung: Server-Benutzeroberfläche > Persistenz > Web-Persistenz > Host
d. Port: {Port für MongoDB}
Der AlteryxServer-Port ist standardmäßig 27018.
Die spezifische Portnummer finden Sie in den Alteryx Systemeinstellungen unter:
AlteryxService-Einrichtung: Controller > Persistenz > Datenbank > Host
AlteryxGallery-Einrichtung: Server-Benutzeroberfläche > Persistenz > Web-Persistenz > Host
e. Datenbank: [AlteryxService] oder [AlteryxGallery]
f. Methode: SCRAM-SHA-256
g. Authentifizierungsquelle: [AlteryxService] oder [AlteryxGallery]
h. Benutzername: Benutzer
i. Kennwort: {Ihr Kennwort}
Das spezifische Admin-Kennwort finden Sie in den Alteryx Systemeinstellungen unter:
AlteryxService-Einrichtung: Controller > Persistenz > Datenbank > Kennwort

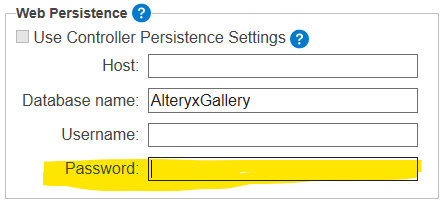
AlteryxGallery-Einrichtung: Server-Benutzeroberfläche > Persistenz > Web-Persistenz > Kennwort
DSN-Einstellungen des Simba MongoDB ODBC-Treibers für AlteryxService.
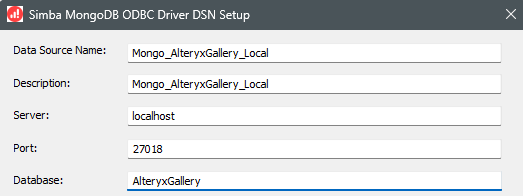
Spitze der Einstellungen für AlteryxGallery (zweiter DSN), falls erforderlich. Authentifizierungsquelle sollte AlteryxGallery sein.
Um die Verbindung zu testen und sicherzustellen, dass sie funktioniert, wählen Sie Test… (Testen) unten im Fenster für die DSN-Einrichtung des Simba MongoDB ODBC-Treibers. Klicken Sie im Testergebnisfenster auf OK, um dieses zu schließen.
Wählen Sie Schema Editor… (Schema-Editor) aus.

Wählen Sie im Schema-Editor-Fenster die Option Modify Local Schema Definition (Lokale Schemadefinition ändern) aus.
Wählen Sie die Datei mit dem Namen MongoDB_Schema.json aus, die beim Workflow „MongoDB to MSSQL_Migrator.yxzp“ dabei war. Sie sollten diese Datei im Ressourcenordner finden, in den Sie das Paket „MongoDB to MSSQL_Migrator.yxzp“ entpackt haben. Öffnen Sie dann die Datei. Wählen Sie danach Verbinden aus.
Wichtig
Wenn Sie Ihre Mongo-Datenbanknamen in einen anderen Namen als „AlteryxGallery“ und „AlteryxService“ geändert haben, müssen Sie die Datei MongoDB_Schema.json bearbeiten, BEVOR Sie die Datei im Schemaeditor öffnen.
Öffnen Sie dazu die Datei MongoDB_Schema.json in einem Texteditor, suchen Sie nach „AlteryxGallery“ und „AlteryxService“, ersetzen Sie die Namen und speichern Sie die Änderungen an der Datei MongoDB_Schema.json.
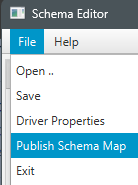
Wählen Sie im Schema-Editor File (Datei) > Publish Schema Map (Schemazuordnung veröffentlichen) aus. Dadurch wird das Schema in Ihrer Datenbank gespeichert, damit der ODBC-Treiber die neu zugeordneten Tabellen referenzieren kann.
Wählen Sie nach dem erfolgreichen Laden der Schemazuordnung OK aus.
Schließen Sie den Schema-Editor.
Wählen Sie im Fenster Simba MongoDB ODBC Driver DSN Setup (DSN-Einrichtung des Simba MongoDB ODBC-Treibers) Erweiterte Optionen... aus.
Ändern Sie den Wert für die Größe der binären Spalte in 2147483647. Wählen Sie dann OK aus.
Wählen Sie OK im Fenster „Simba MongoDB ODBC Driver DSN Setup“ (DSN-Einrichtung des Simba MongoDB ODBC-Treibers) aus.
Lassen Sie den ODBC-Datenquellen-Administrator geöffnet.
Wiederholen Sie die Schritte 3–15, wenn Sie eine separate MongoDB für Ihre AlteryxService- und AlteryxGallery-Datenbanken oder eine eingebettete MongoDB verwendet haben.
Wählen Sie anschließend OK aus.
Wichtig
Wenn Sie eine separate Datenbank für AlteryxService und AlteryxGallery konfigurieren möchten, führen Sie die folgenden Schritte (1–9) für beide Datenbanken aus.
Wechseln Sie zum Fenster ODBC-Datenquellen-Administrator (64-Bit). Wählen Sie die Registerkarte System-DSN und dann Hinzufügen... aus.
Wählen Sie den ODBC-Treiber 17 für SQL Server und dann Fertig stellen aus.
Geben Sie in Microsoft SQL Server DSN Configuration (DSN-Konfiguration für Microsoft SQL Server) die folgenden Eingabeaufforderungen ein:
a. Name: {wählen Sie Ihren eigenen Datenquellennamen}
Beispiel: MSSQL_AlteryxService_Local.
Auf diesen Namen wird später Bezug genommen, um diese DSN-Verbindung in DCM in Teil 9, Schritt 3a zu identifizieren.
b. Beschreibung: {wählen Sie Ihre eigene Beschreibung}
Beispiel: MSSQL_AlteryxService_Local.
c. Server: {Ihre Server-IP-Adresse}
Verwenden Sie localhost, wenn Sie sich auf dem Rechner befinden, auf dem SQL Server ausgeführt wird.
Wählen Sie Weiter aus.
Auf dem Bildschirm How should SQL Server verify the authenticity of the login ID (Wie soll SQL Server die Authentizität der Anmeldungs-ID überprüfen?):
Wenn Sie die SQL Server-Authentifizierung verwenden, wählen Sie die Option With SQL Server authentication using a login ID and password entered by the user (Mit SQL Server-Authentifizierung unter Verwendung einer Anmeldungs-ID und eines von dem/der Benutzer:in eingegebenen Kennworts) aus.
Anmeldungs-ID: {Ihre Benutzer-ID}
Kennwort: {Ihr Kennwort}
Wenn Sie Kerberos oder WinAuth verwenden, wählen Sie With Integrated Windows authentication (Mit der integrierten Windows-Authentifizierung) aus.
Wählen Sie Weiter > Fertig stellen aus.
Wählen Sie in ODBC Microsoft SQL Server Setup (ODBC-Einrichtung von Microsoft SQL Server) die Option Test Data Source… (Datenquelle testen) aus.
Nachdem Sie eine erfolgreiche Verbindung in SQL Server ODBC Data Source Test (SQL Server ODBC-Datenquellentest) bestätigt haben, wählen Sie OK aus.
Wählen Sie in ODBC Microsoft SQL Server Setup (ODBC-Einrichtung von Microsoft SQL Server) OK aus.
Wiederholen Sie Schritte 1–9, wenn Sie über einen separaten MSSQL-Server für die AlteryxGallery verfügen.
Anmerkung
Wir empfehlen, dass Sie den Designer-Migrationsworkflow auf dem Rechner ausführen, auf dem Controller installiert ist. Wenn ein Fehler auftritt und Sie Migrator erneut ausführen müssen, löschen Sie die Datensätze in den neu erstellten Tabellen und führen Sie den Workflow erneut aus.
Suchen Sie das Migrationspaket für den Workflow „MongoDB to MSSQL_Migrator.yxzp“, das Sie im Lizenzierungsportal heruntergeladen haben.
Doppelklicken Sie auf die YXZP-Datei und folgen Sie den Anweisungen zum Öffnen des Workflows in Designer.
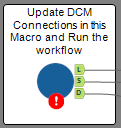
Im Workflow gibt es ein Makro, das aktualisiert werden muss. Wählen Sie das Makro aus:
Wichtig
Beim ersten Klicken auf das Makro wird vor dem Ausführen des Workflows im Ergebnisfenster möglicherweise die folgende Fehlermeldung angezeigt: „Selected connection is not available. Set one up to use the tool.“ (Die ausgewählte Verbindung ist nicht verfügbar. Richten Sie eine ein, um das Tool zu verwenden.) Sie können den Fehler ignorieren, da er nach dem Einrichten und Ausführen des Workflows behoben sein wird.
Wählen Sie unter Choose DCM Connection for MongoDB Controller Persistence (AlteryxService) (DCM-Verbindung für MongoDB Controller-Persistenz wählen (AlteryxService)) die Option Eine Verbindung einrichten aus. Wenn Sie eine eingebettete MongoDB verwenden, hosten Sie Ihre AlteryxService- und AlteryxGallery-Datenbanken auf separaten Servern oder verwenden Sie andere Anmeldedaten. Dann ist diese MongoDB-Verbindung nur noch für AlteryxService und in Teil 8 erstellen Sie eine Verbindung für die AlteryxGallery-MongoDB. Wenn Sie AlteryxService und AlteryxGallery in derselben Datenbank hosten, ist dies die einzige MongoDB-Verbindung, die Sie einrichten müssen.

Wählen Sie im Fenster Verbindungsmanager die Option + NEU aus.
Geben Sie unter Neue Datenquelle Folgendes ein:
a. Datenquellenname: Geben Sie den Namen der Mongo-AlteryxService-Datenquelle ein, den Sie in Teil 4, Schritt 5a eingegeben haben.
b. ODBC-DSN: Wählen Sie den MongoDB AlteryxService ODBC-DSN aus, den Sie in Teil 4 erstellt haben.
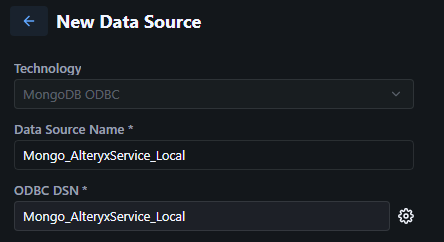
Wählen Sie Speichern aus.
Wählen Sie Anmeldedaten verbinden aus.
a. Authentifizierungsmethode: MongoDB-Benutzername und -Kennwort
b. Anmeldedaten: Neue Anmeldedaten erstellen
c. Anmeldedatenname: Name Ihrer Wahl
Beispiel: MongoDB_AlteryxService_Local
d. Tresor: DCM
e. Benutzername: Benutzer
f. Kennwort: {your_password}
Um das spezifische Admin-Kennwort in den Alteryx Systemeinstellungen zu finden, gehen Sie zur AlteryxService-Einrichtung: Controller > Persistenz > Datenbank > Kennwort.
g. Authentifizierungsmethode: SCRAM-SHA-256
h. Authentifizierungsquelle: AlteryxService
i. Verbindung für SDK zulassen: Deaktiviert
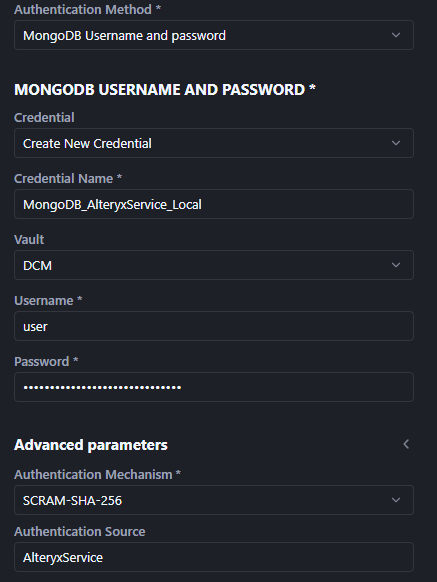
Wählen Sie Verbindung testen aus. Wenn der Verbindungstest erfolgreich war, wählen Sie Erstellen/verknüpfen aus.
Wenn Sie AlteryxService und AlteryxGallery in derselben Datenbank hosten, deaktivieren Sie das Kästchen für Use different DCM Connection for MongoDB Web Persistence (AlteryxGallery) (Andere DCM-Verbindung für MongoDB-Web-Persistenz verwenden (AlteryxGallery)) und fahren Sie mit Teil 9 fort.
Wenn Sie AlteryxService und AlteryxGallery in separaten Datenbanken hosten, fahren Sie mit Teil 8 fort.
Setzen Sie bei Use different DCM Connection for MongoDB Web Persistence (AlteryxGallery) (Andere DCM-Verbindung für MongoDB-Web-Persistenz verwenden (AlteryxGallery)) ein Häkchen. Wählen Sie dann Eine Verbindung einrichten aus.
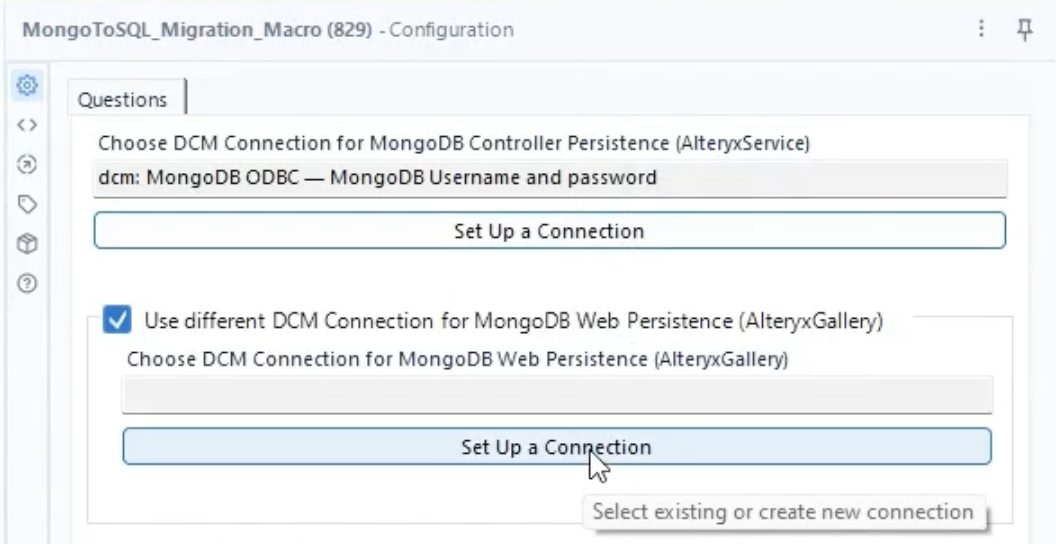
Wählen Sie im Fenster Verbindungsmanager die Option + NEU aus.
Geben Sie unter Neue Datenquelle Folgendes ein:
a. Datenquellenname: Geben Sie den Namen der Mongo AlteryxGallery-Datenquelle ein, den Sie in Teil 4, Schritt 5a eingegeben haben.
b. ODBC-DSN: Wählen Sie den MongoDB AlteryxGallery ODBC-DSN aus, den Sie in Teil 4 erstellt haben.
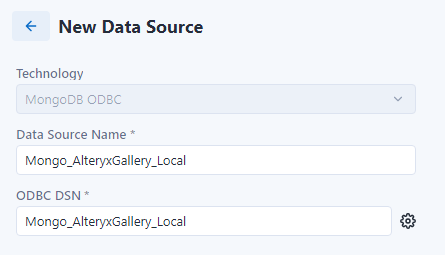
Wählen Sie Speichern aus.
Wählen Sie Anmeldedaten verbinden aus.
a. Authentifizierungsmethode: MongoDB-Benutzername und -Kennwort
b. Anmeldedaten: Neue Anmeldedaten erstellen
c. Anmeldedatenname: Name Ihrer Wahl
Beispiel: MongoDB_AlteryxGallery_Local
d. Tresor: DCM
e. Benutzername: Benutzer
f. Kennwort: {your_password}
Um das spezifische Admin-Kennwort in den Alteryx Systemeinstellungen zu finden, gehen Sie zur AlteryxGallery-Einrichtung: Server-Benutzeroberfläche > Persistenz > Web-Persistenz > Kennwort.
g. Authentifizierungsmethode: SCRAM-SHA-256
h. Authentifizierungsquelle: AlteryxGallery
i. Verbindung für SDK zulassen: Deaktiviert
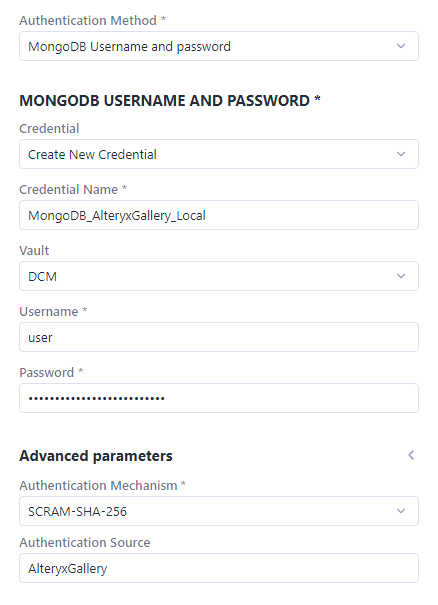
Wählen Sie Verbindung testen aus. Wenn der Verbindungstest erfolgreich war, wählen Sie Erstellen/verknüpfen aus.
Wichtig
Wenn Sie eine separate AlteryxGallery-SQL-DB haben, müssen Sie diesen Teil zweimal durchführen – einmal für AlteryxService und einmal für AlteryxGallery.
Wählen Sie unter Choose DCM Connection for MSSQL DB Controller Persistence (AlteryxService) (DCM-Verbindung für MSSQL-DB Controller-Persistenz wählen (AlteryxService)) die Option Eine Verbindung einrichten aus.
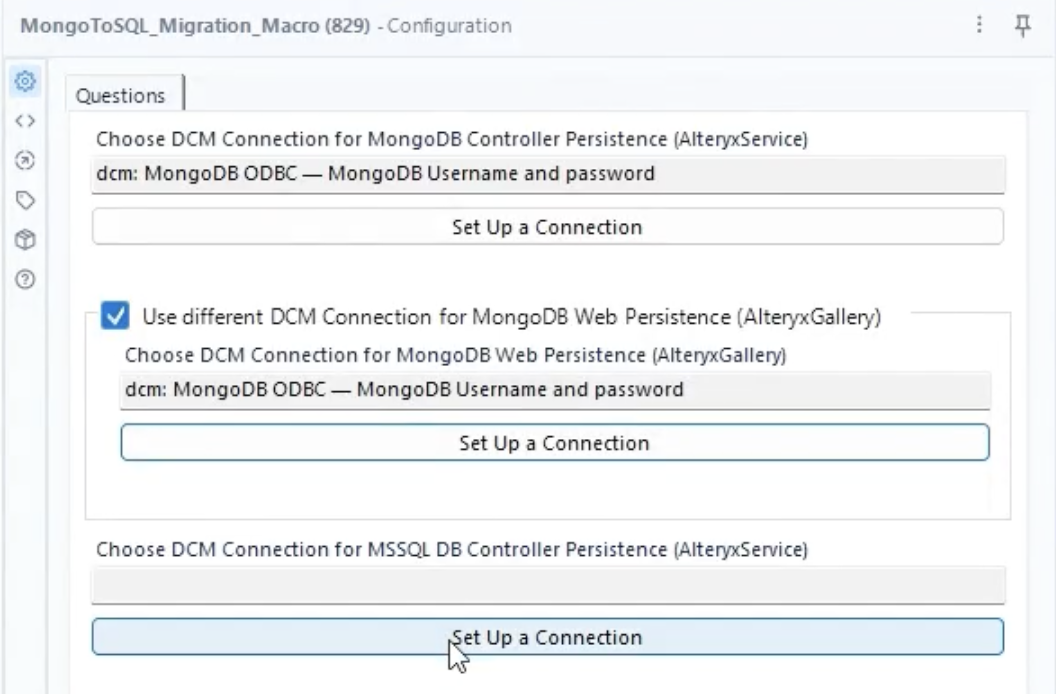
Wählen Sie im Fenster „Verbindungsmanager“ die Option + NEU aus.
Geben Sie unter „Neue Datenquelle“ Folgendes ein:
a. Datenquellenname: Geben Sie den Namen der MSSQL-Datenquelle ein, den Sie in Teil 5, Schritt 3a eingegeben haben.
b. ODBC-DSN: Wählen Sie den MSSQL ODBC-DSN aus, den Sie in Teil 5 erstellt haben.
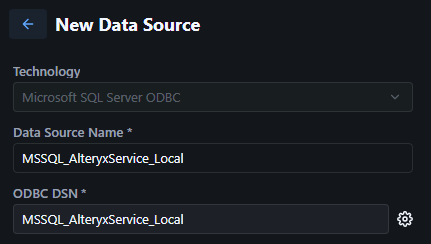
Wählen Sie Speichern aus.
Wählen Sie Anmeldedaten verbinden aus.
Wenn Sie die SQL Server-Authentifizierung verwenden:
a. Authentifizierungsmethode: Benutzername und Kennwort
b. Anmeldedaten: Neue Anmeldedaten erstellen
c. Anmeldedatenname: Name Ihrer Wahl
Beispiel: MSSQL_AlteryxService_Local
d. Tresor: DCM
e. Benutzername: {username}
f. Kennwort: {Ihr Kennwort}
Wenn Sie Kerberos und WinAuth verwenden:
Authentifizierungsmethode: Keine Anmeldedaten
Wählen Sie Verbindung testen aus. Wenn der Verbindungstest erfolgreich war, wählen Sie Erstellen/verknüpfen aus.
Wenn Sie keine separate AlteryxGallery-SQL-Datenbank haben, fahren Sie mit Teil 11 fort.
Wenn Sie eine separate AlteryxGallery-SQL-Datenbank haben, setzen Sie bei Use different DCM connection for MSSQL Web Persistence (AlteryxGallery) (Andere DCM-Verbindung für MongoDB-Web-Persistenz verwenden (AlteryxGallery)) ein Häkchen.
Wählen Sie Eine Verbindung einrichten aus und wiederholen Sie Schritte 2–5 mit den Informationen zu AlteryxGallery anstelle von AlteryxService.

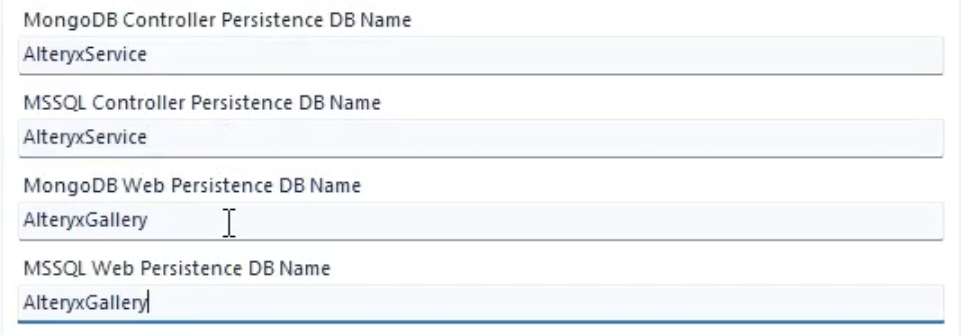
Wenn Ihre MongoDB- oder MSSQL-AlteryxGallery- und -AlteryxService-Datenbanken nicht genau „AlteryxService“ und „AlteryxGallery“ heißen, fahren Sie mit diesem Teil fort. Ist dies nicht der Fall, fahren Sie mit Teil 11 fort.
Füllen Sie die folgenden Datenbanknamen mit Ihren tatsächlichen Datenbanknamen aus:
MongoDB Controller-Persistenz-DB-Name
MSSQL Controller-Persistenz-DB-Name
MongoDB Web-Persistenz-DB-Name
MSSQL Web-Persistenz-DB-Name
Wählen Sie in Designer Ausführen aus, um MongoDB to MSSQL_Migrator.yxmd auszuführen.
Während dieser Workflow ausgeführt wird, wird eine Warnung angezeigt. Wenn Sie sie auswählen, wird im Ergebnisfenster angezeigt, wie weit der gesamte Migrationsvorgang ist.
Sobald der Workflow abgeschlossen ist, sehen Sie die Anzahl der Datensätze, die migriert wurden. Diese Dateien werden auch im lokalen Ordner gespeichert und können von Ihnen abgerufen werden.
Prüfen Sie nach Abschluss der Ausführung, ob währenddessen Fehler aufgetreten sind. Wenn Fehler im Ergebnisfenster angezeigt werden, kopieren Sie die Fehler und senden Sie sie an Ihren Kundendienstvertreter.
Weitere Informationen zur Fehlerbehebung bei der Migration, zur erneuten Ausführung von Migrator oder zur Rückkehr zu Ihrer ursprünglichen MongoDB finden Sie auf der FAQ-Seite von Server SQL.
Wenn die Migration erfolgreich abgeschlossen wurde, werden im Ergebnisfenster 0 Fehler angezeigt, in den Protokollen werden alle Datensätze angezeigt, die von MongoDB zu MSSQL übertragen wurden, und Sie können mit Teil 12 fortfahren.
Nachdem Sie Ihre Daten erfolgreich von MongoDB zur SQL-DB migriert haben, ändern Sie die Persistenzinformationen in den Alteryx-Systemeinstellungen von Ihrer alten MongoDB zu Ihrer neuen SQL-DB.
Wichtig
Die Verbindungszeichenfolge für den Controller unterscheidet sich von der Verbindungszeichenfolge für die Server-Benutzeroberfläche.
Öffnen Sie die Systemeinstellungen und konfigurieren Sie sie wie gewohnt, mit Ausnahme der folgenden Änderungen:
Umgebung > Installationstyp:
Wählen Sie Alteryx Server vollständig für eine Einzelinstanzinstallation aus.
Wählen Sie Benutzerdefiniert für die Multi-Node-Installation aus.
Controller > Persistenz:
Datenbanktyp: Wählen Sie die benutzerverwaltete SQL-DB aus.
Datenbank > SQL-Verbindung. Geben Sie Ihren eigenen Wert für die Controller-Verbindungszeichenfolge aus den SQL-Instanzdetails ein.
Weitere Informationen zum Formatieren dieser Verbindungszeichenfolgen finden Sie unter Erweiterte SQL-DB-Verbindungszeichenfolgen. Beachten Sie, dass die Verbindungszeichenfolge für die Server-Benutzeroberfläche und die Verbindungszeichenfolge für den Controller unterschiedliche Formate haben.
Server-Benutzeroberfläche > Persistenz:
Datenbanktyp: Wählen Sie die benutzerverwaltete SQL-DB aus.
Web-Persistenz > SQL-Verbindung: Geben Sie Ihren eigenen Wert für die Verbindungszeichenfolge für die Server-Benutzeroberfläche aus den SQL-Instanzdetails ein.
Weitere Informationen zum Formatieren dieser Verbindungszeichenfolgen finden Sie unter Erweiterte SQL-DB-Verbindungszeichenfolgen. Beachten Sie, dass die Verbindungszeichenfolge für die Server-Benutzeroberfläche und die Verbindungszeichenfolge für den Controller unterschiedliche Formate haben.
Um die Konfiguration der Alteryx Systemeinstellungen abzuschließen, wählen Sie Weiter/Fertig aus.
Nun ist die SQL-DB zur Verwendung in Server bereit, da die Migration abgeschlossen ist. Öffnen Sie Server.
Sie können den MongoDB-Server jetzt herunterfahren. Wenn Sie ihn laufen lassen, hat dies keine Auswirkungen auf den Alteryx Dienst, abgesehen von der Nutzung lokaler Ressourcen, die für den Betrieb erforderlich sind.
Anmerkung
Wenn Sie Kerberos und WinAuth verwenden: AlteryxService startet nicht, wenn es unter „Lokales Systemkonto“ ausgeführt wird. Um dieses Problem zu lösen, führen Sie AlteryxService vom Domänenkonto aus.