Flow Basics
In Designer Cloud, a flow is a container for holding the objects you create for your end-to-end data pipeline.
With flows, you can perform the following types of actions:
Combine datasets by performing union or join functions.
Share the flows with other users.
Create output definitions and generate job results for them.
Schedule the execution of jobs.
Create references between recipes and external flows.
Export and import into different instances of Designer Cloud platform.
To create a flow:
You can get started with flows by clicking the Flows icon in the left nav bar.
The Flows page displays the flows to which you have access and enables you to create, review, import flows.
To create a new flow, click Create in the Flows page. An empty flow is displayed in Flow View.
For more information, see Flow View Page.
Flow View
In Flow View, you create the objects that are part of your flow.
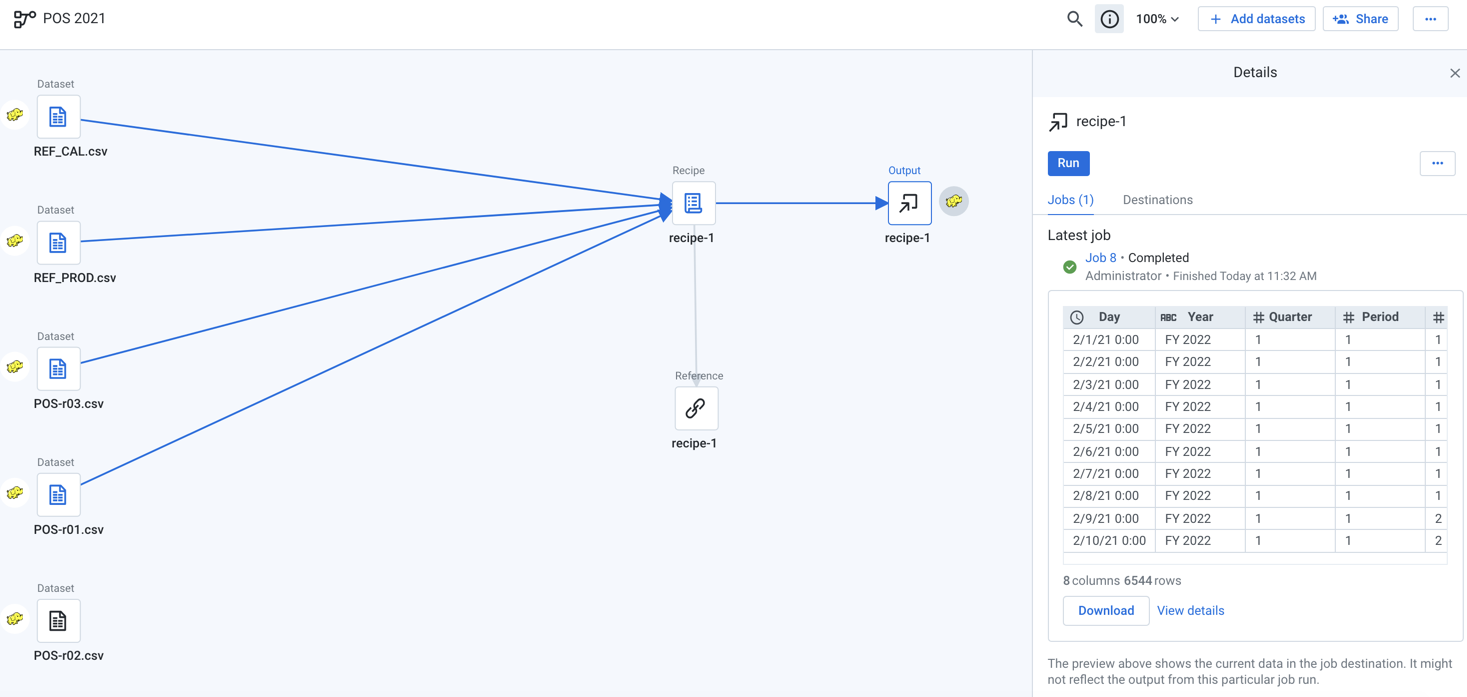
Figure: Flow View page
Top bar
From the top bar of Flow View, you can access a variety of options to perform the following functions:
Share your flow
Add datasets to your flow
Zoom in and out from the canvas
Search your flow for objects
Flow canvas
The primary workspace of Flow View is the flow canvas. From the flow canvas, you can add new objects and organize them:
Add a recipe for an imported dataset
Add a reference dataset for your recipe
Add an output for a recipe
Add more imported datasets
Auto arrange object icons
Add a note to the canvas
Zoom the canvas
Context panel
When you select an object in the flow, you can find additional options in the right panel.
Note
The available options depend on the type of object that you selected.
Flow Objects
A flow can contain the following types of objects.
Required flow objects
To create an end-to-end data pipeline, you must create the following objects:
Imported dataset: A reference to a file- or table-based source of data.
Recipe: A set of steps to transform your data.
Output: A definition for the type, location, and format of the results generated by your recipe, plus additional settings.
Imported datasets
An imported dataset is reference to a dataset that can be imported into . You can import datasets from a variety of flat-file formats and other distributed sources. An imported dataset can be a reference to a file, multiple files, database table, or other types of data.
Note
When you import a dataset, you are creating a reference to the source dataset. The source data is never modified.
For more information, see Import Basics.
Recipes
A recipe is a series of user-defined data transformation steps that can be applied to your data. In Flow View, recipes can be created from other objects:
You can create a recipe from an imported dataset. The steps in this recipe are applied to the data referenced in the imported dataset.
You can create a recipe from another recipe to join recipes together.
When you create a recipe in Flow View, an empty recipe object is created for you. You can edit the recipe to add or modify steps in it.
For more information, see Transformer Page.
Reference Datasets
A reference dataset is a reference to the output of a recipe, which can be used in another flow. When you modify the source recipe, the reference dataset that is used in another flow is automatically updated with the updated data.
To create a reference dataset, select the recipe icon in Flow View. Then, click the + icon and select Create reference dataset.
A reference dataset is created. When you import data into another flow, you can select the reference dataset for import.
For more information, see View for Reference Datasets.
Outputs
An output defines the set of files or tables, formats, and locations where the results of a recipe's transformations are written after a job run has been completed. Every flow requires an output in order to publish results.
An output object is composed of settings related to how the job results are generated, including one or more publishing actions. A publishing action defines how the results are written, including:
output location
output format
format-specific settings
Tip
You can apply parameters to your output locations.
You can create publishing actions in multiple formats for file-or table-based outputs and publish them to different locations. For more information, see Flow View Page.
Search Flows
You can search for specific objects in your flow, which helps to filter complex flows. When you start typing a search term, search results are highlighted in yellow, both in the Flow View canvas and in the search panel.
Steps:
From Flow View, click the Search icon.
In the Search panel, enter a search term. When you start typing, matching results are highlighted in yellow in the canvas and in the search panel.
By default, all object types are searched. You can filter the search results by object type. From the Filter by type drop-down, select one or more of the following:
Datasets
Recipes
Outputs
References
The search results are displayed.
Flow Sharing
You can share your flows with other users in your project or workspace. Click the Share button to share the flow with other users.
Note
When a flow is shared, the receiving users must have access to the flow. Flow access is based on varying levels of authorization to shared flows.
In the Owner column of the Flows page, a shared icon indicates that the flow has been shared.
For more information, see Share a Flow.
Organize Flows into Folders
You can organize your flows into folders. A folder is a container for storing your flows. From the Flows page, click Create > Create Folder to create a folder.

Figure: Flows in a folder
After creating a folder, you can use the Move option in the Flows Page or Flow View to move your flows into a folder.