Append Datasets
If you are wrangling datasets that represent transactional or serialized data, you can append together slices of data to build a larger dataset for richer analysis.
A union appends two or more similar datasets together. Rows of the second dataset are added to the end of the first.
You can include the following objects in a union:
A recipe: The output columns of a recipe are used in the union. Note that changes to the recipe can affect the union.
A dataset: You can union directly with a dataset to which you have access.
A reference dataset: A reference dataset is a link to the output of a recipe from another flow.
Tip
You can create a reference dataset from a recipe. In Flow View, click the recipe and select Create Reference Dataset.
In a union, the Cloud Portal can match columns for you automatically.
You can also manually tweak the matching and decide the columns to include or exclude in the resulting dataset.
Steps
To start a join, begin from Dataset A:
In Flow View, right-click a dataset and select Add > Union.
If your first dataset already has a recipe, click the recipe, and select Append Union.
In the Transformer page, you can enter
unionin the Search panel.
The Union dialog previews the columns in the output on the left side and the column from the source datasets on the right side.
To add data from a dataset, recipe, or reference, click Add data.
From the Choose data to Union dialog, select or search the datasets to union from the available options.
From the drop-down, you can choose how you want to align the columns between datasets. Select one of the aligning methods such asAuto Align,Align by Name, andAlign by Positionto map the columns of the new datasets to the existing datasets.
ClickApply.
A preview of the columns in the union is displayed.
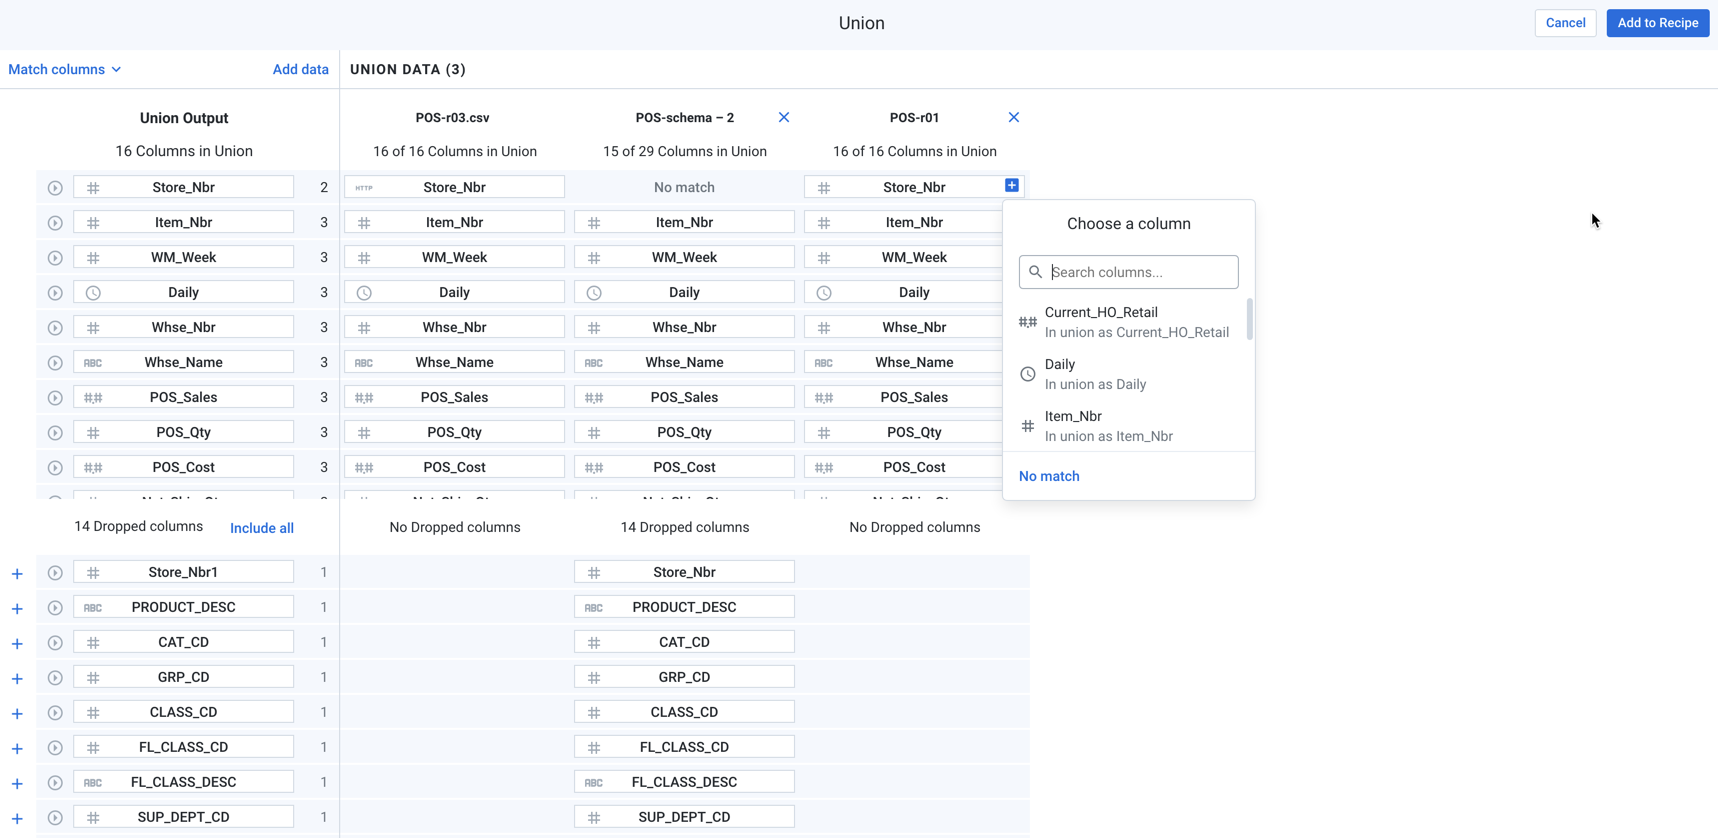
Figure: Union Summary
Review the output columns in the left panel.
To remove a column from the output, click the X icon next to the column in the left panel.
If needed, you can change the columns and their order in the output dataset based on selections in the right panel:
To completely remove the dataset from the union, click the X icon next to the dataset name in the right panel.
To add a column to the union output, click the Plus icon to the right of the column entry.
To include all available columns in the output, click Include all or select the respective Plus icon against the column.
To add the union as specified, click Add to Recipe.
The rows of data in the unioned datasets are added to the original dataset, and the union transformation is inserted in the appropriate recipe.
Example
For example, you are cleansing log messages on a weekly basis. You can create separate datasets for each day's log messages and then bring them altogether into a single dataset for processing through a single recipe. This method works best for datasets that have identical or very similar structures.
Below, you can see two datasets of contact information. These simplified datasets track customer contact records.
Dataset01:
Name | Last Contact | |
|---|---|---|
Jack Jones | jack@example.com | 06/15/2015 |
Tina Toms | tinat@example.com | 08/02/2015 |
Larry Lyons | larry.lyons@example.com | 03/22/2015 |
Dataset02:
Name | Last Contact Date | |
|---|---|---|
Amy Abrams | 07/24/2015 | amy.abrams@example.com |
Tina Toms | 05/12/2015 | tinat@example.com |
Samantha Smith | 04/22/2015 | samantha@example.com |
Notes:
There is one overlapping record for Tina Toms.
There is a mismatch in one column name ("Last Contact" vs. "Last Contact Date").
The columns are in a different order.
Steps:
Load your first dataset (
Dataset01) .In the recipe panel, add a step. In the Transformation textbox, enter
union.In the Union page, you bring together two or more datasets based on a shared set of fields.
A union operation appends datasets together.
To add another dataset, click Add datasets. Navigate to select the file to add to the union (
Dataset02).Initially, fields are mapped based on the column names. However, in this example, the
Last_Contact_Datefield fromDataset02is not included. You can:Click the + icon next to the
Last_Contact_Datefield in the left panel. The field is added as a separate field. However, it is not matched with the other contact date field from the original dataset.From the Match columns drop-down menu, select By Position. In this case, you can see that there are only three fields, but the order is mismatched.
Tip
When possible, you should try to rename or align columns in your datasets prior to building a Union transformation step. Otherwise, you might have to edit the columns after the union has been completed.
To rename a column, click Rename from the column drop-down in the Transformer page. You can use the same drop-down to move a column.
In this case, you can cancel the union and reposition the
Emailcolumn after theLast Contactcolumn inDataset01.Then, open the Union page again and add
Dataset02. Select By Position from the Match columns drop-down menu. Your columns are matched.Click Add to Recipe.
Dataset02 records have now been added to Dataset01, which now contains all of the records from both datasets. Note that the record for Tina Toms appears twice in the appended dataset.
If the appended dataset is a record of all contacts, you should leave the duplicate record in place.
If the appended dataset is a record of the most recent contact with each customer, you should remove the duplicate record with the Deduplicate transformation. For more information, see Deduplicate Data.
Note
Be sure to verify that the data type for each column is accurate.