Generate a Sample
When you transform your data in the Transformer page, you are performing these transformations on a sample of the total dataset. As needed, you can generate new samples using a variety of algorithms to acquire other slices of your data.
The initial data sample is collected from the initial rows of the dataset. Whenever you create a recipe and open the dataset in the Transformer page, Cloud Portal automatically generates the initial sample.
By default, the initial sample is the first 10 MB of your dataset.
The size of the sample can be modified by an administrator.
For file-based sources, the initial sample is taken from a limited number of files.
By default, this limit is set to
10files.The maximum number of files from which a sample can be generated can be defined by an administrator.
If your dataset is less than 10 MB, then the entire dataset may be loaded as an initial sample.
For datasets larger than 10 MB, the first 10MB of rows are loaded into the Transformer page.
Tip
On the Transformer page, this first sample is listed as Initial Data. For more information on how this special sampling type is generated, see Overview of Sampling.
When to Take a New Sample
The initial sample allows you to get started immediately building your recipe steps. However, your recipe and dataset may require additional samples. For example:
If you have a very long dataset with many rows, there may be statistically significant values that are not part of the first 10MB of data. The recipe steps that you create may not affect those rows properly, since you have not seen any data from them.
If you have a very wide dataset with many columns, you may need to take additional filter-based samples to focus on the separate segments of your data. For example, if your dataset contains mismatched or missing values, you may consider taking an Anamoly-based sample that can look for mismatched, or missing, or both values in your dataset.
As you add steps in your recipe, the current state of the Transformer page is rendered based on the currently valid sample (initial sample, in this case) plus all of the recipe steps between the step where the sample was taken and your current step. All of these steps must be rendered in the browser. As you add more recipe steps without taking a sample, browser performance is affected.
Tip
You should utilize sampling as much as possible to improve the browser performance and to get good coverage of the samples across recipes.
Note
Generation of a new sample is executed as a job. Quick scan jobs are executed through Trifacta Photon on the Trifacta node, while Full scan jobs are executed on an available clustered running environment. Depending on your deployment, there may be costs associated with generating a sample.
You can generate a new sample when:
You are working with complex and wide datasets.
You have complex flows.
Your dataset has a bad data or outliers that may require a different sample.
You have datasets with more than 10 MB of data.
You have added one or more multi-dataset operations with steps, such as a join, union, pivot, or lookup.
Change Sample Size
If you are encountering low-memory conditions related to sampling or wish to improve the performance of the sampling process, you can adjust the size of the samples that are displayed in the browser for your current recipe. For more information, see Change Recipe Sample Size.
Limitations
Advanced sampling options are available only with a full scan of the dataset.
Undo/redo do not change the sample state, even if the sample becomes invalid.
When a new sample is generated, sort transformations are not preserved for some type of outputs. Sort transformations must be reapplied. See Sort Rows.
When executed on the Trifacta Photon running environment,samples taken from a dataset with parameters are limited to a maximum of 50 files.
Collect a New Sample
You can use the existing loaded sample, or you can collect a new sample to use.
Steps:
In the Transformer page, click the Eyedropper icon at the top of the page.
From the Samples panel, select the required type of sample. For more information, see Sample Types.
In the Collect new sample panel, select either Quick or Full scan.
Quick: Creates a sample by partial scanning of the dataset and yields quicker results.
Tip
Quick scan samples are executed by default in the Trifacta Photon running environment. If that environment is not available, the Cloud Portal may attempt to run the Quick Scan job on an available clustered running environment.
Full: Creates a sample by scanning the full dataset. This method takes a longer time depending on the size of the dataset.
Tip
Full scan samples are executed in the cluster running environment.
Click Collect to collect the sample. A sample job ID is generated for each sample you collect. When the sample is available, the Load Sample message is displayed in the Transformer page.
To load the sample, click Load Sample.
Example - Random sample
Random samples can be generated from a quick or full scan of your dataset.
Tip
A random sample is a fast way to get another randomized slice of your dataset. Often, this can be a first sample to generate after loading a new dataset into the Transformer page.
Steps:
In the Transformer page, click the Eyedropper icon at the top of the page.
From the Samples panel, select Filter-based sample.
In the Collect new sample panel, select the type of scan: Quick or Full.
Click Collect.
When sample collection is complete, a confirmation message is displayed. Click Load sample.
The random sample is loaded into the Transformer page.
Example - Filter-based sample
The Filter-based sample is helpful when you want to filter the data based on specific values or formulas. The following example filters the required values in the Region column for calculating discounts, and then generates a random sample from the matching rows only. For example, you may have a dataset with many values for Region such as Atlantic, North East, West Coast and want to calculate discounts only for North East region, you can collect a Filter-based sample.
Steps:
In the Transformer page, click the Eyedropper icon at the top of the page.
From the Samples panel, select Filter-based sample.
In the Collect new sample panel, enter the following details:
From the Scan column, select Quick. For more information, see "Collect a New Sample" above.
In the Filter field, enter
Region == 'North East'.
Click Collect. A confirmation message is displayed.
Click Load sample. The Filter-based sample is loaded with only the
North Eastvalues for theRegioncolumn.
Example - Anomaly-based sample
If your dataset has missing values or mismatched values, you can use Anomaly-based sample type to filter the missing values. The following example is based on the missing values in a Discount column. When you apply the Anomaly-based sample, the sample displays only rows that have missing values for the Discount column.
Steps:
In the Transformer page, click the Eyedropper icon at the top of the page.
From the Samples panel, select Anomaly-based sample.
In the Collect new sample panel, enter the following details:
From the Scan column, select Quick. For more information, see "Collect a New Sample" above.
Select the required column:
Discount.From the anomaly type, select Find missing values only.
Click Collect. A confirmation message is displayed.
Click Load sample. The Anomaly-based sample is loaded with the missing values for the
Discountcolumn.
Cancel Sample
To cancel a sample collection, click the X next to the progress bar. The interrupted sample is listed as unavailable in the Collected samples panel.
Load Sample
You can create as many samples as required based on your dataset. All collected samples are available in the Collected samples panels, where you can review and load them as required.
Steps:
In the Samples panel, click See all collected samples.
From the Collected samples panel, select the required sample from the Available tab. For more information, see "Collected Samples" below.
Note
Samples listed under the Unavailable tab are invalid for the current state of your recipe. You cannot select these samples for use.
If you want to edit the sample name, click the Pencil icon against the sample.
Delete Sample
After you have created a sample, you cannot delete it through the application.
Note
Designer Cloud does not support deletion of samples after they have been created. For more information, contact your IT administrator.
Invalid Samples
Note
Samples are valid based on the state of your flow and recipe at the step where the sample was collected.
Whenever you add or modify a step to the recipe, Designer Cloud verifies if the current sample is valid. The current sample can become invalid if you add a new step before the step where the sample was created. For example, if you have created a sample in 30th step and if you add a new step that breaks the sample before the 30th step, then the sample becomes invalid.
After the sample becomes invalid, the Transformer page reverts to the recently collected sample that is valid.
Note
If the sample is reverted to an earlier sample, then more steps between when that sample was generated and your current location in the recipe are generated in the browser's memory. Browser performance may be impacted.
Note
If you modify a SQL statement for an imported dataset, any samples based on the old SQL statement are invalidated.
Collected Samples
The collected samples store the details of your samples collected for your dataset. In the Samples panel, click See all collected samples link.
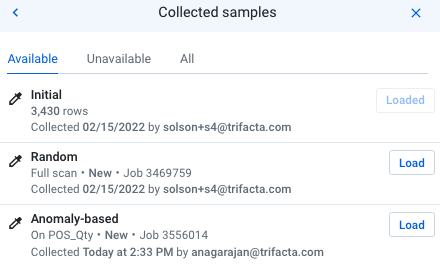
Figure: Collected samples
The collected samples contain the following tabs:
Available: Displays the available samples that can be used. You can click Load to load the required sample.
Unavailable: Displays the invalid samples, which cannot be selected for use. If subsequent steps make a sample valid again, it is moved to the Available tab.
All: Displays both the available and unavailable samples.
You can click the sample name to view the sample details.
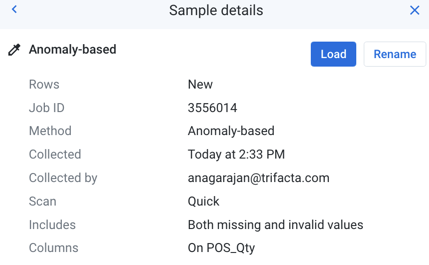
Figure: Sample details
Load: Click Load to load the sample.
Rename: Click Rename to rename the sample
Review Sample Jobs
You can review and manage all of your samples like transformation jobs. For more information, see Sample Jobs Page.
Best Practices
For more information on best practices, troubleshooting, and browser crashes, see https://community.trifacta.com/s/article/Best-Practices-Managing-Samples-in-Complex-Flows.