Union Page
In the Union page, you can append data from one or more datasets to an existing dataset.
For example, if you have multiple datasets containing transactional data, such as log files, you can use the union operation to join daily or weekly slices of this data into a single dataset.
In a union operation, the Cloud Portal attempts to match columns between multiple datasets. As needed, you can perform manual tweaks to the matching and decide which columns to include or exclude in the resulting dataset.
A union operation is different from a join operation. In a join operation, data from two datasets is brought together based on a defined primary key. The type of join determines the columns included in the output. For more information, see Join Window.
Tip
Depending on the types of operations you need to perform, you should perform your union steps earlier or later in the recipe. See Optimize Job Processing.
In the Search panel, enter union in the textbox.
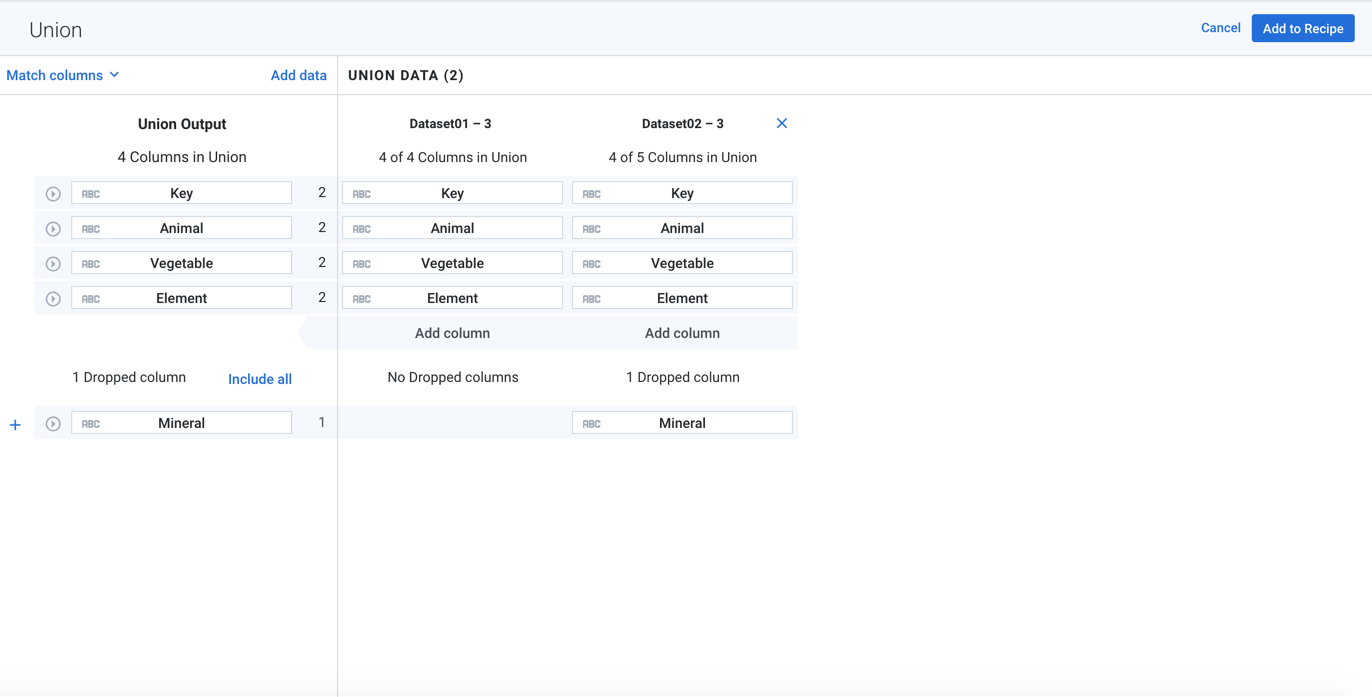 |
Figure: Union Page
Dataset Actions:
To add data from a dataset, recipe, or reference to the union, click Add data.
Select one or more objects to add to the union and choose one of the following methods to match columns:
Auto Align. When this option is selected, Designer Cloud performs intelligent mapping of the columns of the new dataset(s) to the dataset already loaded in the Transformer page. Auto alignment uses the following to map:
Edit distance between column names
Column data types
Similarity between sampled data in the datasets
Note
Auto align is not available after you have selected the dataset to union. Auto align may add a few seconds to the union operation.
Add Datasets and Align by Name. Matches are made based on the name of each column. Partial matches might be identified as matches, as well.
Add Datasets and Align by Position. Matches are made based on horizontal position of each column in each dataset. Extra columns will be dropped. This method might be useful if column names have changed between datasets.
To remove data from the union, click the X next to its name in the right panel.
You cannot remove the original dataset from which the Union page was opened.
Mapping Schema
The schema of the output that is to be generated by the union operation is displayed in the left panel.
The column names of the original dataset are used to populate the column names of the output dataset, where applicable.
Each object that has been added to the union is displayed in the right panel.
Panel | Left Side | Right Side 1 | Right Side 2 |
|---|---|---|---|
Upper | Output dataset - included cols. | Dataset 1 - included cols. | Dataset 2 - included cols. |
Lower | Output dataset - excluded cols. | Dataset 1 - excluded cols. | Dataset 2 - excluded cols. |
Custom column mappings
As needed, you can modify the default column mappings in your dataset. To remap a column, hover over the column entry in the right panel, Then, click the Plus icon:
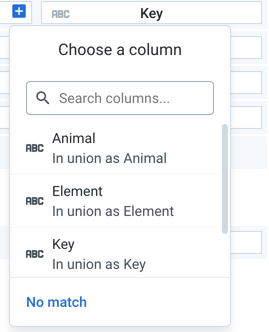
Figure: Custom Column Mapping
In the window, you can select the column in the current dataset that should appear in that location. Use this dialog to remap column order in each dataset.
Click the Search columns field and begin typing to locate other columns.
You can also specify that no match should be performed, which results in no data being imported from this column into the unioned dataset.
Tip
To map one of the dropped columns in your additional data to one of the source columns, hover over the empty No Match area next to the source column entry. Click the Plus icon to open the above mapping. Then, select the column from your additional data to slot into that location.
Output Panel
In the left panel, you can review and modify the columns to be included in and excluded from the output. By default, all matching columns are included in the output; if there are no initial matching columns, all columns from the original dataset are included in the output by default. You can see the columns that are sources for the union output column on the same line in the right panel.
Each column entry contains a data type identifier for the source column. Data types may be re-inferred as part of the union. You can change the data type after the union is completed.
To the right of the column name, you can see the number of datasets in the union where the column occurs.
Column Actions:
To review the top five values for any column, click the Expand icon. You can see the count of each value across all included data.
To remove a column from the union output, click the X icon to the left of the column entry in the upper panel.
To add a column to the union output, click the + icon next to the left of the column entry in the lower panel.
To include all available columns in the output, click include all.
To add the union as specified, click Add to Recipe.
Note
Unnest, union, or join transforms may significantly increase the number of rows or columns in your dataset. To prevent overloading the browser's memory, the application may apply a limit function to the results to artificially limit the number of rows displayed in your sample. You can generate a new sample if desired. This limitation is not applied during the job execution.
Updates
To modify a union after it has been created, click the Edit icon for the entry in the Recipe panel. See Recipe Panel.
After you have added the union to your recipe, changes to the underlying data should automatically propagate to the dataset into which they have been unioned. No refreshing of the data is necessary.
However, it is possible that subsequent changes to your sources can cause problems in the output and downstream references. You can fix these dependency issues.
Tip
If you must freeze the data that you are adding in, you should create a copy of it as a snapshot and union in the copy. See Dataset Details Page.
To use the copy, edit the union transform in the copy and switch the data that is in use. See Fix Dependency Issues.