Job History Page
In the Job History page, you can track the status of all of your jobs and plan runs.
Flow jobs: These jobs execute transformations on your source data to generate outputs.
Sample jobs: For more information on sampling jobs, see Sample Jobs Page.
Plan runs: These jobs execute a sequence of tasks. For more information, see Plan Runs Page.
Flow Jobs
You can only see jobs for the flows to which you have access in your current environment.
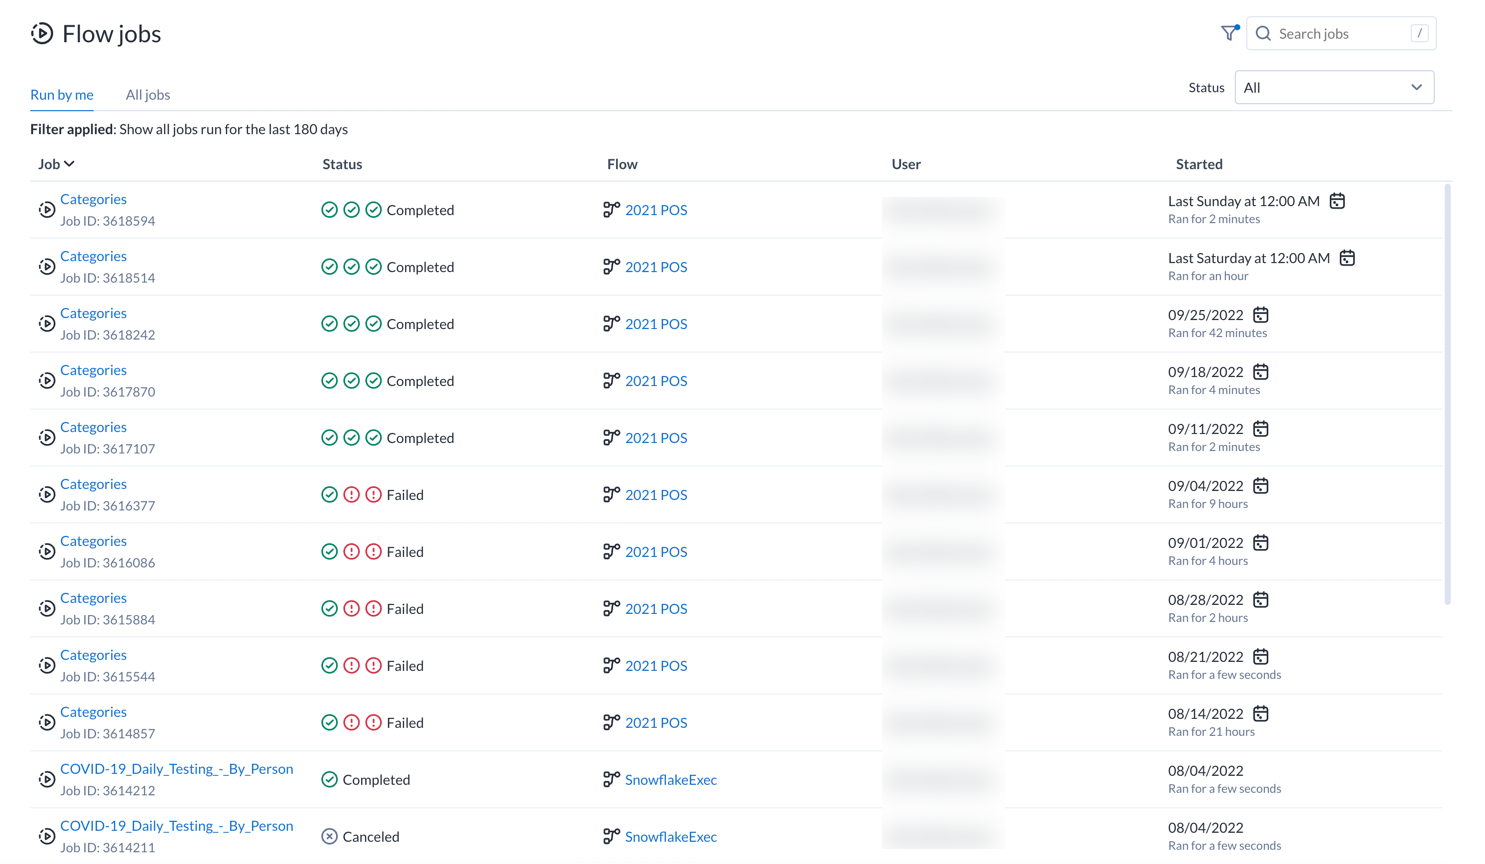
Figure: Job History page
Default view:
By default, the displayed jobs are:
jobs that you have run. See "Job Tabs" below.
for all job statuses. See "Job Status" below.
from the last 180 days are displayed. You can change this filter as needed. See "Filter Jobs" below.
Job Tabs:
Run by me: Jobs that you have initiated for the filtered time period are listed here.
All jobs: All jobs that were initiated for assets that you own are listed here. For example, if a collaborator has run a job on an asset that you own, you can review its status here.
Columns:
Job: Internal identifier for the job. This value is unique for all jobs in your Alteryx instance.
Click the ID number to explore details about the job.
User: The Alteryx user that initiated the job.
Run from:
Location where the job was launched. Click the link to view details.
Status:
See Tabs above.
Started: Start timestamp for the job.
Scheduled jobs are indicated with an icon.
Actions:
Filter by status: Click one of the tabs to filter the display to show only the listings for the selected job status.
Filter by type and date: Click the Funnel icon to filter the list of jobs by source of execution, date range, or both. See below.
Search: Enter text in the search field to filter the listed jobs by job ID, asset name, or dataset name.
Context menu:
Next to the job listing, click the options menu to see the following:
Cancel Job: Select to cancel a job that is currently being executed.
Note
If you do not have permission to cancel a Dataflow job, the appropriate permissions must be added to your IAM role by an administrator. The default IAM role available with the product has these permissions, but these permissions may not be present if you are using a custom or personal IAM role in your account. For more information on IAM permissions, see Required Dataprep User Permissions.
Note
In some cases, the product is unable to cancel the job from the application. In these cases, click View in Dataflow, and from there you can cancel the job in progress .
View Dataflow Job: Open the job listing in Dataflow.
Additional options are available for each job. See Job Details Page.
Job Types
Each job listed in the Job History page is a grouping of related jobs acting on the same recipe and dataset(s). Each of these jobgroups breaks down into one or more of the following job types.
Tip
To review the status of individual jobs within a jobgroup, hover over the icons in the Status column for the jobgroup.
Pre-ingest SQL: These jobs are SQL scripts that execute before the source data is ingested to the platform.
For additional details on these jobs, see the SQL scripts tab in the Job Details page. See Job Details Page.
For more information on these types of SQL scripts, see Create Output SQL Scripts.
Transform: These jobs perform transformations on imported datasets based on the transformations from which the job was launched.
Profile: If enabled as part of the job definition, a Profile job generates a visual summary of the results of your transform job.
Profiling jobs may take longer than transform jobs.
Even when selected, profiling jobs may not appear in the Job History page. In some cases, a profiling job may be folded into a transform job for optimization reasons.
Note
When the profiling job is run as part of the transform job, there is no listing for profiling in the mouse-over popup.
See Job Details Page.
Publish: Depending on multiple factors, your job may include a second Publish job that occurs after the transform job. For example, job groups can include internal Publish jobs for writing results to the designated location in the base storage layer.
Publishing can also be executed as a separate, post-execution job. As needed, job results can be published from their target location to another location or data store. These jobs are tracked separately as Publish jobs and can be launched from the Job Details page.
Ingest: For larger datasets from some relational connections, the platform transfers the data from the source to the default storage layer for faster processing. These ingest jobs occur before any transform or profiling takes place.
Post-ingest SQL: These jobs are SQL scripts that execute after the job results have been published.
For additional details on these jobs, see the SQL scripts tab in the Job Details page. See Job Details Page.
For more information on these types of SQL scripts, see Create Output SQL Scripts.
Job Status
In the Status dropdown, each option corresponds to a possible status for jobs that have been initiated on the platform.
All jobs: All jobs that you have initiated or were run on assets that you own.
Completed: Job has successfully executed.
Note
Invalid steps in a recipe are skipped, and it's still possible for the job to be executed successfully.
Note
A warning icon may indicate that recipe errors were detected during the transform phase. You can hover over the icon for more information.
Failed: job failed to complete.
Note
You can re-run a failed job. If you have since modified the recipe, those changes are applied during the second run.
Publish Failed: Some failed jobs may be listed under this status, which means that the publishing step of the configured job failed to complete.
Canceled: Job was canceled.
Running: Job is in progress.
Queued: Job has been queued for execution.
Filter Jobs
To filter the list of jobs based on dates or source of execution, click the Funnel icon. You can use the following dialog to filter the display of jobs.
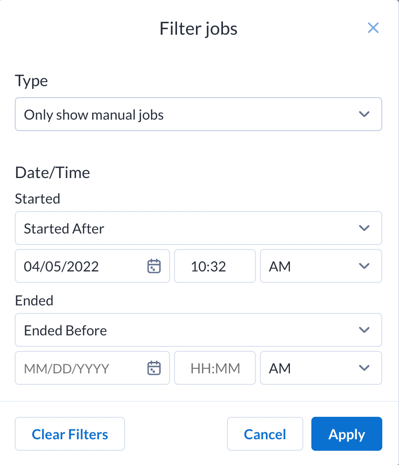
Figure: Filter Jobs dialog
Job type:
Show jobs based on the following available options:
Show all jobsOnly show manual jobsOnly show scheduled jobs
Started:
Specify the date and time when the jobs to display began.
If needed, you can specify the start time as a range. Select
Start Betweenfrom the drop-down list and populate both date-time rows.
Ended:
Specify the date and time when the jobs to display ended.
If needed, you can specify the end time as a range. Select
Ended Betweenfrom the drop-down list and populate both date-time rows.
Actions:
To clear the time period values, click Clear Filters.
To apply the specified time filter to the Job History page, click Apply.
Change default filter:
An administrator can change the default number of days that are displayed. For more information, see Dataprep Project Settings Page.