Flow View Page
In Flow View, you can access and manage the objects that you have added to or created in the selected flow. You can perform a variety of actions to effectively manage flow development and job execution through a single page in the Trifacta Application.
Note
Access to this page in the application and privileges on its related objects is governed by roles in your workspace. For more information, please contact your workspace administrator.
Note
If the displayed flow has been shared with you, some options are not available.
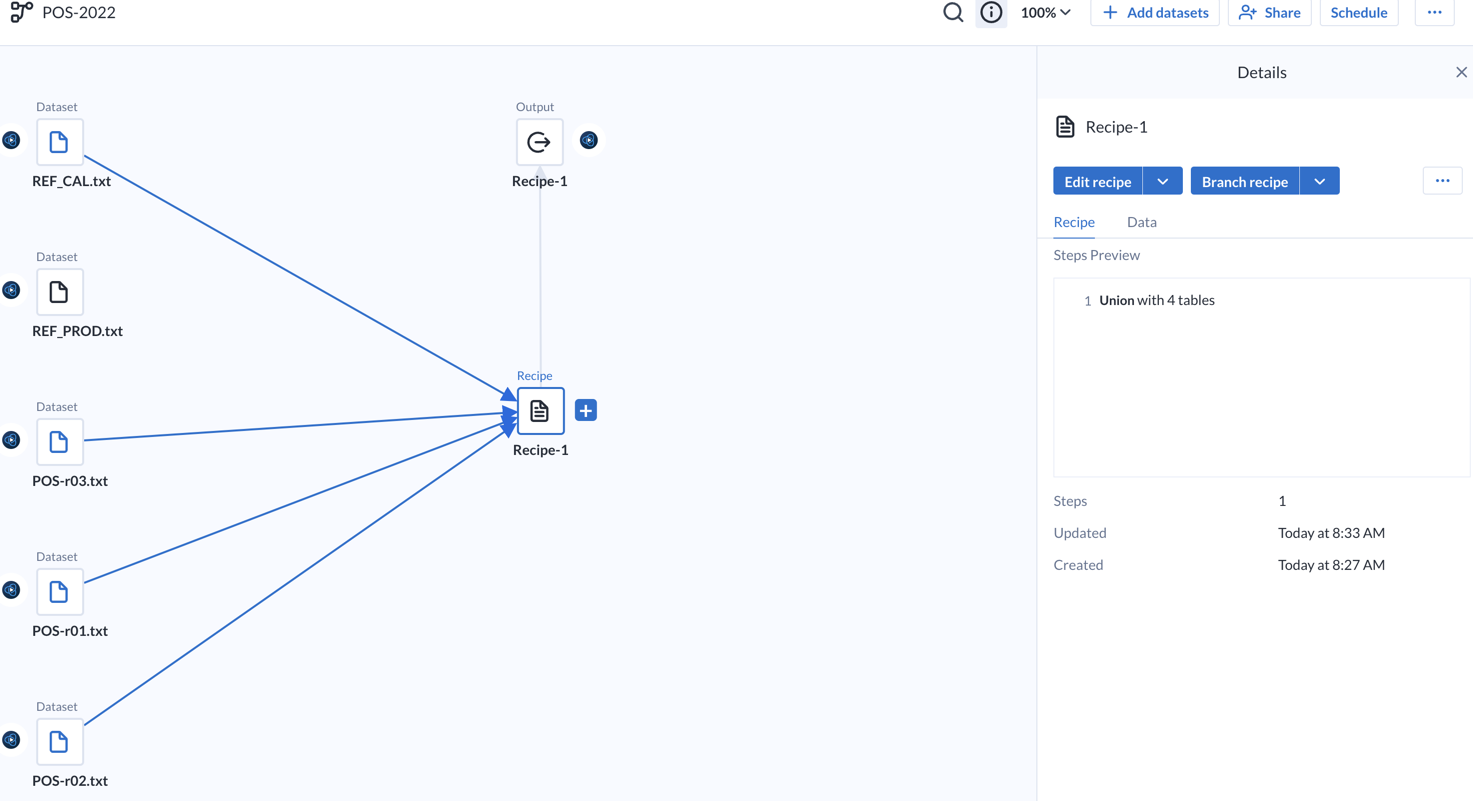
Figure: Flow View page
Flow View Organization
Flow View is organized into the following basic areas:
Area | Description |
|---|---|
Top bar | At the top of the screen, you can access a menu of options, which enable adding objects to your flow, configuring aspects of your flow, and and other flow management tasks. See "Top bar" below. |
Flow canvas | The primary workspace of Flow View is the flow canvas, where you build and organize the objects in your flow. See "Flow Canvas" below. |
Context panel | When you select one or more objects in your flow, the object details and relevant context menu options are available in the right-hand panel. See "Context Panel" below. |
Flow Placeholders:
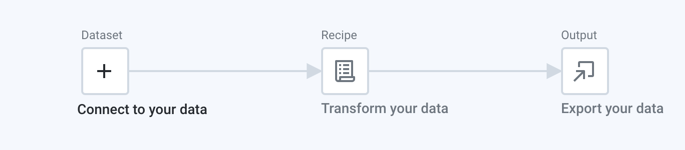
Figure: Placeholders in empty Flow View
When you create a new flow, the above placeholder objects are added to the canvas for your use.
To add or import datasets to your flow, click Connect to your data. See "Add Datasets to Flow" below.
When you add a dataset to the flow, a recipe and output object are automatically added in their respective placeholders.
Top Bar
From the bar at the top of Flow View, the following options are available:
Tip
To rename the flow, click the flow name at the top of Flow View.
Search icon: Click this icon to search for objects in your flow. See Flow Search Panel.
Details icon: Click to toggle display of the details panel. This setting is saved for the individual user.
Zoom menu: Flow View attempts to zoom the canvas to display as much of the flow as possible. As needed, you can change the level to zoom in or zoom out on the canvas.
Tip
You can access these zoom controls through the context menu for the flow canvas.
Zoom in: Zoom in 10% on the canvas to focus on greater detail.
Zoom out: Zoom out 10% from the canvas to see more of it.
Zoom to fit: Change the zoom level to fit the objects of your flow.
Zoom to selection: Zoom to center the selected object on the canvas.
25%, 50%, or 100%: Change the zoom level to one of the preset levels.
Add Datasets: Click to add new datasets to the flow. See "Add Datasets to Flow" below.
Schedule: To add a scheduled execution of the recipes in your flow:
Flow owners can create schedules. Other users must have the appropriate privileges to create schedules for the flow.
Define the scheduled time and interval of execution at the flow level. See Add Schedule Dialog.
After the schedule has been created, you can review, edit, or delete the schedule through the Clock icon.
The time of the next scheduled run is displayed in the time zone of the local browser.
Define the scheduled destinations for each recipe through its output object. These destinations are targets for the scheduled job. See View for Outputs below.
Add Datasets to Flow
From the Flow View page, you can add data through the following objects:
Imported datasets - data sourced from outside the platform
Reference datasets - dataset objects that are created from the output of a recipe in the current flow or another flow
Note
For long-loading relational sources, you can track progress of the load. While the data is loading, some recipe and flow options are disabled.
These independent objects can be joined, unioned, or referenced by other datasets in the flow. For more information on these object types, see "View for Objects" below.
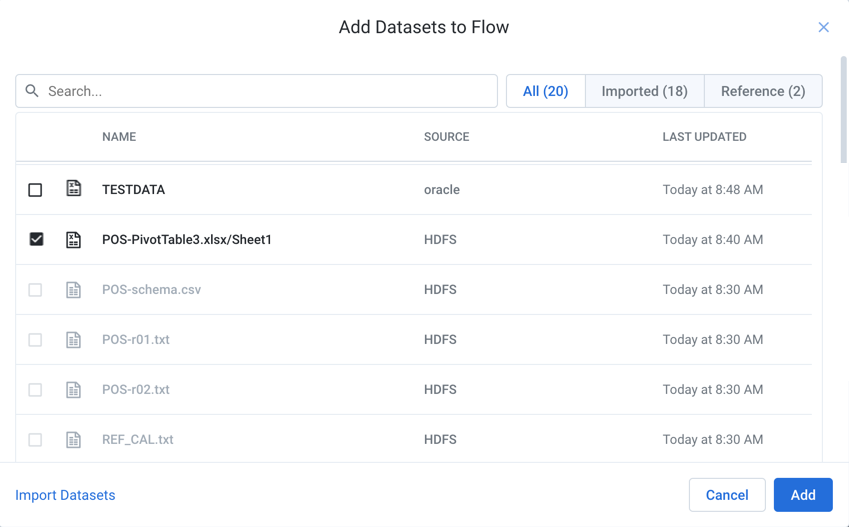
Figure: Add datasets to current flow
Search for or select the dataset to add.
Use the page view controls to browse for other datasets, or select the appropriate tab to filter the list to a specific type of object.
To import new datasets from external sources, click Import Datasets. See Import Data Page.
When you have made your selections, click Add.
The object or objects are added as a new object in flow view.
Flow Canvas
The central workspace of Flow View, the canvas is where you add and arrange the objects in your flow. In the canvas, you can select one or more objects at a time, drag them to reposition them on screen, and zoom in or out to focus on your current area of development.
When you add an object to the canvas, an icon representing it is added to the flow canvas. This object can be repositioned as needed.
Tip
The relative position of objects on the flow view canvas is preserved between screen updates. On refresh, the window on the canvas is repositioned based on the leftmost object on the canvas to focus on the flow to other objects from that one.
If you create an object from another object, such as an output from a recipe, an arrow connects the recipe to the output.
For any object, the objects on which it depends are displayed to the left of the original object, and there is a line from the preceding objects to the original object.
Tip
When you run a job for a recipe, all of the recipes steps for the preceding datasets are executed as part of the job, and only the results of the terminal dataset are generated.
Note
Objects marked with a red dot indicate a problem with the object's configuration. Please select the object to begin investigating the error. Error information may be displayed in the right panel.
Select:
Click the icon for an object to select it.
Object details for the specific type of object are displayed in the context panel.
Right-click the object to open its context menu.
To select multiple objects:
Click and drag over a set of objects.
To select a discrete set of objects, press
CTRL/COMMAND+ click the objects.When you select multiple objects, the objects are listed in the context panel with options that are applicable to all of the objects. Some objects, like notes, do not have a context panel.
Right-click to display the context menu of options that are applicable to the selected objects.
See "Context Panel" below.
Move:
To move an object, click and drag it to a new location. Any arrows connecting to the object are repositioned as well.
To move multiple objects, select them and then drag them to a new location.
Canvas notes
As you develop your flow, you can add helpful notes on the canvas in various sections of the flow. For example, if you are collaborating with another user, you can leave status information about objects that are still in progress.
Tip
You can drag notes like other objects on the canvas, so they can be repositioned with the related flow object.
From a note's context menu, you can edit or delete the note.
Flow objects
In the flow canvas, you work with the following types of objects:
Connections
Imported datasets
Unstructured datasets
Recipes
Outputs
Notes
Reference datasets
Datasets with parameters
Datasets:
To begin working with data:
Click Add datasets. Locate your source data and import it into your flow. See "Add Datasets to Flow" above.
In Flow View, select the imported dataset on the flow canvas. Then, in the context panel, click Add new recipe. A new, empty recipe is associated with the dataset.
Tip
Double-click an imported dataset to see a preview of it. Some datasets cannot be previewed.
Tip
You should rename your recipe as soon as you create it.
To open in the Transformer page, click the recipe and select Edit Recipe. See Transformer Page.
When created, these objects are connected together by lines flowing between them, which show the relationships between the objects in the flow.
Recipes:
A recipe is a set of steps to transform source data into the results you desire.
Tip
Double-click any recipe to edit it.
A recipe can be created from the following objects:
An imported dataset, as described above.
A reference dataset is an object that has been pulled into a flow from another flow. See "View for Reference Datasets" below.
Another recipe. You can chain together recipes. For example, you may have a set of steps that you always apply at the beginning of transforming a specific type of feed. This recipe can be added into each flow as the first recipe chained to an imported dataset of that feed type.
Output objects:
The following objects can be created off of a recipe:
An output object is a set of publishing targets for which you can execute jobs.
A reference object is a reference to one of your flow's recipes that can be used in another flow. When a reference object is created, the target flow receives the output of the executed recipe.
In the target flow, this object appears as a reference dataset.
When a reference dataset is used in a flow, the target flow receives the output of the executed recipe.
For more information on these objects, see Application Asset Overview.
Context Panel
Select an object from your flow to open an object-specific panel on the right side of the screen.
When multiple objects are selected, the displayed details and options apply to all of the objects.
If the selected objects are of different types, the available options are limited.
Tip
You can right-click any object in Flow View to see the list of available actions that appear when you select it and choose from the right panel.
Depending on the type of object or objects that you select in the canvas, the view in the context panel changes:
Tip
The object on the canvas and the context panel display the same set of context menu options. For more information on these options, see the links below.
View for Imported Datasets
View for Dataset with Parameters
For datasets with parameters, the context panel and available options are different from non-parameterized imported datasets. See View for Dataset with Parameters.
View for Unstructured Datasets
If detecting structure has been disabled for your imported dataset, the structure detecting steps are broken out into the first steps of a recipe that is auto-generated for you. You can review and modify them within the recipe. See View for Unstructured Datasets.
View for Recipes
See View for Recipes.
View for Outputs
Outputs are created from recipes. See View for Outputs.
View for Reference Datasets
A reference dataset is sourced from the outputs of another recipe. A reference dataset can be used in a flow other than the source flow. See View for Reference Datasets.