Plan Basics
A plan enables the execution of a sequence of discrete tasks in the Dataprep by Trifacta platform. These tasks can be flow jobs, workflow jobs, HTTP requests to other platforms, and much more. The sequence of tasks can be gated based on success or failure criteria and can be restarted if needed where the plan failed.
Overview
In many scenarios, data pipelines have dependencies in them. Data sourced from one dataset must be cleaned and delivered for use in another data pipeline. When a pipeline is built, it needs to be scheduled for periodic execution. Ideally, when the execution completes, downstream stakeholders must be informed that the pipeline has succeeded or failed in execution.
In Dataprep by Trifacta platform, plans provide the mechanism for building these robust data pipelines within the application, in which sequences of tasks can be executed to deliver more diverse datasets. As a result of the success or failure of these executions, the Trifacta Application can deliver messages to receiving applications, such as Slack.
A plan is a sequence of tasks.
A task is a type of execution in the Trifacta Application.
A trigger is a condition under which a task is executed.
Tip
As one of your plan tasks, you can configure an HTTP message, which allows you to trigger endpoints in the Trifacta Application itself. So, you can configure your plan executions to trigger a wide range of activities within the product itself.
For more information, see Overview of Orchestration.
Example
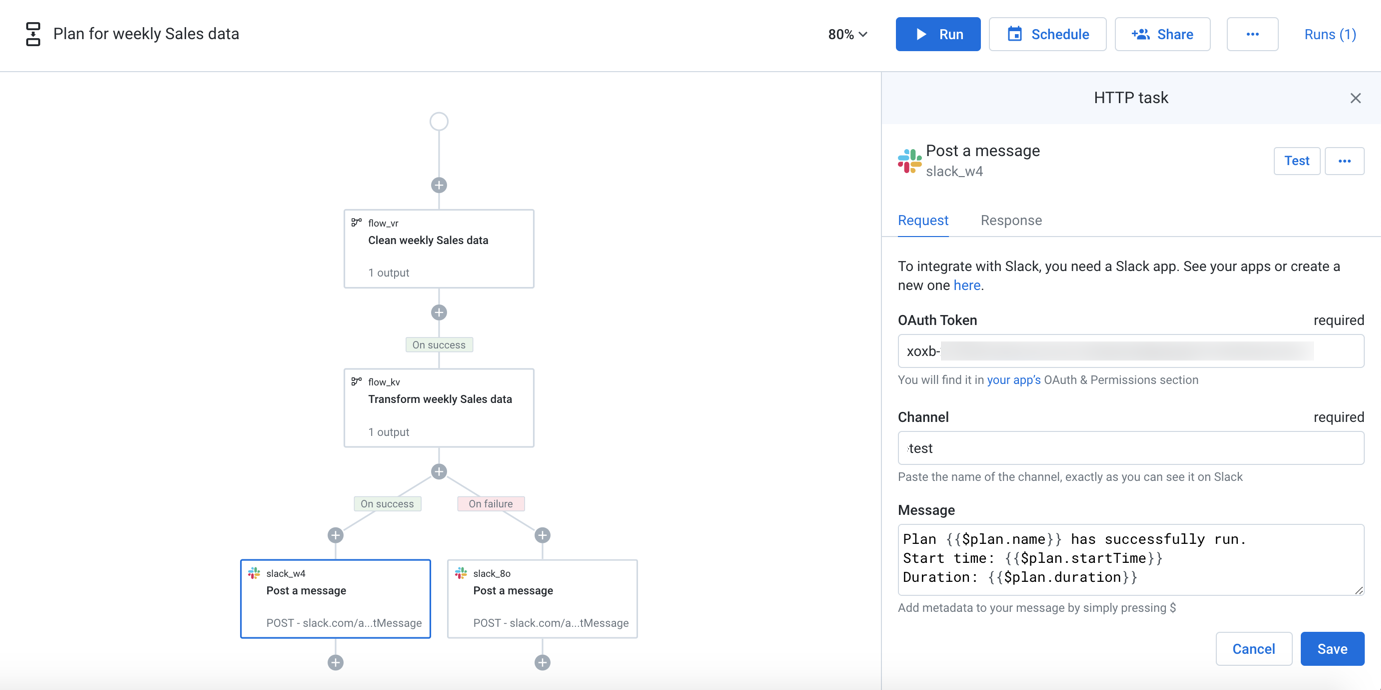
The following example shows how to create a plan that executes the following tasks:
Execute the task that performs the initial cleaning of your data. The results data is saved to a known location.
Execute the task that transforms the cleaned data for downstream uses.
Based on the outcome of step 2:
On success: Send a success message to a Slack channel.
On failure: Send a failure message to a Slack channel.
In Plan View, this plan might look like the following:

Figure: A plan with a sequence of tasks and branching Slack tasks to deliver results messages
After creating the above plan, you can perform test runs.
If the tests are successful, you can schedule the plan for periodic execution.
Create a Plan
Prerequisites
You must have access to all of the assets that you intend to use it in your plan.
For each flow in your plan:
All of the recipes must have output objects associated with them.
Each output object has at least one of the following that is created for it:
file-based output
table-based output
Specifying an HTTP task requires knowledge of the target endpoint and the parameters required for the request. HTTP tasks are considered developer-level assets.
Steps
From the left navigation bar, click the Plans icon.
In the Plans page, click Create. A new plan with the name
Untitled - Xis created, whereXis a number.Tip
Click the
Untitled - Xto enter a plan name and description.In Plan View, click the Plus icon in the plan canvas.
Select the type of task from the right panel.
Flow task:
To add a flow task, select Flow task.Then, select the output of the flow to generate.
Tip
You are prompted to create an output if there are no outputs associated with the flow.
To create the flow task, click Create task. The task is created and added to the plan.
To add or remove outputs, click Add/remove outputs from the right panel and click Update task.
HTTP task:
To add an HTTP task, select HTTP task and enter the required information.
Tip
You can test the HTTP task before you create it. To test for a basic connection and get relevant information, you should only use the GET method.
To save the task, click Save. The configuration is saved and added to the plan.
To test the plan, click Run.
To create a schedule for the plan, click Schedule in the top menu bar or click the empty circle in the Plan view page.
Schedule a Plan
You can schedule executions of your plan. See Schedules.
How To
For more information on how to create and manage your plans, see Plan Tasks.
Topics: