Create Dataset with SQL
As needed, you can insert custom SQL statements as part of the data import process. These custom SQL statements allow you to pre-filter the rows and columns of relational source data within the database, where performance is faster. This query method can also be used for wider operations on relational sources from within the Dataprep by Trifacta platform.
Limitations
General
Warning
All queries are blindly executed. It is your responsibility to ensure that they are appropriate. Queries like DELETE and DROP can destroy data in the database. Please use caution.
Note
Column names in custom SQL statements are case-sensitive. Case mismatches between SQL statement and your datasource can cause jobs to fail.
SQL statements are stored as part of the query instance for the object. If the same query is being made across multiple users using private connections, the SQL must be shared and entered by individual users.
Note
If a dataset created from custom SQL is shared, collaborators are not permitted to edit the custom SQL.
Each statement must be terminated with a semi-colon (
;) and a newline:SELECT * FROM myDB.myTable;
SQL statements must be valid for the syntax of the target relational system.
If you modify the custom SQL statement when reading from a source, all samples generated based on the previous SQL are invalidated.
Declared variables are not supported.
Common Table Expressions (CTEs) are not supported.
For each SQL statement, all columns must have an explicit name. Example:
Function references such as:
UPPER(col)
Must be specified as:
UPPER(col) as col_name
Each SQL query must be a single statement.
Single Statement
The following limitations apply to creating datasets from a single statement.
All single-statement SQL queries must begin with a
SELECTstatement.Selecting columns with the same name, even with
"*", is not supported and generates an ambiguous column name error.Tip
You should use fully qualified column names or proper aliasing. See Column Aliasing below.
Users are encouraged to provide fully qualified path to table being used. Example:
SELECT "id", "value" FROM "public"."my_table";
You should use proper escaping in SQL.
Use
To use, please complete the following steps.
Steps:
In the Library for Data page, click Import Data.
In the Import Data page, select a connection.
Within your source, locate the table from which you wish to import. Do not select the table.
Click the Preview icon to review the columns in the dataset.
Tip
You may wish to copy the database, table name, and column names to a text editor to facilitate generating your SQL statement.
Click Create Dataset with SQL. Enter or paste your SQL statement.
Warning
Through the custom SQL interface, it is possible to enter SQL statements that can delete data, change table schemas, or otherwise corrupt the targeted database. Please use this feature with caution.
Note
If this button is disabled and you have enabled the custom SQL feature, the connection that you are using may lack credentials. Please review the connection definition.
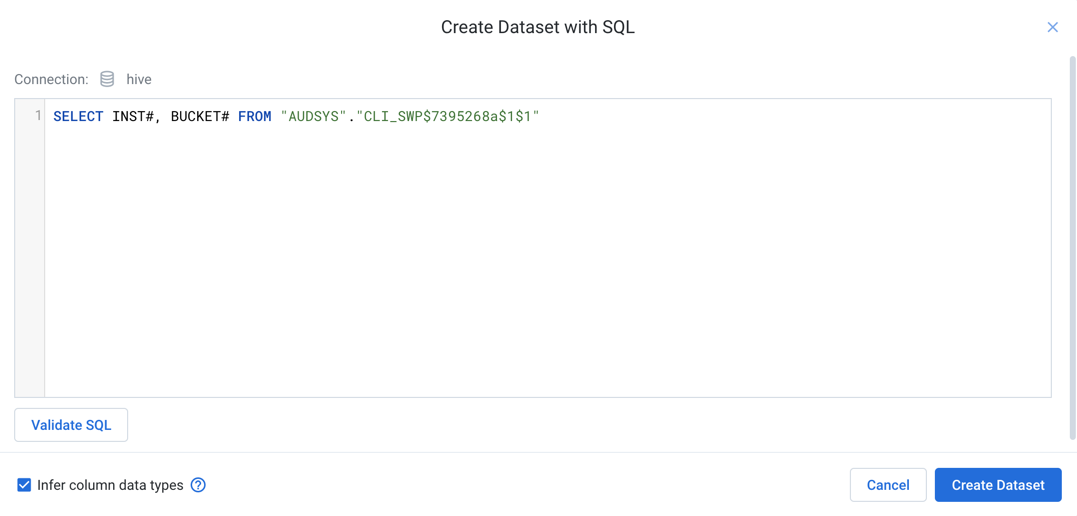
Figure: Create Dataset with SQL dialog
To test the SQL, click Validate SQL. For details, see below.
To apply the SQL to the import process, click Create Dataset.
The customized source is added to the right panel. To re-edit, click Custom SQL.
Complete the other steps to define your imported dataset.
When the data is imported, it is altered or filtered based on your SQL statement.
Create with Variables
If parameterization has been enabled, you can specify variables as part of your SQL statement. Suppose you had table names like the following:
publish_create_all_types_97912510
publish_create_all_types_97944183
publish_create_all_types_14202824
You can insert an inline variable as part of your custom SQL to capture all of these variations.
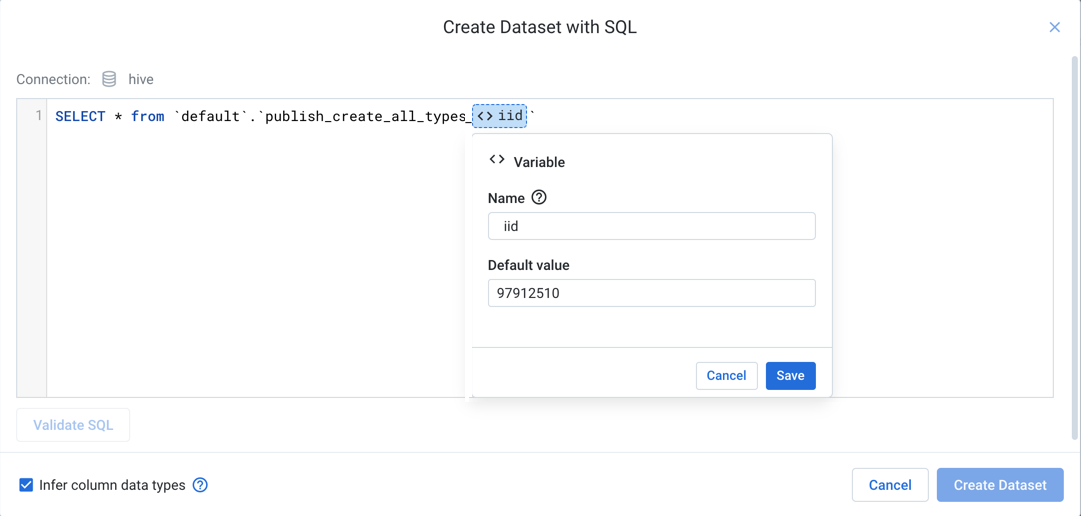
Figure: Insert variables in your custom SQL
In the above, custom SQL has been added to match the first example table. When the value is highlighted and the icon is clicked, the highlighted value is specified as the default value.
Tip
Type env. to see the environment parameters that can be applied. These parameters are available for use by each user in the environment.
Provide a name for the variable, and click Save.
Through the Run Job page, you can specify overrides for the default value, so the same job definition can be used across all matching tables without much modification.
Create with timestamp parameter
You can insert a timestamp parameter into your custom SQL. These parameters are used to describe timestamp formats for matching timestamps relative to the start of the job at the time of execution.
Note
A SQL timestamp parameter only describes the formatting of a timestamp value. It cannot be used to describe actual values. For example, you cannot insert fixed values for the month to parameterize your input using this method. Instead, parameterize the input using multiple input variables, as described in the previous section.
Note
Values for seconds in a SQL timestamp parameter are not supported. The finest supported granularity is at the minutes level.
Note
When the dataset is created, the current date is used for comparison, instead of the job execution date.
In the following example, the timestamp parameter has been specified as YYYY-MM-DD:
SELECT * FROM <YYYY-MM-DD> ;
If the job executes on May 28th, 2019, then this parameter resolves as 2019-05-28 and gathers data from that table.
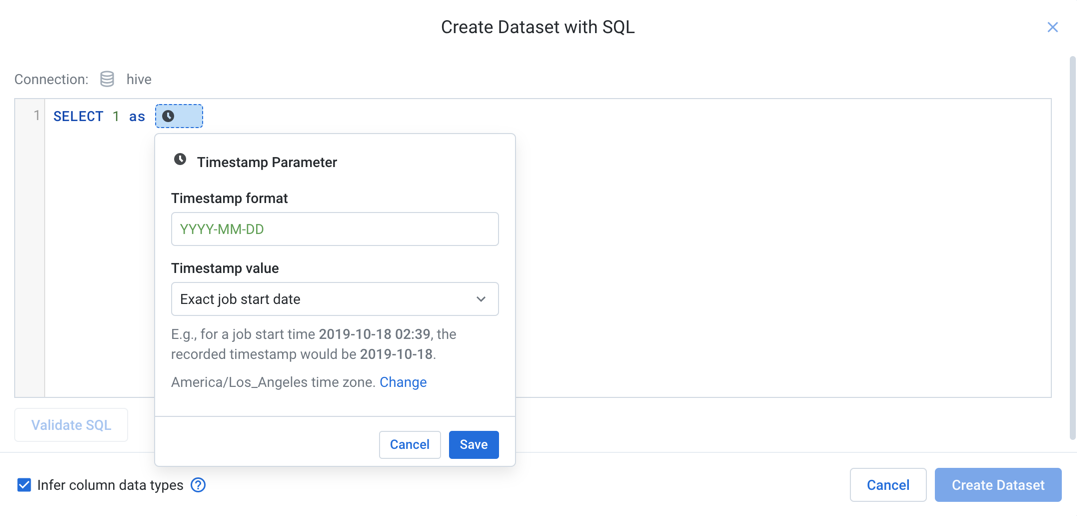
Figure: Insert timestamp parameter
Steps:
Click the Clock icon in the custom SQL dialog.
Timestamp format: You can specify the format of the timestamp using supported characters.
Tip
The list and definition of available tokens is available in the help popover.
Timestamp value: Choose whether the timestamp parameter is to match the exact start time or a time relative to the start of the job.
Tip
You can use relative timestamp parameters to collect data from the preceding week, for example. This relative timestamp allows you to execute weekly jobs for the preceding week's data.
To indicate that the timestamps are from a timezone different from the system timezone, click Change.
To save the specified timestamp parameter, click Save.
SQL Validation
You cannot create a SQL-based dataset if any of your SQL statements do not pass validation. Errors must be corrected in the SQL or in the underlying database.
All
SELECTstatements are planned, which includes syntactical validation. However, these statements are not executed. Validation should be a matter of a few seconds.
SQL Syntax
For more information on SQL syntax and supported variations, see Supported SQL Syntax.