Import Excel Data
In addition to CSV and other formats, Dataprep by Trifacta can directly import Microsoft® Excel® workbooks and folders containing workbooks.
The worksheets of a workbook can be imported as:
Individual datasets
A single dataset
A dataset with parameters
Note
When importing one or more Excel files as a parameterized dataset, you select worksheets to include from the first file. If there are worksheets in other Excel files that match the names of the worksheets that you selected, those worksheets are also imported. All worksheets are unioned together into a single imported dataset with parameters. Pattern-based parameters are not supported for import of Excel worksheets.
Limitations
Note
Before you begin, you should review information on file formats supported for import, which cause your files to fail to import or to be properly ingested and formatted. For more information, see Supported File Formats.
XLSX and XLS format are supported. Other Excel-related formats, such as XLSM format, are not supported.
Strict Open XML format is not supported. You can save the file as an XLSX file and then import it.
Some characters, such as hashtags (
#) and curly braces ({}) cannot be used in filenames. For more information, see Supported File Formats.Filepath and source row number information is not available from original Excel files. These references return values from the CSV files that have been converted on the backend. For more information, see Source Metadata References.
Source Excel files with cells bracketed by single double quotes may not be properly ingested if any terminating quotes are missing.
Tip
You can check the data quality bars for mismatched values or, for strings, the data histogram bars for anomalous values to see if the above issue is present. If so, deselect Detect Structure on import. Then, use a Split rows transformation applied to the affected column to break up the column as needed.
Macros in your Excel files are not imported.
During import, cell formulas are applied, and the output values are used in the imported dataset.
You cannot import password-protected Excel files.
Import of Excel files with protected columns or cells is not supported.
Compressed Excel files are not supported.
Conversion of large Excel files require non-linear increases in memory requirements.
If loading your Excel-based dataset in the Transformer page results in a blank screen, please take a new sample. The file requires conversion again with each generated sampling.
Note
When you share a flow that contains a dataset sourced from Microsoft Excel, the user with whom the flow is shared may receive a
Could not parseerror. In this case, the user does not have access to the original sample. The workaround is to take a new sample or to run a job on the full dataset.Latest state of the Excel file may not be reflected in the Transformer page due to caching. When you run a job, the platform always collects the latest version of the data and converts it to CSV for execution.
Use
When Excel data is imported intoDataprep by Trifacta, each sheet in an imported file must be converted to a CSV and then ingested for use.
Steps:
In the menu bar, click Library for Data page.
In the Library for Data page, click Import Data. Select the connection to use.
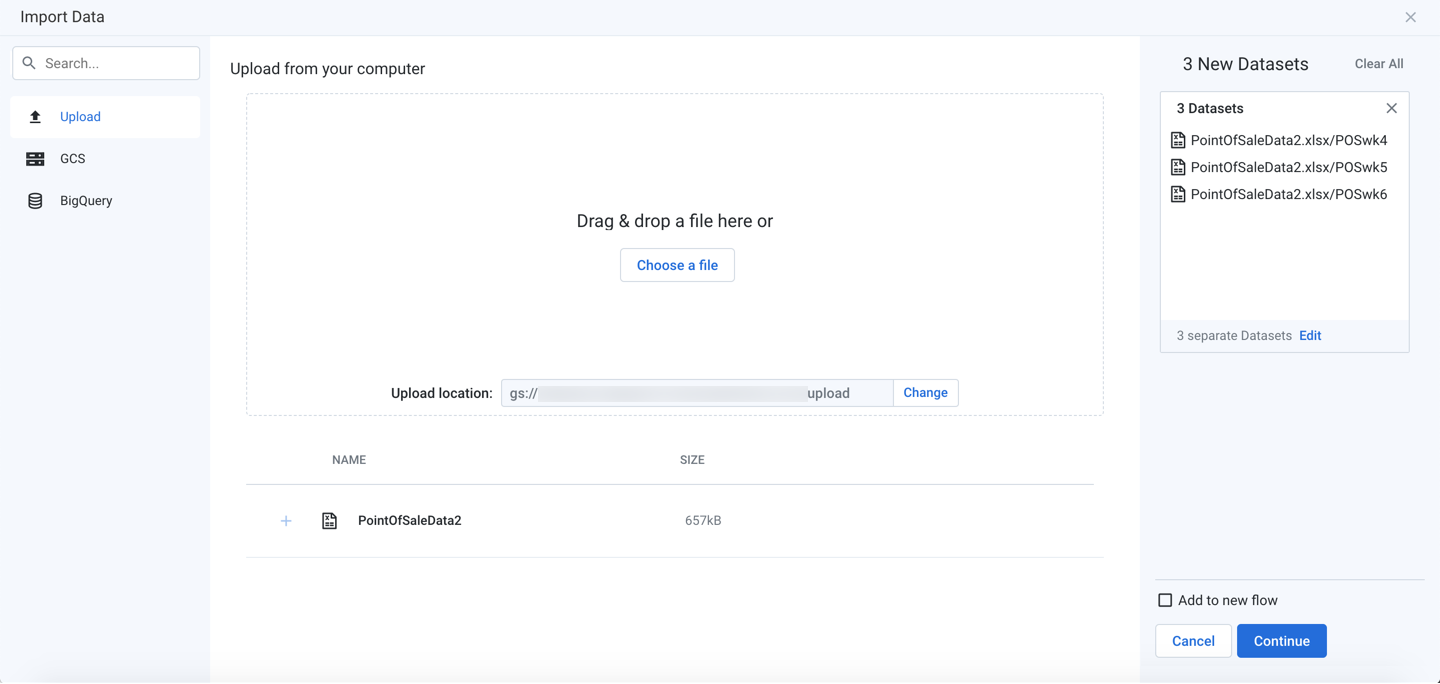
Figure: Import Excel workbook
Tip
If you experience issues uploading large XLS/XLSX files, you can convert the files to CSV files and then upload them.
After you select the workbook, it is uploaded and converted to CSV format and stored by the platform. Depending on the size of the workbook, this process may take a while.
By default, all worksheets in the workbook are imported as individual datasets. To change how the data is imported, click Edit in the right panel.
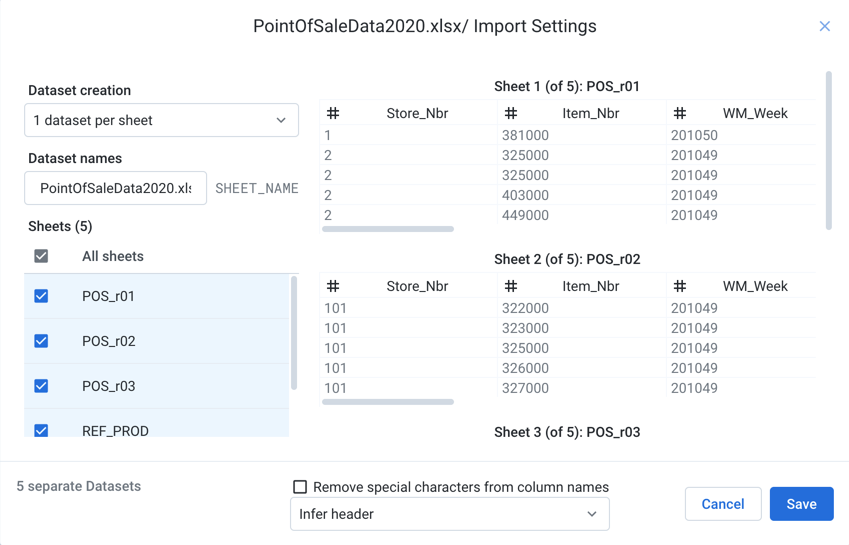
Figure: Import settings for Excel datasets
Dataset creation:
1 dataset per sheet: (Default) Each selected sheet in the workbook is imported as a separate dataset.
Specify the base name of the datasets that you are creating. If you are creating a single dataset, the name of the workbook is used.
Selected sheets into 1 dataset: All selected sheets in the workbook are combined and imported as a single dataset.
Note
The schemas of each dataset must match. Columns must be listed in the same order in each dataset. The column headers are taken from the first selected dataset.
All and future sheets into 1 dataset: If the workbook is updated periodically with new sheets that you would like to add in the future, select this option. After initial selection of sheets, all sheets that are added to the workbook in the future are automatically added as part of the imported dataset.
Tip
Use this option to capture future additional sheets or changes to the names of the current sheets.
Note
When an imported dataset based on this option is first loaded into the Transformer page, the data grid displays an initial sample taken from rows in the first sheet only. When you take another sample from the Samples panel, data is collected from other sheets.
Note
This option is available only if you are connected to a backend file storage system.
Selected sheets:
You can select the sheets to import.
Note
If you are importing a folder of Excel files, data preview and initial sampling are executed against the first file found in the folder.
To preview the data of an individual sheet, mouse over a dataset and click Jump to.
Remove special characters from column names: Select this option to remove any special characters from the inferred column headers during import.
From the drop-down, you can specify how you want the application to parse the data for column headers.
To save changes, click Save.
After your datasets have been added, you can edit the name and description information for each in the right navigation panel.
Optionally, you can assign the new dataset(s) to an existing flow or create a new one to contain them.
For more information, see Import Data Page.