Validate Column Values against a Dataset
When needed, you can validate a column of values against a pre-defined set of values maintained in a separate dataset. This method of data validation is most useful for String-based data that does not easily map to a specific pattern of values.
Overview
This method of validation is completed through the following general steps:
Prepare your validation dataset. Create a dataset containing the unique values against which you wish to validate.
Import your validation dataset. After you have prepared the dataset externally, you should import it into the Cloud Portal.
Join your data to your validation dataset. You perform a join from the dataset you're wrangling to the validation dataset that you imported. Validation errors should be identifiable as missing values in the validation column.
Triage defects as necessary.For rows that cannot be resolved, additional wrangling may be necessary.
Standardize data. You can use the Standardize tool to review the differences between invalid data and valid data.
Example
This approach is best demonstrated by example. Below, you can see a set of orders for product.
productName | customerName | Qty | totalSales |
|---|---|---|---|
Product ADA | Customer ABC | 2 | 26 |
Product AEV | Customer DEF | 4 | 100 |
Product DXL | Customer EFG | 6 | 42 |
Product EDM | Customer ABC | 1 | 26 |
Product JTO | Customer DEF | 3 | 75 |
Product JUB | Customer EFG | 5 | 35 |
Product NRS | Customer ABC | 6 | 26 |
product NSE | Customer DEF | 8 | 200 |
Product ZZZ | Customer EFG | 10 | 80 |
Notes:
You can see that this set of orders is spread across 10 different products for three different customers.
In the productName column, there is a mismatch in capitalization.
The final productName value (
Product ZZZ) does not exist.
The product names in this list must be validated against a dataset containing the list of all available products. This list is 100 product names long.
You can use the links below to download these datasets as CSV files for exploration in your project or workspace.
Prepare Validation Dataset
If you haven't done so already, you should prepare your validation dataset for use in the Cloud Portal. Below, you can see the first 10 rows of the ProductNames dataset:
productName |
|---|
Product ADA |
Product AEV |
Product ANH |
Product ARA |
Product ARM |
Product AUJ |
Product BAD |
Product BAP |
Product BEI |
Product BEZ |
Notes:
A column header is provided in the dataset. This is helpful for identifying the column to use later as the join key.
You may wish to enter a validation column, simply contains the value
TRUE.Tip
If your dataset does not contain this column, you can create a new formula within the Transform Builder to insert this value. This step is covered later.
Import Validation Dataset
If you have prepared your dataset, you must import into in the application.
Steps:
In the Cloud Portal, click Library for Data.
Click Import Data.
Navigate to the file or files to import.
Tip
If you are using the example files, you can right-click them above, download them to your desktop, and then drag and drop them into the Import Data page.
Import the file as a new dataset.
Tip
If you are using the example datasets, you can call it
Reference-ProductNames.It may be helpful to import the file into a new file and create a recipe from it.
For the example dataset, there is a single column of values. To make this dataset useful as a validation dataset, add the following transformation, which adds a second column called validation containing the value true for each row.
Transformation Name |
|
|---|---|
Parameter: Formula type | Single row formula |
Parameter: Formula | 'true' |
Parameter: New column name | validation |
The example reference dataset now looks like the following:
productName | validation |
|---|---|
Product ADA | TRUE |
Product AEV | TRUE |
Product ANH | TRUE |
Product ARA | TRUE |
Product ARM | TRUE |
Product AUJ | TRUE |
Product BAD | TRUE |
Product BAP | TRUE |
Product BEI | TRUE |
Product BEZ | TRUE |
Join with Validation Dataset
Now you can join your existing dataset with the new validation dataset. A join performs a comparison of the column values in one dataset compared to the column values in another dataset. Where matches are detected, columns and values of the joined-in dataset are inserted into the source dataset. For more information on joins, see Join Types.
Steps:
Edit the recipe of the source dataset.
As a new step for the recipe, enter
join datasetsin the Search panel.Select the source of the joined-in data:
If you created a recipe and added steps (as in the example), then click the Recipes in current flow tab.
If you imported a clean dataset, then click one of the Datasets tabs.
For Join type, select Left.
Tip
A left join includes all rows from the left (source) dataset and only the matching rows from the right dataset for a specified set of column values (join keys) in the left dataset. If a column value in the left dataset does not exist in the right dataset, then null values are listed for that row's entry for all columns imported from the right dataset.
For the Join keys, select the column containing values to check from the left (source) dataset and then column containing the reference values in the right dataset.
Tip
In the example datasets, both of these columns are called
ProductNames, which assists the join tool in identifying the join key columns.Under Join Keys, hover over one of the column names. Then, click the Pencil icon.
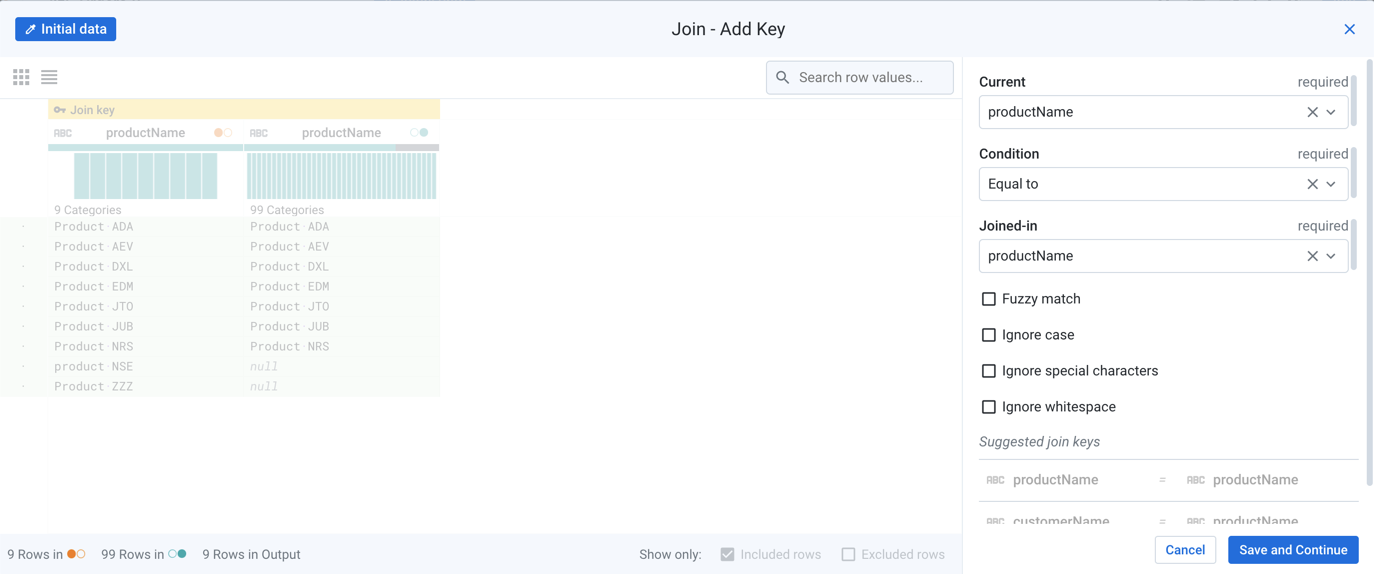
Figure: Edit join keys
When you edit the join keys, you can specify the Condition, which defines the type of comparison that is performed to determine a match.
The other options allow you to fine-tune how matching is performed. In particular, the Ignore case option is off, which means that by default, joins are case-sensitive. So,
product 01does not match toProduct 01.Tip
In the example data, you can see that the
product NSEentry does not have a match, which is due to differences in case. If Ignore case is enabled, then this entry may find a match. However, you may wish to maintain case-sensitive searches to ensure that you can clean up the data correctly.Click Save and continue.
Click Next.
Select all columns, and click Review.
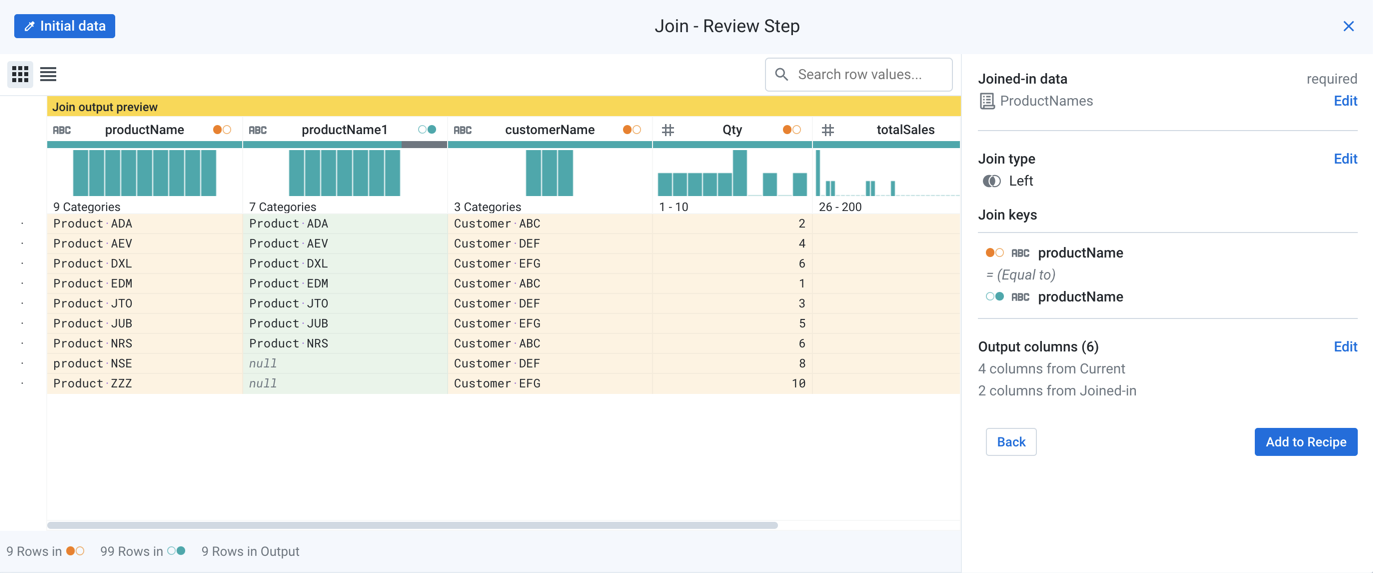
Figure: Review join
Tip
In the example, you can see that two rows failed to match.
Click Add to recipe.
Triage Invalid Data
You should now have a dataset containing all columns from both datasets.
Tip
In the example dataset, a second column called validation was added. This column contains null values for the mismatched rows. So, you can delete the duplicate ProductName column, which contains null values in two rows.
You can make some decisions on how to triage the invalid values in the ProductNames column.
Insert error messages
You can use a transformation to replace the null values in the validation column with a meaningful message:
Transformation Name |
|
|---|---|
Parameter: Columns | validation |
Parameter: Formula | IF ($col == NULL(),'Error - invalid Product Name','ok') |
The transformation replaces the null values with Error - invalid Product Name and writes ok for the other rows.
Delete invalid rows
If the entire row of data is invalid because of the invalid value, then you simply delete the row. This transformation deletes rows, where the validation column contains a null value:
Transformation Name |
|
|---|---|
Parameter: Condition | Custom formula |
Parameter: Type of formula | Custom single |
Parameter: Condition | (validation == NULL()) |
Parameter: Action | Delete matching rows |
Update validation dataset with new values
If you discover that some of the mismatched rows should be part of your validation dataset, you can follow these general steps to add them.
Steps:
In Flow View, add a new recipe off of the recipe where the join occurs.
Edit this new recipe.
Insert this transformation to filter the dataset down to the rows containing the new values:
Transformation Name
Filter rowsParameter: Condition
Custom formula
Parameter: Type of formula
Custom single
Parameter: Condition
(validation == NULL())
Parameter: Action
Keep matching rows
You can then delete all columns except (in the example) the
ProductNamecolumn. From the column menu of theProductNamecolumn, select Delete others.You should now have a single column containing the missing values. You can create a union between this dataset and the validation dataset to add the values. See Append Datasets.
Run a job on this recipe to generate the output file.
This output file can then be used to replace the source data. In Flow View, select the imported dataset. From the context panel, open the More menu and select Replace.
Standardize invalid data
You can standardize values in join key column for your source data, which may address some of the invalid data. The Standardization tool attempts to cluster similar values together within the column, so that you can try to identify if your values in your source dataset can be matched to values in the target dataset.
Tip
After you have identified issues, this step may be best to apply before the join. By applying it before the join, some or all of the mismatched value issues may be addressed.
For your source column, you can select Standardize from the column menu.
In the example, the ProductNames column values are being standardized. In this case, the lower case product NSE value has been corrected to be Product NSE.
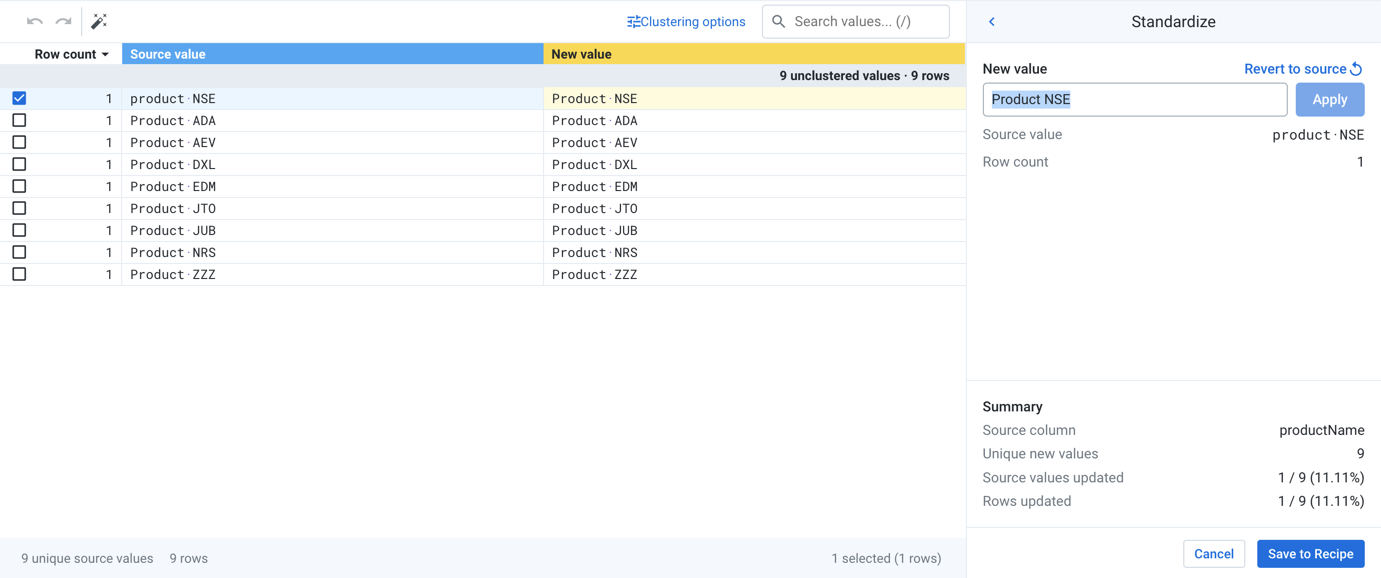
Figure: Standardize join key values
For more information, see Overview of Cluster Clean.