Work through the settings screens to configure Connect.
Displays Alteryx Connect version information, directory locations, license status, and other information.
Set a New Password for the superuser account 'admin'.
Type a password.
Type the password again to verify correct entry.
Select Save.
Set a New Password for the H2 database.
Type a password.
Type the password again to verify correct entry.
Select Save.
Set the values associated with your instance of Connect.
Instance Name: Type or paste a name for the instance connection.
Base URL: Type or paste the URL where the Connect instance will be hosted.
Appearance theme: Select to view the user interface in either the modern or legacy theme.
Enable asset recommendation: When enabled, enter a cron expression to schedule the Asset recommendation calculation. By default, the asset recommendation is calculated daily at 2am. Recommendations improve as you continue to use Connect.
Use CDN for JS & CSS files: When enabled, libraries are downloaded from CDN. If disabled, files are downloaded from the Connect server.
Help us improve Alteryx Connect by allowing the collection of anonymous usage data: Select to provide usage data to the Customer Experience Improvement program. This is selected by default.
usage Data Collected
As part of the Customer Experience Improvement program, Connect can gather information on how users are interacting with the Connect platform in accordance with the Alteryx Privacy Policy. This includes any time a user interacts with a page or performs a search.
When a user begins a session, Connect gathers the following information:
A hash value of the user's license number.
The version of Connect in use.
A hash value of the SeatGuid.
The timestamp of when the datapack was prepared.
For each user interaction within a session, Connect gathers the following information:
A hash value of the user ID.
A hash value of the entry ID.
The event type, such as search versus page selection.
The timestamp of when the event occurred.
An identifier related to the current session.
Select Save.
Add and manage single sign-on options. You can select either a new SAML or Active Directory option.
Note that various issues can occur due to custom configuration on the customer's side. In this case, check the FAQ for solutions to different scenarios.
Important
It is not allowed to have duplicate emails with respect to SAML or Windows authentication. If a user's email matches a SAML or Windows authentication email, you must change the user's email that you use to set up the Connect account.
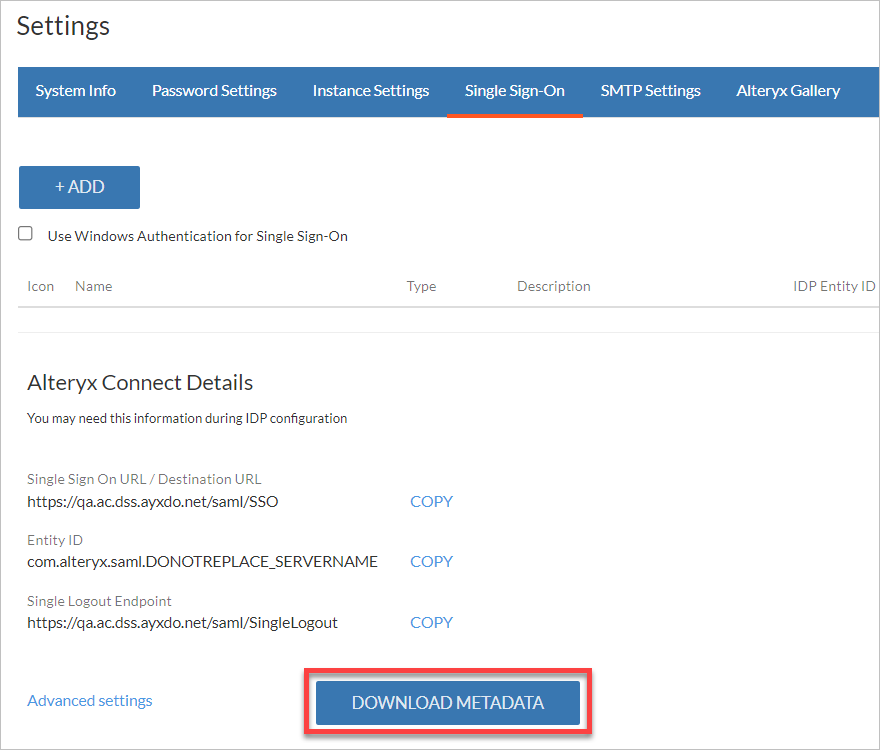
Add and manage single sign-on options for multiple IdPs. To add a new SAML option:
Go to Settings > Single Sign-On and make sure you can see the Download Metadata button. If you don't see this button, refer to the FAQ section of this page for troubleshooting.
Verify that a user's email in Connect doesn't match a SAML or Windows authentication email.
Select + ADD to open the New SAML window.
Provide a Name, Icon, and Description of the new IdP. Then select the method you want to use to provide Identity providerdetails.
You may need to visit the IdP site for the necessary information.
Add IDP endpoint: Enter the SSO URL endpoint and Entity ID, which is a globally unique name for a SAML entity. The ID and endpoint locations do not need to match, but both should contain the needed URL paths and ports to be reached by an external service.
Upload IDP metadata: Select Choose File to browse to a local XML file that contains the IdP metadata, then select Open to upload the file.
Get IDP metadata from URL: Provide the IDP Metadata URL. Connect can only access publicly-available URLs.
Automatically redirect to IDP when logging in: To automatically redirect to IdP when logging in, check the Automatically redirect to IDP when logging in box. Users will be redirected from the Connect login page to IdP page to login. You can set this option only for one SAML.
You can still access the standard Connect login page by logging out.
Select Use Windows Authentication for Single Sign-On to link users' Connect logon with their Windows logon. See Windows Authentication.
Use the information provided under Alteryx Connect Details when registering Connect as a service provider with an IdP. For more information on how to register a service provider with an IdP, see the IdP's documentation.
Endpoint URL: The location an IdP points to when making a connection.
Entity ID: The unique identifier for Connect as a service provider.
Start URL: The URL available when first logging on to your Connect instance.
Download Metadata: This creates a service provider metadata file that can be used to configure the IdP when configuring SAML single sign-on. If you can’t see the Download Metadata button, see the FAQ section for troubleshooting.
Use the table to manage configured IdPs.

In the Active field, select the black icon to enable an IdP for use. Confirm, and a confirmation message appears in the bottom left. The icon changes to a green check mark.
After every IdP change, the IdP is disabled and needs to be activated again.
In the Detail field, select Test to test the provider connection. Only the connection to the specified server is tested.
In the three-dot menu:
Select Edit to edit an existing IdP connection. Select Save to confirm.
Select Delete to remove an existing IdP connection. Select Remove to confirm.
Advanced Settings
Advanced settings contains options for changing your default Connect certificate, certificate key, and certificate store.
Important
Starting with version 21.4, Connect is using SHA-256 algorithm for SAML by default. As an admin, you can change the configuration to SHA-1 in Global Config if needed. If you experience any issue, contact customer support.
We provide connectors for the most popular LDAP directory - Microsoft Active Directory (AD). To add a new Active directory option, select + ADD to open the Add Active Directory window.
Provide a Directory Name. Optionally, specify the value for the Default Internal Group field. This field determines which internal group the new users are added to.
You can specify the way how Full Name of a user will be constructed. You can use any LDAP attribute to create the Full Name. For example, ${displayName} (${sAMAccountName}) will be displayed as John Doe (jdoe).
Important
You can use special characters from all languages when loading users and directories from Active Directory.
You can use up to 104 characters.
You can’t use certain characters. Invalid characters are: " / \ [ ] : ; | = , + * ? < > whitespace.
In Server settings, provide a Hostname and Port. Optionally, specify Username and Password. For communication on secure protocol, check the Use SSL box. If your directory server is configured for the anonymous mode, check the Use anonymous box.
In Schema settings provide Base DN, a root node in LDAP from which to search for users and groups.
If you want to add new parameters, configure the User Schema, Group Schema, and Membership Schema settings.
In Other, you can specify the way how an XID of a user will be constructed by entering the XID Definition.
Use any LDAP attribute: for example, ${mail} will create an XID john.doe@mail.com for the user with the email john.doe@mail.com.
In case that Active Directory loader finds an existing user with the same XID value in Connect, it will merge these two together. This user will be handled as loaded from AD.
Leave blank to let Connect create the XIDs in a default way.
Users disabled in Active Directory
In case users are disabled in Active Directory, they will be disabled also in Connect after the synchronization with AD. For more information, see the People article.
Configure an outgoing SMTP mail server to enable the communication features of Alteryx Connect, including sign-up, sharing and notifications. Also, see the Notification Queue status.
Notification Queue allows you to decide what to do with the items in your queue.
To see the current Notification Queue status, navigate to Admin Menu > Settings > SMTP Settings > Notification Queue Status.
For more information how to set Notification Queue, see the Maintenance article.
Set the SMTP, or Simple Mail Transfer Protocol, settings to enable Connect's communication features. Select Skip to proceed with all communication features disabled.
Host Name: Type or paste the name of your host server.
SMTP Port: Type or paste the port number assigned to your protocol. Standard SMTP ports are 25, 465, and 587.
From email address: Type or paste the email address associated with outgoing communication.
Set your Subject Prefix:
To specify a subject prefix can help users to set email rules and store the emails in a separate folder.
Define the string which is put in the beginning of the email subject when sending emails from Connect. Leave blank for no prefix.
Set your Connection Security options.
Use TLS: Select to use Transport Layer Security, or TLS, a cyptographic protocol. TLS is preferred in modern web systems.
Use SSL: Select to use Secure Sockets Layer, or SSL, a cytographic protocol.
Set your SMTP Server Authentication. To use authentication for SMTP server, check the Use authentication for SMTP server box.
To test whether the credentials to the SMTP server are valid, select Test Connection.
Select Save.
Establish connections between Connect and Alteryx Server.
To link Connect and Alteryx Server, you must have administrator access to an Alteryx Server.
Enter the Gallery Name and Gallery URL associated with your Alteryx Server.
Enter the Gallery Web API URL associated with your Alteryx Server. We've added this setting because of the change in the authentication from OAuth1 to OAuth2 we use for the Server API.
You can choose from two Gallery authentication types.
With Built-in authentication you have to enter your Gallery username and password while adding an Alteryx Server.
By choosing Integrated Windows authentication, you have to enter your domain username and password.
Enter the admin Gallery username and Gallery password you use to log into the Alteryx Server.
By checking Do not obtain API keys automatically, you’ll have to enter the API credentials manually.
Select which Loader parameters should be used.
To enable displaying details about the Alteryx Designer Tools used in Connect, check the Collect Information about Used Tools box. For more information, see the Analytic Workflows help page.
To quickly get an overview about used database data sources when loading the objects from the AYX Gallery (especially in case of new Connect deployment), check the Create database objects in Connect box. For more information, see the Load Metadata from an Alteryx Server Gallery help page.
Enter the Gallery key associated with your Alteryx Server, known as the admin API key in Alteryx Server.
To find the Gallery key, log into your Alteryx Server using your admin credentials. Access Settings, and select Keys. Copy the Admin API Key.
Enter the Gallery secret associated with your Alteryx Server.
To find the Gallery secret, log into your Alteryx Server using your admin credentials. On the side menu, access Data Connections.
Enter the Connect loader username and Connect loader password you used to configure your metadata loaders.
Test: Select to test the connection to your Alteryx Server.
Save: Select to save the connection information, which can be viewed on the Connection tab.
Save and Harvest: Select to save the connection information and collect metadata available from Alteryx Server. The metadata is available to Connect users on the Data Sources asset page. See Understand Assets. If a loader requires credentials, edit them on the Connection tab.
In case you can’t see the Download Metadata button and therefore connect to Server UI, it can indicate an issue with the SAML keystore. For troubleshooting, visit the Troubleshooting: Download Metadata Button Is Not Visible When Configuring SAML on Alteryx Connect article.
To configure SAML for OneLogin, visit the Configuring SAML on Alteryx Connect for OneLogin article.
To change the Single Sign-On Entity ID, go to the How do I change the Single Sign-On Entity ID in Alteryx Connect? article.
To add SAML IDP Signing Certificate to Connect Keystore, visit the How To: Add SAML IDP Signing Certificate to Connect Keystore article.
To configure SAML on Alteryx Connect for ADFS, see the instructions in the How To: Configure SAML on Alteryx Connect for Active Directory Federation Services (ADFS) article.
To configure SSL on Connect, visit these articles in Alteryx Community: How To: Configure SSL (Issued SSL Certificate) on Connect and How To: Configure SSL (Self-Signed Certificate) on Connect.
If you get an error message 'An error occurred while automatically trying to obtain gallery keys' and therefore can't establish a connection between Connect and Gallery, see Cannot Establish a Connection between Connect and Gallery for troubleshooting instructions.