The controller manages the service settings and delegates work to the workers. You can only enable one machine as the controller in a deployment.
Configure the controller component on the Controller screens in System Settings. The Controller screens are available in System Settings if you've selected 1 of these options on the Environment > Setup Type screen:
Designer and Scheduler Only
Complete Alteryx Server
Custom > Enable Controller
The General Configuration screen includes configuration options such as where you want to store temporary files and log files and what information you want to log.
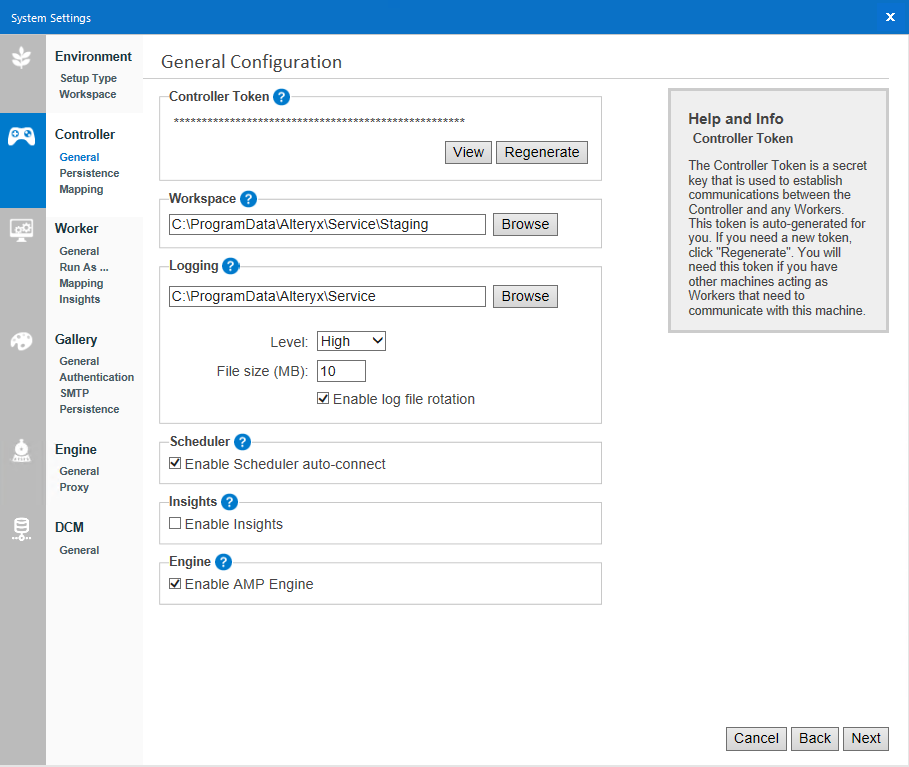
The Controller Token is an auto-generated secret key that the controller uses to communicate with workers and machines using Designer.
If a machine using Designer isn't a controller machine and you want to schedule a workflow for a future date on this machine, you have to add the controller token on the Schedule Workflow screen to schedule a workflow.
You also need the controller token if you want to have one machine act as a controller and another machine act as a worker. Set up the controller machine to get your controller token. Then, add the controller token in System Settings > Controller > Remote when setting up the worker machine.
You can regenerate the token if necessary, for example, if the token is compromised. If you regenerate the token you have to update Server UI and worker nodes in the deployment. If you want to regenerate your token, select Regenerate.
The Controller Workspace is the location where the controller stores temporary or cache files. By default, the folder is located within the global workspace folder as defined in the Environment screens in System Settings. Use a location that is safe to store large amounts of files.
The controller produces logs for events, such as services started and shut down, execution requests, etc. These logs can be helpful for troubleshooting. Visit Configure and Use Server Logs for more info.
Select Enable Scheduler auto-connect to allow users on the machine to auto-connect to the Scheduler. Enable this if you have difficulties connecting to the Scheduler.
Select Enable Insights to allow the machine to handle requests for rendering insights in the Server. Insights are interactive dashboards created in Designer.
Check Enable AMP Engine to enable running workflows that use the Alteryx Multithreaded Processing (AMP) engine in this environment. This is the on-off setting for the Server environment. If you enable the AMP engine for the controller, you also need to set at least 1 worker to run the AMP engine on the System Settings > Engine screen. Go to the Engine and AMP Engine Best Practices help pages for more info.
Understand AMP Engine Settings
The Enable AMP Engine setting on the System Settings > Controller screen is the on-off setting for the Server environment. This setting enables AMP at the environment level. The setting in System Settings > Engine tells the worker which engines it can use and thus, which workflows it can run. Go to the Engine and AMP Engine Best Practices help pages for more info.
For example, let's take a 3-node environment. Node 1 is set up for the controller and Server UI and has AMP enabled. Node 2 is a worker only node with the engine set to Original Engine Only. Node 3 is a worker only node with its engine set to Both Engines. In this scenario, running AMP workflows on Server is enabled and these workflows would only run on node 3. Original engine workflows would run on either node 2 or node 3. If node 3 is offline Original-engine workflows would still run on node 2, but AMP workflows would get stuck in the queue until node 3 came back online.
We recommend testing the AMP engine in a development environment before deploying it to production. Learn more about the AMP engine, including memory requirements, in the AMP Engine documentation and AMP Engine Best Practices.
As the orchestrator of workflow executions and various other operations, the controller needs a location where it can maintain the available workflows, a queue of execution requests, and other information. Define where information critical to the functioning of the service is stored on the Persistence screen.
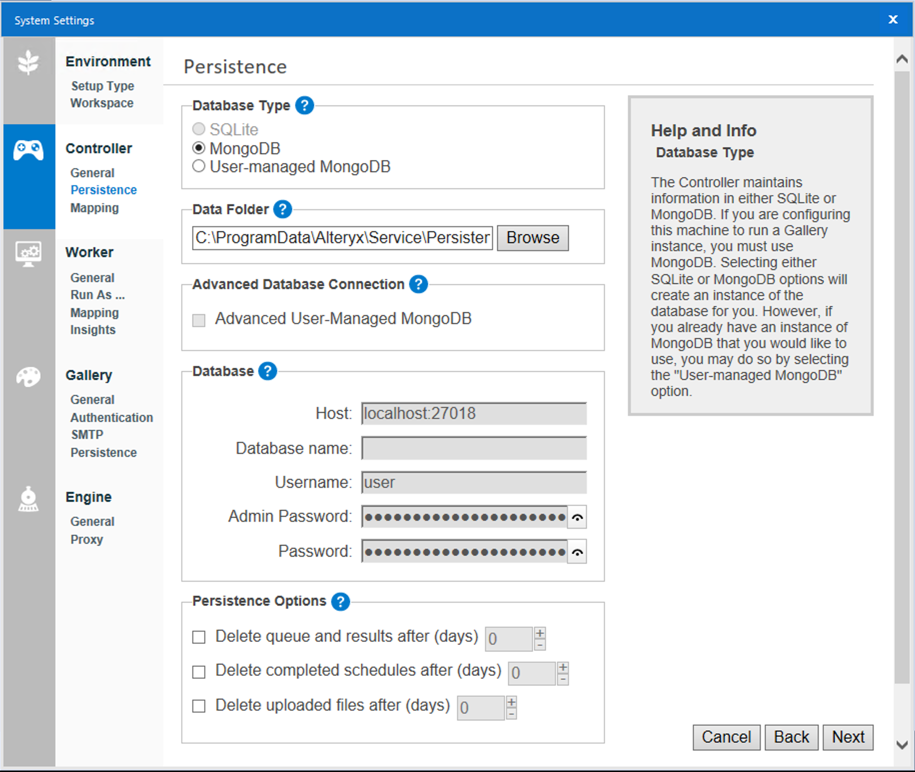
The controller maintains data in either SQLite or MongoDB databases. Server offers embedded SQLite or MongoDB options, as well as a User-Managed MongoDB option. If you are configuring the machine for a Server UI, you must use MongoDB or User-Managed Mongo DB.
SQLite: Creates an instance of the SQLite database. Recommended for lightweight and local deployments that use the scheduler.
MongoDB: Creates an instance of the MongoDB database. Recommended for heavier usage.
User-Managed MongoDB: Allows you to connect to your implementation of MongoDB.
Important
For User-Managed MongoDB, we only support MongoDB with SCRAM authentication. MongoDB with Kerberos authentication isn't supported.
We highly recommended that you have an automated backup system for your persistence database. For information on backing up MongoDB, go to MongoDB Backups. To back up SQLite, you can zip or copy the persistence folder found in
\ProgramData\Alteryx\Service\.If you switch between SQLite and MongoDB database types, scheduled jobs aren't migrated. These jobs have to be manually rescheduled.
The Data Folder is the storage location for either the SQLite or embedded-MongoDB database files. If you select User-Managed MongoDB, the Data Folder is disabled as it is configured in your MongoDB instance.
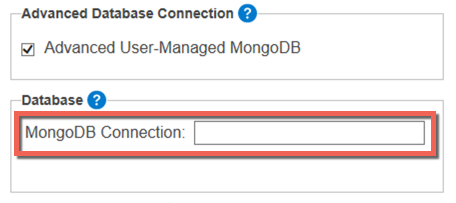
Select Advanced User-Managed Mongo DB if you require support for these.
TLS/SSL
Replica Sets
Sharding
MongoDB Atlas
Important
If you were using replica sets before the availability of the connection string option (2020.1 release or previous), you have to change to a connection string.
When you have selected this option, the Database section displays a MongoDB Connection field for you to specify your MongoDB connection string. Visit the Advanced Connection String help page for tips and examples on specifying connection strings.
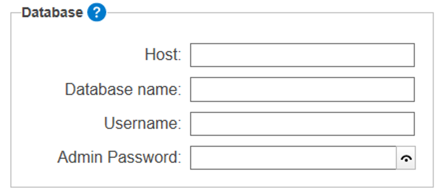
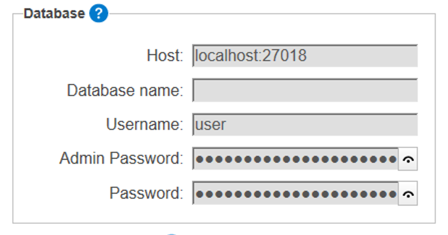
If you selected User-Managed MongoDB and you aren't using the Advanced Database Connection, you will specify the Host location of the MongoDB instance, as well as, the Database Name in the Database section. If the MongoDB instance requires authentication, enter these in the Username and Admin Password fields.
For embedded MongoDB, the Host, Username, Admin Password, and Password fields are automatically populated. The Admin Password is for MongoDB Admins to set up backups and replica sets. The Password is used by all components to communicate with MongoDB. You can also use the Password for creating usage reports that connect to the database.
Special characters in usernames, passwords, or parameter values have to be URL encoded.
The database maintains a history of workflow results, schedules, and uploaded files. You can flag various items and files for deletion after a specified number of days. These settings reduce the hard drive space your Server uses.
Important
Persistence options are applied retroactively. If you set all persistence options to delete after 10 days, your history of workflow results, schedules, and files will only show the last 10 days.
These settings will also be applied to the history available for Server Usage Report.
For all persistence options, records in an error state aren't deleted.
Delete queue and results after (days): Deletes completed jobs from the database and workflow results after the specified number of days.
Delete completed schedules after (days): Deletes schedules that have a State of Completed after the specified number of days.
Delete uploaded files after (days): Deletes files uploaded to the Server UI via analytic apps after the specified number of days.
Important
We recommend that you employ a regular backup cadence and enable the deletion of queue and results, completed schedules, and uploaded files after 180 days (or a non-zero value of your choice). A value of 0 persists items indefinitely.
Benefits: This reduces the hard-drive space usage and decreases the size of the Server Usage Report output.
On the Mapping Configuration screen, configure the machine to act as a Map Controller and define the thresholds for the tile and layer caching. Caching map tiles and the reference maps needed to render them increases performance. A larger cache size and increased time-to-live results in faster responses for previously-requested tiles, but take up more memory and disk space. A smaller cache has the opposite effect.
Enable map tile controller: Select Enable map tile controller to allow the machine to serve map tiles rendered by workers. The Map Question and Map Input tools use these tiles for rendering maps.
Memory cache: This is the maximum number of map tiles stored in memory. 1,000 tiles require roughly 450 MB of memory. A higher memory cache results in more stored tiles to increase performance but requires more system resources.
Disk cache: This is the maximum amount of space allocated for caching map tile images on the hard drive. A higher disk cache results in greater consumption of drive space but may increase the performance of map tile requests.
Reference layer time to live: Map Questions and Map Input tools create reference layers and are driven by a YXDB file. The controller can maintain a reference to this YXDB file to help speed up rendering. This setting defines the amount of time to persist reference-layer information. Increasing this number may optimize the performance of frequently requested layers. Expired reference layers are regenerated the next time they are requested.
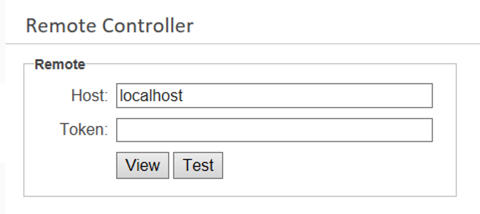
If you have configured the machine to act as a worker, the Remote Controller screen is the only screen present under Controller. This is where you connect the machine to the controller machine. Enter the host location and the controller token to connect to the controller machine.
Host: Enter the host location of the controller machine.
Token: Enter the controller machine token. You can find the Controller Token in the System Settings of the controller machine on the Controller > General screen. Go to the General Configuration section in this article.
Select View or Hide to hide or display the controller token characters.
Configure Worker.