Use and configure the metadata loaders directly in Connect. For loading the metadata from Designer, see Load Metadata into Connect.
For the actual execution of the loaders a Gallery with connectivity back to Connect is needed.
There must be two-way visibility between Connect and Server.
You can load metadata to Connect directly either from Alteryx Gallery or from other loaders.
To load data to Connect directly from Alteryx Gallery, perform the following steps:
Go to Administration Console > Admin Menu > Settings > AlteryxGallery.
In the Alteryx Gallery specify the Gallery name, Gallery URL, Gallery password, Connectloader username and Connect loader password.
This is a mandatory step. Save and Harvest will upload loaders package onto a Gallery server and at the same moment it will start the Gallery (Alteryx Loader).
Select Test Connection to verify the username and password.
If there is checkbox on Do not obtain the API keys automatically, you need to enter them manually.
Select Save and Harvest. Once you press Save and Harvest, the workflows will start to load. This will be indicated by a message visible in the left bottom corner of the page. This is the first sign that the connection between the server and Connect works. Wait until it’s done.
Authentication
You can choose from two Gallery authentication types:
With Built-in authentication you have to enter your Gallery username and password while adding an Alteryx Gallery.
By choosing Integrated Windows authentication, you have to enter your domain username and password.
You have to enable the Admin API keys in Gallery. Go to Alteryx Gallery > Settings > Keys. Enable Admin API by checking Yes.
To load data to Connect directly from other loaders, perform the following steps:
Go to Administration Console > Admin Menu > Connections. You should see the Gallery you just added and its details.
Under Loaders, select Add Connection.
You will get a list of loaders, and you can select the corresponding one in the Technology section.
After selecting the Technology, you will be moved to Properties. In this section you need to fill in the required connection details and choose objects to load, based on the Technology you have selected. Don’t forget to provide Administrator credentials under Alteryx Connect Credentials.
Loader Requirements
For each technology you need to fulfil the loader requirements. More information about each loader is accessible through the link displayed in the Properties section.
5. After filling in all the required information in Properties, select Add.
6. After selecting Add, you can see the following screen with the available connection. Select Harvest.
7. A window pops up. Select Harvest.
8. To view the metadata, go to Data Sources and select a folder to view its contents.
By performing the previous steps, you harvested the data into Connect without opening Designer.
Gallery Connections: To set up a regular harvest for your Alteryx Gallery, select Schedule in Gallery Connections. To start the harvest immediately, select Harvest in Gallery Connections.
Loaders: To set up a regular harvest for other loaders, select Schedule in the three-dot menu. To start the harvest immediately, select Harvest under Loaders or Harvest in the three-dot menu.
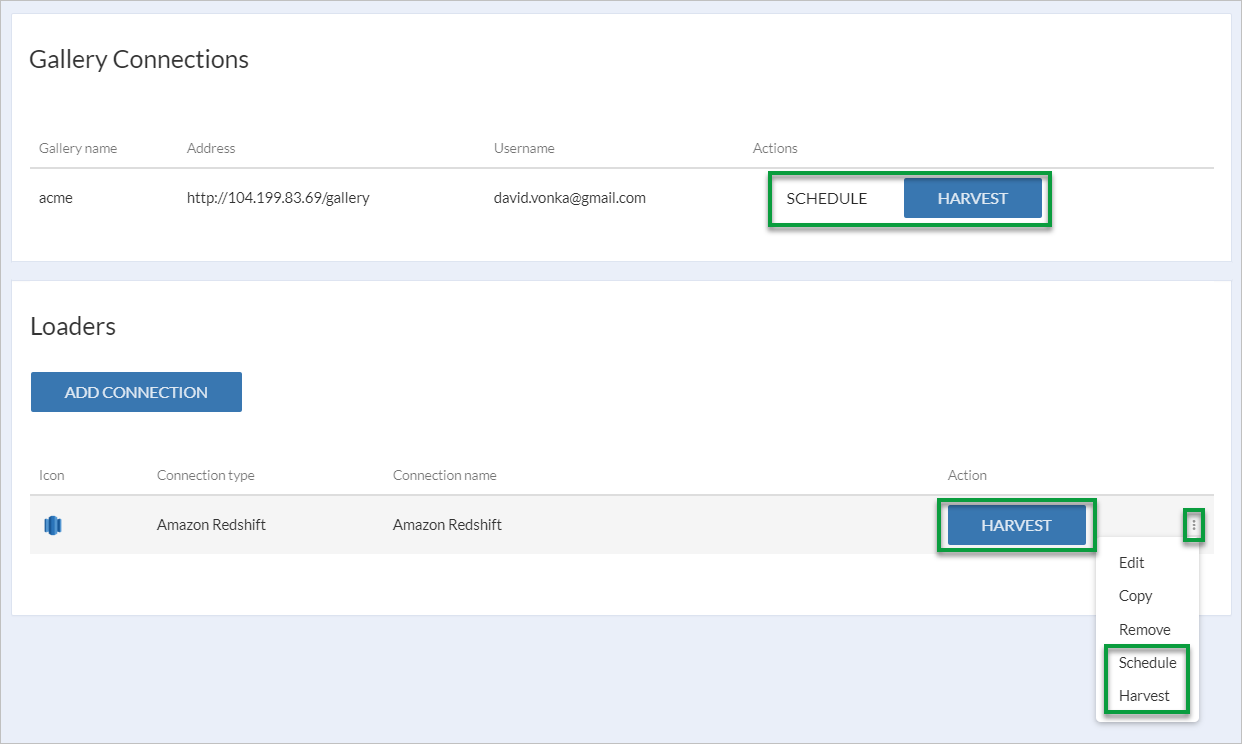
If you select Schedule, you’ll have the option to enable or disable loader scheduling. By default, the scheduler is Disabled.
To configure the schedule details, enter a Cron expression. If the expression entered has "*" in the seconds position, the scheduler will run repeatedly until the minute value no longer fulfills the condition. To run the job once, enter "0" in the seconds position. Then switch the loader to Enabled and select Save.

Crone example:
0/5 ? - every 5 seconds, at xx:xx:x0 and xx:xx:x5
0 0 12 ? * WED - every Wednesday at 12:00:00 pm
For more information about the fast deployment of metadata loaders, see the Community article How To: Fast Deployment of Metadata Loaders in Connect.