Join Window
In the Join window of the Cloud Portal, you can join your current dataset with another dataset or recipe based upon information that is common to both datasets.
For example, you could join together two sets of regional sales data based upon the product identifiers that they both use to track sales. In the Search panel, enter join datasets or select the Join icon from the toolbar.
A join is a standard operation for merging the data from two different datasets. For more information, see Join Types.
You cannot perform joins on columns of Object or Array data type.
A join operation is different from a union operation. In a union operation, data from one or more datasets is appended to the current dataset, assuming that the columns are identical or very similar. For more information, see Union Page.
Tip
Depending on the types of operations you need to perform, you may need to perform joins earlier or later in your recipe. For more information, see Optimize Job Processing.
Note
Unnest, union, or join transforms may significantly increase the number of rows or columns in your dataset. To prevent overloading the browser's memory, the application may apply a limit function to the results to artificially limit the number of rows displayed in your sample. You can generate a new sample if desired. This limitation is not applied during the job execution.
Before You Begin
Review your record counts. Before you specify the join, you should review your record counts and the uniqueness of your keys, which should provide an idea of the number of records you may see in the output. Note that the number of output records depends on the type of join and the matches between join keys.
Review your join key values. If there are variations in the values in your join keys, you may end up with duplicate records in your joined dataset. Look for mismatched or missing values in your join keys, and correct if possible.
Review the granularity of your data. If you bring together data at a lower fidelity than the source, you can end up with record matches that are not actually matching data. For example, if your timestamps are down-sampled from milliseconds to seconds as part of the join, you may have "matching" timestamps in seconds that were not matches at the millisecond level in the source data.
Step 1 - Select Dataset or Recipe
In the Search panel, enter join datasets. Then, select the dataset or recipe that you wish to join with your current dataset.
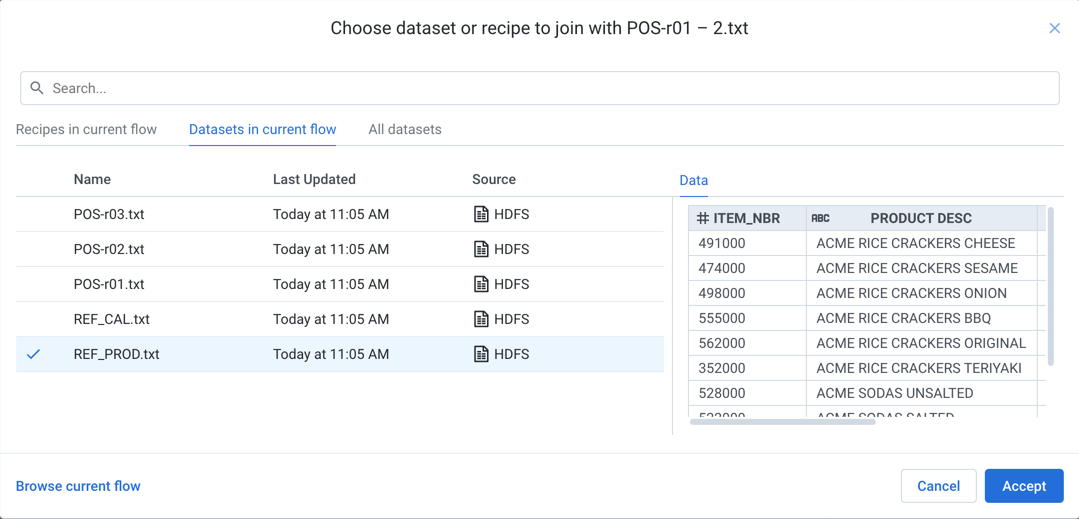
Figure: Select dataset or recipe to join
You can use the Data tab to preview the data in the selected object.
Note
You must have read access to the object to join it to your dataset.
Use the Search bar to locate specific objects.
Click Accept.
Step 2 - Select Join Conditions
In the next step, you specify the type of join and one or more join keys (columns).
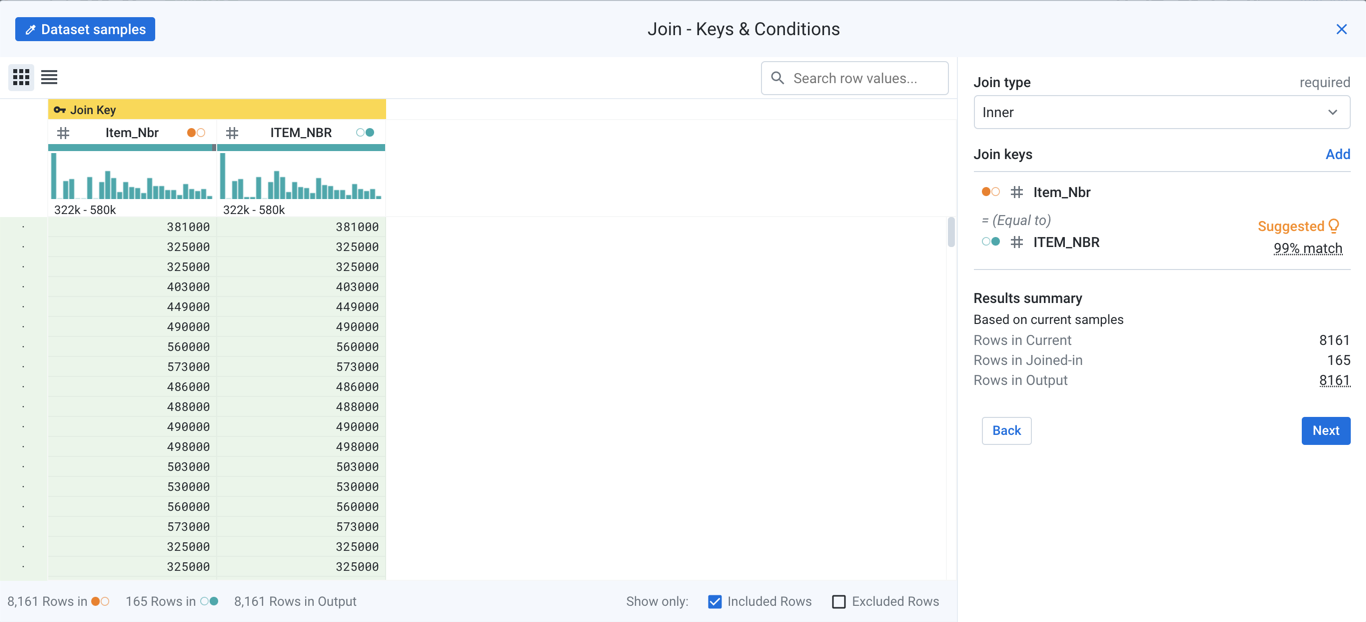
Figure: Specify join type and join keys
Dataset samples:
Mouse over the Dataset samples indicator to see the current samples from the datasets that are part of the join. For more information, see Samples Panel.
Join type:
From the drop-down, select the type of join to apply.
Join keys:
In the above image, the platform has determined that the item number (Item_Nbr) field of Region 1 data and the item number (ITEM_NBR) field from REF_PROD should be used as the keys for performing the join.
To make changes to the two join keys, mouse over the specified keys:
To remove the two columns as join keys, click the X icon.
To edit the keys to use and other key options, click the Pencil icon. See below.
To add more join keys, click Add.
Note
Be careful applying multiple join keys. Depending on the join type, this type of join can greatly expand the size of the generated data.
Edit keys:
By default, matches between join keys are performed on a strict, case-sensitive matching between key values in the selected columns. In some cases, it may be useful to loosen the conditions under which matches are found.The following options are applied to the join key columns in both sources to attempt to find matches. After the join is executed, no data in either column is changed based on these selections.
Option | Description |
|---|---|
fuzzy match | Use a fuzzy matching algorithm for key value matching. Tip Use this option to perform fuzzy join matching of primary keys between datasets. Note Fuzzy joins can only be applied to String data types. Other data types cannot be fuzzy-matched using the algorithm. Fuzzy matching uses the doublemetaphone algorithm for matching strings (keys). Both primary encodings of each key value must match. See DOUBLEMETAPHONEEQUALS Function. |
Ignore case | Ignore case differences between the join key values for matching purposes. |
Ignore special characters | Ignore all characters that are not alphanumeric, accented Latin characters, or whitespace, prior to testing for a match. |
Ignore whitespace | Ignore all whitespace characters, including spaces, tabs, carriage returns, and newlines. |
Summary:
You can use these metrics to identify the likelihood of accurate matching between the join keys and the row count generated in the output.
Click Next.
Step 3 - Select Output Columns
From the selected datasets, you can specify the columns to include in the output.
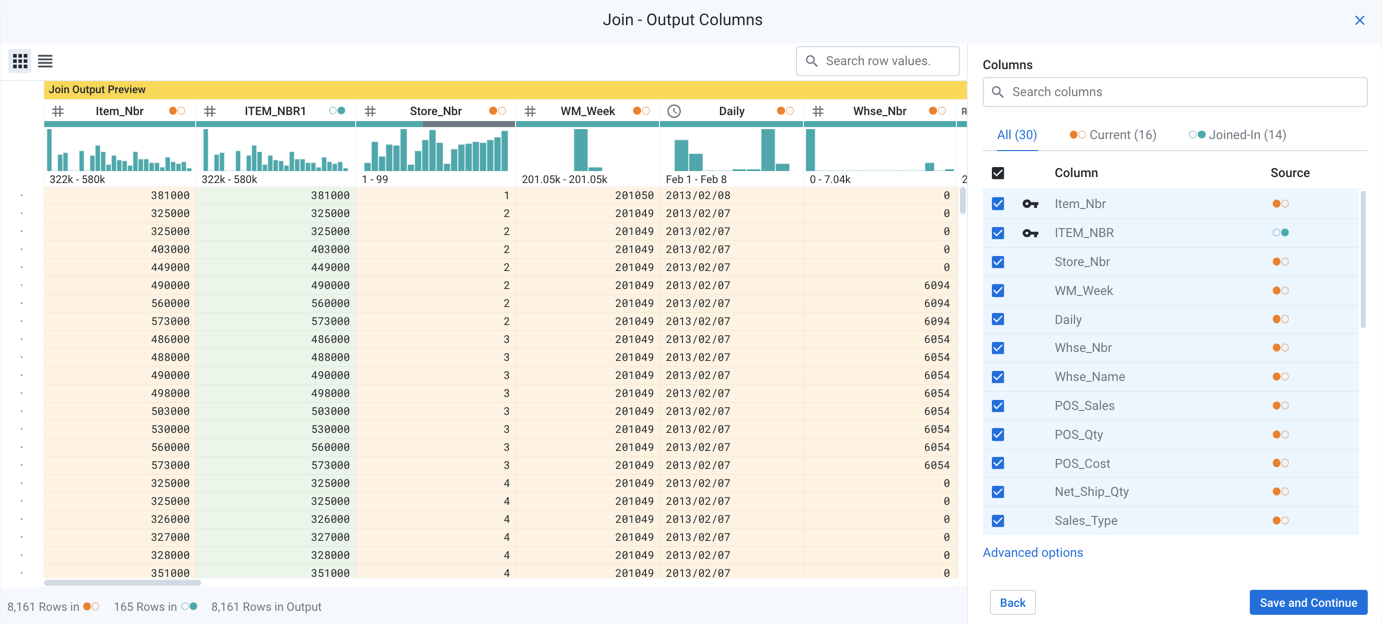
Figure: Select output columns
Select columns:
Review the list of available columns, which are displayed for both sources.
Use the search panel to search for specific columns.
To include all columns:
Click the All, Current, or Join-In tabs.
Click the checkbox at the top of the list.
Advanced options
Name prefixes
You can apply prefixes to column names in the joined dataset, which can be helpful for tracking the source of a column in complex datasets. For example, you may wish to prepend each column from a dataset called, salesRegion01 with the prefix: sR01.
Name prefix for columns in Current data: Enter a prefix to apply to the names of columns sourced from your current dataset that appear in the joined output.
Name prefix for columns in Joined_in data: Enter a prefix to apply to the names of columns sourced from the joined-in dataset that appear in the joined output.
Dynamically updating Joins
After you have joined in another set of data, subsequent changes to that data can be automatically reflected in the output of the join:
Include all columns from Current data: Dynamic updates always include the latest data from your current dataset.
Include all columns from Joined-In data: Dynamic updates always include the latest data from the dataset that you are joining in.
Note
After you add your join to the recipe, if the data grid is empty, then the keys that you specified in the join may not have a match in the currently selected sample. You should revisit the keys used in your join. If the join still generates an empty grid on the current sample, you should collect a new sample. See Samples Panel.
Tip
If you must freeze the data in the dataset that you are joining in, you should create a copy of the dataset as a snapshot and join in the copy. See Dataset Details Page.
To join in the copy, edit the join and change the source that is being joined. See Fix Dependency Issues.
Click Save and Continue.
After you have selected your columns and any advanced settings, click Review.
Step 4 - Review Join
Review the join that you have specified. To modify any aspect of it, click the appropriate Edit link.

Figure: Review join
To add the specified join to your recipe, click Add to Recipe.