Publishing Actions
You can add, remove, or edit the outputs generated from this job. By default, a CSV output for your home directory on the selected datastore is included in the list of destinations, which can be removed if needed. You must include at least one output destination.
Columns:
Actions: Lists the action and the format for the output.
Location: The directory and filename or table information where the output is to be written.
Settings: Identifies the output format and any compression, if applicable, for the publication.
Actions:
To change format, location, and settings of an output, click the Edit icon.
To delete an output, click the X icon.
Add Publishing Action
From the available datastores in the left column, select the target for your publication.
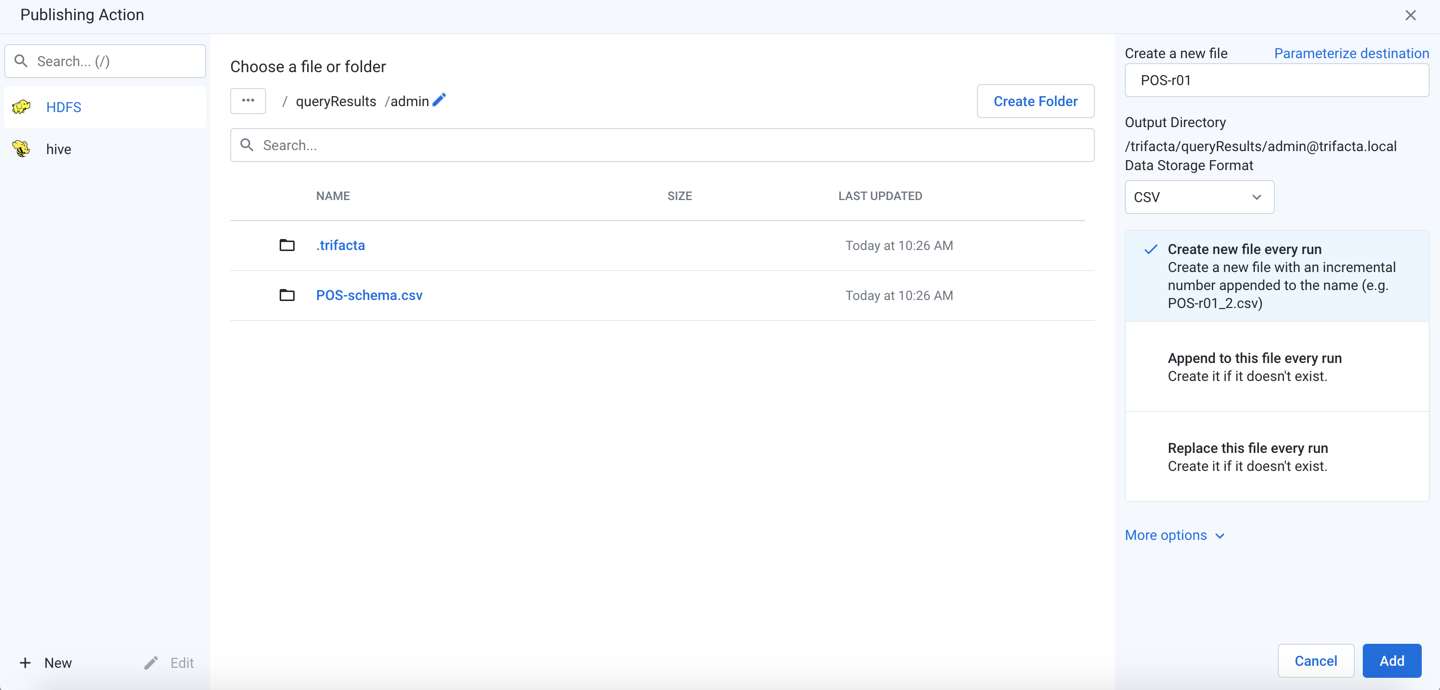
Figure: Add Publishing Action
Note
Do not create separate publishing actions that apply to the same file or database table.
New/Edit: You can create new or modify existing connections. By default, the displayed connections support publishing. See Create Connection Window.
Steps:
Select the publishing target. Click an icon in the left column.
Snowflake: You can published your results to the current project or to a different one to which you have access.
Note
You must have read and write access to any Snowflake database to which you are publishing.
To publish to a different project, click the Snowflake link at the front of the breadcrumb trail. Then, enter the identifier for the project where you wish to publish your job results.
Note
Your projects and their identifiers are available for review through the Designer Cloud menu bar. See UI Reference.
Click Go. Navigate to the database where you wish to write your Snowflake results.
For more information, see Snowflake Connections.
Locate a publishing destination: Do one of the following.
Explore:
Note
The publishing location must already exist before you can publish to it. The publishing user must have write permissions to the location.
To sort the listings in the current directory, click the carets next to any column name.
For larger directories, browse using the paging controls.
Use the breadcrumb trail to explore the target datastore. Navigate folders as needed.
Search: Use the search bar to search for specific locations in the current folder only.
Manual entry: Click the Edit icon to manually edit or paste in a destination.
Choose an existing file or folder: When the location is found, select the file to overwrite or the folder into which to write the results.
Note
You must have write permissions to the folder or file that you select.
To write to a new file, click Create a new file.
Create a new file: See below.
Create Folder: Depending on the storage destination, you can click it to create a new folder for the job inside the currently selected one. Do not include spaces in your folder name.
Create a new file: Enter the filename under which to save the dataset.
Select the Data Storage Format.
For more information, see Output Settings below.
As needed, you can parameterize the outputs that you are creating. Click Parameterize destination in the right panel. See Parameterize destination settings below.
To save the publishing destination, click Add.
To update a publishing action, hover over its entry. Then, click Edit.
Todeletea publishing action, selectDeletefrom its context menu.
Variables
If any variable parameters have been specified for the datasets or outputs of the flow, you can apply overrides to their default values. Click the listed default value and insert a new value. A variable can have an empty value.
Note
Override values applied to a job are not validated. Invalid overrides may cause your job to fail.
Note
Unless this output is a scheduled destination, variable overrides apply only to this job. Subsequent jobs use the default variable values, unless specified again. No data validation is performed on entries for override values.
Tip
At the flow level, you can specify overrides at the flow level. Override values are applied to parameters of all types that are a case-sensitive match. However, values that are specified at runtime override flow-level overrides. For more information, see Manage Parameters Dialog.
For more information on variables, see Overview of Parameterization.
Output Settings
Depending on the type of output that you are generating, you must specify additional settings to define location, format, and other settings.
See File Settings.