Configure the authentication method you want to use to manage Server access on the System Settings > Gallery Authentication page.
Start by selecting the authentication method you want to use for your Server. Then, go to the setup steps for your selected method.
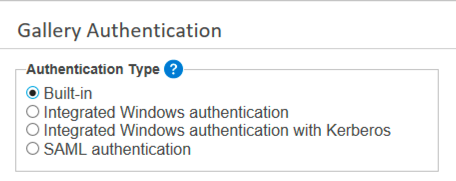
Server supports built-in authentication, integrated Windows authentication with or without Kerberos support, and SAML authentication.
Built-in: Users specify an email address and password of their choosing to access the Server.
Integrated Windows authentication: Users access the Server with internal network credentials.
Integrated Windows authentication with Kerberos: Users access the Server with internal network credentials using Kerberos authentication protocols. The setup process for both Integrated Windows authentication and Integrated Windows authentication with Kerberos are the same. For more information, go to Complete the Set Up for Your Selected Authentication Type and choose Set Up Integrated Windows Authentication.
SAML authentication: Users access the Server with Identity Provider (IDP) credentials.
Warning
Server doesn't support changing the authentication type after configuration. Doing so might compromise the Server functionality. If you want to change the authentication type, contact your account team to discuss options for assistance.
The set up for each authentication type varies. Select your selected authentication type for steps to complete the setup.
After selecting Built-in authentication, create a Default Gallery Administrator at the bottom of the Gallery Authentication page. The Gallery (Server) administrator manages users, workflows, and more. For Built-in authentication, enter the administrator's email address.
Complete the remaining screens in System Settings (go to the Server UI and Engine help pages for more info on these screens),and select Finish.
To complete the creation of the Gallery administrator account, go to the sign-in page of the Server. To do so, select the link to the Server shown on the System Settings > Status page or enter the URL to the Server in your internet browser.
Select Sign In.
On the sign-in page, select Sign Up for New Account.
Enter a First Name and Last Name, and select a time zone from the drop-down menu.
In Email, enter the email address that you provided for the Default Gallery Administrator on the System Settings > Gallery Authentication page.
In Password, create an account password. Your password must contain:
At least 8 characters
At least 1 letter
At least 1 number
Uppercase and lowercase letters
At least 1 special character
Select Sign Up.
You are now logged in as the Gallery (Server) administrator. The credentials you entered in the sign-up form are saved as your credentials going forward. You are now ready to add Server users. Go to Add Server Users.
Important
If you are using AWS with Windows Authentication, the TCP connection has to maintain the same source port to stay authenticated. For this reason, we recommend using either the network or classic load balancer rather than application load balancer.
Note
The difference in setting up the Integrated Windows Authentication and Integrated Windows Authentication with Kerberos is the protocol which is used to authenticate users with Active Directory. The Integrated Windows Authentication option uses NTLM while the Integrated Windows Authentication with Kerberos replaces NTLM with Kerberos.
No special configuration within Server itself is needed but the Kerberos option requires a properly configured Kerberos realm and KDC to be present in the Active Directory domain.
After selecting Integrated Windows authentication, create a Default Gallery Administrator at the bottom of the Gallery Authentication page. The Gallery (Server) administrator manages users, workflows, and more. For Integrated Windows authentication, enter the user account in this format: domain\username.
Complete the remaining screens in System Settings (go to the Server UI and Engine help pages for more info on these screens),and select Finish.
The default Gallery (Server) administrator can now access the Server. To do so, select the link to the Server shown on the System Settings > Status page or enter the URL to the Server in your internet browser. You are now logged in as the Gallery (Server) administrator and ready to add Server users. Go to Add Server Users.
Multi-Domain Support
Server supports multiple domains for Windows authentication. You don't need to configure anything in Server to enable this, but these capabilities and permissions have to be present across the domains.
The domain the Server runs on needs to have the same trust policy as other domain users so Active Directory can resolve and determine user permissions.
Both domains need to be part of the same forest.
The Alteryx service needs to be able to read all attributes from CN=Users and CN=Computers containers for both domains. The Alteryx service runs under the local system account on the server it is installed on. If you define a dedicated service account instead of using the local system, the account has to have permission to read all attributes from both containers to enable authentication for both domains.
To configure SAML authentication for Single Sign On (SSO), your Identity Provider (IDP) has to support SAML.
Important
Before configuring SAML authentication for the Server, you have to add Server as a Service Provider in the IDP. The IDP might need...
the ACS Base URL (for example, http://localhost/webapi/Saml2/Acs).
the SP Entity ID (for example, http://localhost/webapi/Saml2).
Starting with version 2022.3, we are using updated service provider endpoints via the Web API service. The existing configurations using the previous endpoints continue to work, and no action is required at this time to continue using SAML for your existing Alteryx Server. For more information see Server 2022.3 Release Notes.
The IDP might also require that you map email, firstName, and lastName attribute statements to corresponding fields in the IDP to authenticate users.
The IDP Signing Certificate should be configured with a signing algorithm of SHA-256 or greater.
Select an option for obtaining metadata required by the IDP. You can configure SAML using an IDP Metadata URL or an X509 certificate and IDP SSO URL.
Complete the SAML IDP Configuration.
ACS Base URL: The URL for the Assertion Consumer Service that accepts SAML messages to establish a session.
IDP URL: The URL for the Alteryx application configured in the IDP, also known as, the IDP Entity ID.
IDP Metadata URL: The URL provided by the IDP that includes the IDP SSO URL and the X509 certificate for configuring the Alteryx Authentication Service.
IDP SSO URL: The SSO URL, provided by the IDP, that the Alteryx Authentication Service uses to log into the IDP.
X509 certificate: The public certificate provided by the IDP for secure communication with the Alteryx Authentication Service.
Enable Request Signing: For IDPs that require request signing, you can enable the Enable Request Signing setting. This setting requires a valid signed certificate with an associated RSA private key to be installed in the Windows Certificate Store.
SSL/TLS Certificate Hash: Once you have your certificate and private key installed, provide the unique hash for the SSL/TLS certificate.
Verify IDP: Select to open a browser window, log in, test the IDP configuration, and set the default Server administrator.
A Gallery (Server) administrator account has to be created to administer the site (manage users, workflows, and more). For SAML authentication, select Verify IDP to test the IDP configuration and populate the field with IDP credentials.
You are now logged in as the Server administrator. You are now ready to add Server users. Go to Add Server Users.
Note
Admins can sync user and group access to Server using Azure Active Directory (Azure AD) and SCIM protocol. This allows admins to manage user and group permissions and Server access from their identity provider as a single source of truth. Synching users and groups from Azure AD to Serves is automatic. This makes it faster to onboard or offboard new Server users.
This functionality is available for customers that use SAML as their authentication method. Any identity provider that supports SCIM can use this functionality. Note that we only officially tested and support Azure AD.
To read more about SCIM settings, go to Alteryx Server Settings.
For information on how to configure Alteryx Server for SCIM with Azure Active Directory, go to Configure Alteryx Server for SCIM with Azure Active Directory.
For more information about Azure SCIM, refer to the Microsoft Azure documentation.
For information on how to deploy and test your SCIM endpoint in Azure, go to Tutorial: Develop a sample SCIM endpoint in Azure Active Directory.
Refer to these answers to the most fundamental questions about Azure SCIM together with Alteryx Server:
Once you enable SCIM, any entities in Azure (or other IDP) will sync with Server, and future changes to those entities will cause changes to the related objects in Server. Existing users and groups in Server that also exist in IDP will link and update with changes from the IDP. The IDP acts as the source of truth for these objects. For example, if user John Smith exists in both and you've enabled SCIM, if you change John Smith to John Doe in Server, the next sync will change them back to John Smith.
Groups link by Name and users by Email.
Local users and groups that only exist in Server are out of scope for the IDP and will remain as objects managed by Server.
Certain characters might not be transferred from SCIM to Server—this depends on the IDP. If the IDP allows special, restricted, or reserved characters in the name of a group or user object, the character will sync to Server. We don't explicitly allow or forbid any characters for these object names.
Server doesn’t initiate a connection to the IDP for SCIM. Instead, it provides a number of API endpoints and an access token that the IDP uses to initiate a connection to Server. You can manually test these endpoints using standard API testing tools such as Postman.
Server audit logging audits all changes to user and group objects. This includes changes made by SCIM.
SCIM doesn't update asset ownership, roles, or permissions. As such, any existing users and groups retain the assets they currently own, as well as the roles and permissions assigned to them.
The Server group settings determine permissions. The Azure Active Directory doesn't store permissions.
When you sync an AD group from Azure to Server, admins can set permissions for that newly created group in Server. Then, when you add a new user to that AD group, SCIM automatically adds that user to the Server group. The user then gains permissions based on that Server group.
The SCIM feature only includes granting users and groups access to Server from Azure AD. This sync doesn't include permissions for any other assets in Azure, such as databases. Users will still need to use DCM or Server data connections for all data.
If you have to roll back to an older version of Server that doesn't include SCIM, SCIM won't function and won't be available until you upgrade Server again.
If you restore a DB backup from before you configured SCIM, you must reconfigure SCIM after the restore and perform the initial synchronization.
If you have to restore a backup to a version of Server that uses SCIM, you must perform a full resync from the IDP side to bring our database back in sync with the IDP.
When you disable a user using SCIM, schedules will behave as they do now when you deactivate or delete a user. It will behave the same as if you deactivated the user via Server UI or API or deleted them via the API. For more information, go to Deactivate a User.
Sync times vary based on the IDP and might be configurable. For Azure, syncs can take up to 40 minutes and it is a static value that can’t be configured.
We have done extensive testing with Azure and limited testing with Okta. We could not, however, test Okta provisioning agent as it is only provided to paying customers. The other IDPs should work but have not been tested.