Workflow Migration Enterprise Utility
Overview
The Workflow Migration Enterprise Utility demonstrates how you can leverage Designer, Server APIs, and the new Server API tool for remote workflow migration. Auditing examples display the checks required to meet the workflow standards of an organization. Since every organization is different, you should customize this workflow according to your organization’s unique makeup and requirements, as the workflow doesn't account for every consideration. Download the Workflow Migration Enterprise Utility from the Alteryx Marketplace.
Prerequisites
Server API Tool
This Enterprise Utility uses the official Server API tool, available from the Alteryx Marketplace. This tool lets you connect to all available Server API endpoints easily and is used throughout this process.
Python Packages
There are several points in this process where Python makes the API calls or parses the workflow XML into all relevant pieces. You need a few non-standard but widely used packages to accomplish this:
pip_system_certs
bs4
lxml
You can install these packages manually or run the workflow in Setup Part 1 as Admin.
Set Up Log Databases
You need to create a place to hold responses to track audits and approvals. The default is set to a local SQLite database, but this can be any database that you want to use. The workflow in Setup Part 2 creates the necessary metadata for future use. Then, you will update the workflow to point to those newly created database tables.
API Information
The first Server API tool in the workflow requires the source (or development) Server base URL, API Key, and API Secret. These values carry through to all relevant Server API tools that handle data on the dev Server.
When you are ready to publish workflows to the production Server, you can enter those details into the Server API tool further down on the canvas. As with the development Server connection details, these pass through to downstream tools that need access to that Server.
For more information on how to find API keys and permissions, go to API Overview.
Process Summary
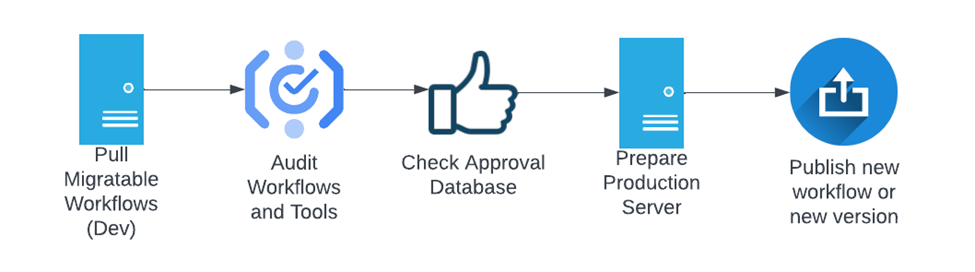
Workflows are migrated from one Server to another, usually from a development Server to a production Server. That process includes several checks to ensure the workflows are suitable for migration.
The workflow developer indicates that their workflow is ready for migration.
The workflows, workflow tools, and workflow tool annotations go through an audit so that only the workflows that meet the company’s standards can be migrated. The outputs of the macros involved in the audit can be leveraged to inform the developer that their workflow failed one of the checks and why it failed.
The workflows receive secondary approval.
The production Server is prepped for the migration. This includes the creation of collections for the workflows and checks to verify whether the workflows already exist in the Server.
Approved workflows are published to Server, or a new version is uploaded. If necessary, the workflows are shared within the defined collections.
The migrated workflows from the development Server have their "ready for migration" flags reverted to "false."
Set Up Your Environment-Specific Connections
Bright green Comment boxes and Containers identify environment-specific settings and inputs. Depending on your customization, there are 8 possible locations to update.
Server API (Dev)
Server API (Prod)
Logging Database In/Out tools in these containers: Audit Logs, Approval Requests, Publish Workflows
The default database is a local SQLite db, but you can change this to another database of your choice.
After you set up the connections, you can customize the actions within the workflow in a few ways—you can detour around sections or disable the containers.
Get SOURCE Data and Extract Relevant Information: The Server API tool pulls all of the collections from the source Server to identify migratable workflows. It then proceeds to download all of the workflow packages and stores them in a binary field.
Audit: Python extracts all workflow and dependent tool XML from the packages using the binary field. Subsequent tools parse out all of the tool and workflow configurations for auditing. The workflow audit lets you set a match threshold for the workflow configuration settings. You can further customize the Tool Audit section for items like Aliases, associated Tool Risk, and annotations/documentation within the workflows. All of the results are tracked at the tool, workflow, and package levels and logged into a table called "Audits".
Approval Requests: After they pass the Audit, workflows are submitted to a secondary approval process, which, in this case, is a separate database. From here, you can enforce secondary approvals—you can track all requests and approvals through a central database. The workflow binary is saved to the table to make integration to external review processes easier.
Publish Workflows: To control ownership of the workflow when it's published to the new Designer, update the Formula tool with a defined owner ID. The "Migrations" table in the logging database serves as a way to track workflow IDs across environments. This enables version control across environments and creates an audit trail for future reference. If a workflow doesn’t have an existing ID pair in the table, then a new workflow is published, and a new pair is added to the lookup table.
Add a new collection to the production Server: In this container, the collections are set up to mirror the development Server. After creating a corresponding collection, the workflow is shared within the collection.
Reset Source Server: Once the workflow successfully posts to the target Server, the workflow on the development Server is updated so that the "ready to be migrated" label is turned off. At this point, it's ready to be updated again to restart the migration process.