Serverホスト復元ガイド
このガイドは、以下のような状況でServer管理者がServerインスタンスを復元するのに役立ちます。
元のホストの障害*
新しいServerマシンへの移行
オンプレミスからクラウドServerへの移行
その他のインフラストラクチャの変更
Serverの復元では、元のServerから次のものを取得することによって、元のユーザー、ワークフロー、スケジュールなどを使って新しいServerを稼働開始できます。
コントローラートークン
RuntimeSettings.xml*MongoDBのバックアップ
*元のホストにアクセスできなくなった状態で障害復旧を行う場合にServerインスタンスを完全に復元するには、元のホストが完全に機能している状態で、RuntimeSettings.xmlを事前に準備する必要があります。詳細については、障害復旧の準備のヘルプページを参照してください。
復元オプション
Serverホストを復元するには、現在次の2つの方法があります。
オプション | 作業内容 | 適した状況 |
|---|---|---|
(ステップ1-7) | ホストの準備、Serverのインストール、ランタイム設定の復元、MongoDBの復元、追加のファイル/設定の復元、Serverの起動、テストなど、すべての手順を手動で実行します。 | スクリプトが使用できない場合、完全な制御が必要な場合、またはカスタム環境の場合に適しています。 |
(ステップ1-4をスクリプトで、ステップ5-7を手動で実行) | 提供される、手順1-4を自動化するスクリプト(準備、インストール、ランタイム設定の復元、MongoDBの復元)を実行します。スクリプトが完了したら、手順5-7を手動で実行します。 | 復元を迅速に行い、手動エラーを削減できます。特に、組み込みのMongoDBを使用した標準的なセットアップで役立ちます。 |
注: どちらのオプションも同じ前提条件(バージョンの互換性、資格情報、バックアップ)を想定し、ステップ5-7 (ファイル/設定の復元、サーバーの起動、テスト)は手動での実行になります。
この手続きの各ステップの詳細は次のとおりです。
このガイドで扱う範囲と前提とする条件
組み込みMongoDBを使用した、単一ノードの既定のServerインストール障害からの復元。
必要な情報が破損していないバックアップがあること。
ターゲットホストが上書き可能であること。
このガイドで扱わない事項
マルチノードServer環境、ユーザー管理MongoDB、またはユーザー管理SQL Serverの場合は、カスタマーサポートにお問い合わせください。
ODBCドライバーのバックアップまたは復元。
ユーザーDSNまたはシステムDSNのバックアップまたは復元。
AlteryxではなくWindowsに保存されている他のエイリアスのバックアップまたは復元。
必要条件
バージョンの互換性:
元のホスト | 対応するターゲットホスト |
|---|---|
2021.4.2.47792 (パッチ5)以降のパッチ | 2021.4.2.47884 (パッチ11)以降の2021.4バージョンのパッチ |
2022.1.1.42590 (パッチ3)以降のパッチ | 2022.1.1.42691 (パッチ9)以降の2022.1バージョンのパッチ |
2022.3.1.430 (Server GA)以降のパッチ | 2022.3.1.553 (パッチ6)以降の2022.3バージョンのパッチ |
2023.1.1.123 (Server GA)以降のパッチ | 2023.1.1.247 (パッチ2)以降の2023.1バージョンのパッチ |
Alteryx Serverのすべての最新バージョンおよび将来のバージョン | 元のホストとターゲットホストが同じバージョンとパッチであれば、GAまたはパッチリリースは問いません。 |
このガイドで説明している手順を実行する前に、ワークフロー操作に必要なすべてのデータベースドライバーとソフトウェアをインストールして、ダウンタイムを最小限に抑えるようにします。
ターゲットホストの管理者権限。
権限借用に使用されるすべての資格情報へのアクセス。これには、サービスアカウント(Local System以外の場合)、Run Asユーザー、定義済み/使用中のワークフロー資格情報が含まれます。
復元元ホストのコントローラートークン。
復元の一部として暗号化キーを復元するには、直接的な通信経路が必要です。新しいServerでは、元のServerコントローラーノードで実行されているAlteryxServiceにネットワーク経由でアクセスできる必要があります。この必須条件を満たすことができない場合は、カスタマーサポートにお問い合わせください。
復元元ホストのMongoDBのバックアップ。バックアップの実行方法についてはこちらのリンクから確認してください。
Serverのバックアップと復元の詳細については、「Alteryx Server Backup & Recovery Best Practices(Alteryx Serverバックアップと復元におけるベストプラクティス)」のPart 1とPart 2をご覧ください。
ターゲットホストが元のホストと、Windowsのタイムゾーン設定で同じタイムゾーンに設定されていることを確認します。同じタイムゾーンに設定されていないと、スケジュール表示の際にエラーが発生する可能性があります。
オプション
次の項目は、復元元 Server では利用されていない可能性があります。元のServerでその機能が使用されていたかどうかを確認し、使用されていた場合は、このガイドで「オプション」と記載されている該当の手順を完了してください。
サービスログオンユーザー
ワーカー構成の Run-As ユーザーの詳細は次のとおりです。
ドメイン
ユーザー名
パスワード
Server 設定用の SMTP サーバーのユーザー名とパスワード。
%ProgramData%\Alteryx\Toolsのコネクタ。復元元ServerのAlteryxシステムベース接続エイリアスおよびIn-DB接続エイリアス。
システムのIn-DBデータ接続:
%PROGRAMDATA%\Alteryx\Engine\SystemConnections.xmlを参照システムデータ接続:
%ProgramData%\Alteryx\Engine\SystemAlias.xmlを参照
復元元ServerのAlteryxユーザーベース接続エイリアスとIn-DB接続エイリアス。以下は、各 run-asまたはワークフロー資格情報ユーザーアカウントに関連する場合があります
ユーザーデータ接続:
C:\\Users\[username]\AppData\Roaming\Alteryx\Engine\UserConnections.xmlを参照ユーザーのIn-DBデータ接続:
C:\Users\[username]\AppData\Roaming\Alteryx\Engine\UserAlias.xmlを参照
元のServerのワークフローで使用されているAlteryx予測ツールおよびRライブラリ。
ステップ2のAlteryx Serverのインストール手順で予測ツールをインストールすることで、適切なバージョンが使用されるようになります。
復元方法の選択
ステップ1: 準備
# | ステップ | 詳細 |
|---|---|---|
1.1 | ホストのタイムゾーンの設定 | ターゲットのホストのWindowsタイムゾーンは、元のホストと一致するように設定する必要があります。 |
1.2 | Alteryxへのアクセスを確保する | Alteryxライセンシングシステムが使用するwhitelist.alteryx.comにホストが接続できる必要があります。 |
ステップ2: Alteryx Serverのインストール
# | ステップ | 詳細 |
|---|---|---|
2.1 | 元のホストのAlteryx Serverのバージョンは、次のいずれかですか?
| はい: ターゲットホストを、元のホストとまったく同じメジャーバージョンおよびパッチバージョンにインストールまたはアップグレードします。パッチインストールではなく、フルインストールファイルを使用してください。 必要に応じて、fulfillment@alteryx.comに連絡して、必要なインストールファイルを要求してください。 ステップ2.4に進みます。 いいえ: ステップ2.2に進みます。 |
2.2 | 元のホストのAlteryx Serverのバージョンは、必須条件セクションのバージョンの互換性テーブルの互換性のあるターゲットホストの列に記載されていますか? | はい: ターゲットホストを、元のホストとまったく同じメジャーバージョンおよびパッチバージョンにインストールまたはアップグレードします。パッチインストールではなく、フルインストールファイルを使用してください。 必要に応じて、fulfillment@alteryx.comに連絡して、必要なインストールファイルを要求してください。 ステップ2.4に進みます。 いいえ: ステップ2.3に進みます。 |
2.3 | ターゲットホストにAlteryx Serverの最新のパッチバージョンをインストールします | ターゲットホストに、元のホストにインストールされているメジャーバージョンで利用可能な最新のパッチをインストールまたはアップグレードします(たとえば、元のホストが2022.3パッチ3を使用している場合は、ターゲットホストに2022.3の最新のパッチをインストールします)。 |
2.4 | Alteryx Serverの設定 | 既定の設定を使用してAlteryx Serverを設定します。後の手順で必要となるため、AlteryxServiceが実行されていることを確認してください。Server UIにサインインする必要はありません。 |
2.5 | トラブルシューティング ライセンスキー「使用中」エラー | ライセンスキーがまだ古いサーバーに関連付けられている場合は、そのマシンでライセンスキーの無効化を行う必要があります。そのマシンにアクセスできない場合は、ライセンス管理者に連絡してライセンスを解除してください。 |
ステップ3: RuntimeSettings.xmlの復元
# | ステップ | 詳細 |
|---|---|---|
3.1 | binフォルダーでコマンドプロンプト1を開く | 管理者としてコマンドプロンプトを開き、
|
3.2 | サービスの停止 | 次のコマンドを入力します。
成功すると、 |
3.3 | 既存の RuntimeSettings.xml のバックアップ | 次のコマンドを入力します。
|
3.4 | 障害復旧の準備として、ターゲットホストへ事前にRuntimeSettings.xmlを準備していますか? | はい: 障害復旧プロセスのRuntimeSettings.xmlは、事前にターゲットホストの ステップ3.13に進みます。 いいえ: 元のホストから現在のターゲットホストの ステップ3.5に進みます。 |
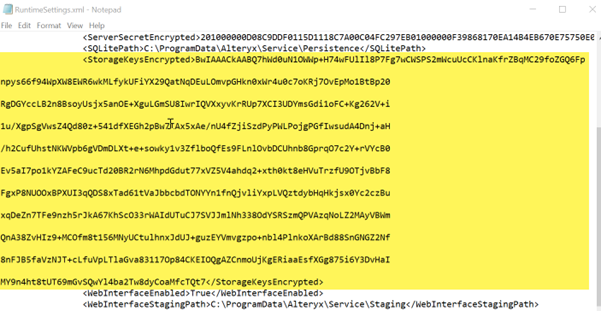
3.5 | コントローラートークン のクリア | コピーしたRuntimeSettings.xmlを編集し、<ServerSecretEncrypted>タグ間のすべての文字列を削除します。タグは以下のように残します。  ファイルを保存して閉じます。 |
3.6 | コントローラートークン の復元 | 元のサーバーコントローラートークンを使用して、次のコマンドを入力します。
トラブルシューティング: バージョン2021.3+では、このステップで次のエラーが発生する場合があります: 「サーバーシークレットの設定に失敗しました: CryptImportKey(3)のエラー: 不良なデータ。(-2146893819)」。これを修正するには、前のステップを参照し、タグ間から値が削除されたことを確認します。 |
3.7 | 暗号化されたストレージキーの復元 |
 |
3.8 | Run Asユーザー の復元 | 元のホストにRun Asユーザーが存在する場合は、次のコマンドを入力します。存在しない場合は、この手順をスキップします。 |
3.9 | SMTPパスワード の復元 | [Alteryxシステム設定] > [Server UI] > [SMTP] > [Password]に入力した場合(SMTPチェックボックスがオフになっていても)、次のコマンドを入力します。入力しなかった場合は、この手順をスキップします。 |
3.10 | RuntimeSettings.xmlを保存 | RuntimeSettings.xmlファイルを保存します。 |
3.11 | 元のホストのAlteryx Serverのバージョンは、次のいずれかですか?
| はい: ステップ3.13に進みます。 いいえ: ステップ3.12に進みます。 |
3.12 | 暗号化キーの転送 この機能は、次のバージョンでのみ使用できます。
| 重要: これには、元のホストでAlteryxServiceが実行されており、ターゲットホストがネットワーク経由でこれにアクセスできる必要があります。 暗号化キー転送プロセスの手順を使用すると、既存のコントローラーから新しいコントローラーに暗号化キーを転送できます。 |
3.13 | そのままコマンドラインに留まる | ステップ4では、 |
ステップ4: MongoDBの復元
# | ステップ | |
|---|---|---|
4.1 | MongoDBバックアップの取得 | 元のホストから新しいホストの |
4.2 | 新しいフォルダーへの復元 | バックアップフォルダーから新しい復元フォルダーにMongoデータベースを復元します。以下に示すようにmongoRestore.logを参照して、復元が正常に行われたことを確認します。 使用しているServerのバージョンに適した復元コマンドを見つけるには、MongoDBのバックアップドキュメントのMongoDBバックアップからの復元セクションを参照してください。 |
4.3 | 正常に復元が完了したことを確認する | 正常に復元が完了したことを確認します。 注意 復元が失敗した場合も前の手順では報告されず、Server上でのデータの欠落につながる恐れがあるため、この手順が必要です。これを行うには、データが復元されたMongoDBフォルダーの mongoRestore.log ファイルを確認します。mongoRestore.log を開き、次の手順を実行します。
復元に失敗した場合、または上記のキーワードの検索で該当する結果が見つかった場合は、収集したすべての情報をカスタマーサポートに連絡してください。 MongoDBの復元が失敗した場合は、続行しないでください。 |
4.4 | RuntimeSettings.XMLでMongoパスを設定 | RuntimeSettings.xmlを編集し、 例:  保存してテキストエディターを閉じます。 |
4.5 | MongoDBの起動 | 次のコマンドを入力します。
例
|
コマンドプロンプトウィンドウを閉じないでください。 ステップ4.5でウィンドウを閉じた場合、以降のステップはどれも機能しなくなります。 | ||
<<2番目のコマンドプロンプトセクションの開始>> | ||
4.6 | 2番目のコマンドプロンプトをbinフォルダーで開く | 管理者として 2番目のコマンドプロンプトを開き、
|
4.7 | 管理者以外のMongoパスワードの取得 | 次のコマンドを入力して、非管理者のMONGOパスワード をメモ帳にコピーします。
|
4.8 | Mongoコマンドラインの開始 | 次のコマンドを入力します。
例
成功すると、「 |
4.9 | 元のServerによって設定されたAlteryxGalleryのロックの削除 | 次のMongoコマンドを入力します
成功すると、「 |
4.10 | AlteryxGalleryコマンドラインの終了 | 次のコマンドを入力します。
|
4.11 | AlteryxServiceデータベースへの接続 | 次のコマンドを入力します。
例:
成功すると、「>」プロンプトが表示されます。 |
4.12 | 元のServerによって設定されたAlteryxServiceロックの削除 | 次のMongoコマンドを入力します
成功すると、「 |
4.13 | Mongoコマンドラインと コマンドプロンプト2 を終了 | 次のコマンドを入力します。
コマンドプロンプト2 を閉じます。 |
<<2番目のコマンドプロンプトセクションの終了>> | ||
4.14 | Mongoデータベースの停止 | 元のコマンドプロンプトで、キーボードコマンド
を1回以上、MongoDBを終了して通常のコマンドプロンプトに戻るまで入力します。 コマンドプロンプトを閉じます。 |
ステップ5: その他のファイルと設定の復元
# | ステップ | 詳細 |
|---|---|---|
5.1 | 元のServerに サービスログオンユーザー がいるか | 新しいServerに サービスログオンユーザー を設定します。 [Windows Serviceアプリ] > [AlteryxService]を右クリック > [プロパティ] > [ログオン] |
5.2 | データドライバーとシステムDSNの追加 | 元のServerと一致するように、同じバージョン のドライバーと 同じ名前 のシステムDSNを追加します(https://downloads.alteryx.com/)。 |
あなたの復元作業には該当しない可能性のある、高度な問題: | ||
5.3 | より安全な環境では、必要なRun Asユーザー権限を設定 | ワークフローの実行に使用されるすべての資格情報(Run As、サービスログオン、ワークフロー保存時の資格情報セット)に適切なアクセス権があることを確認し、必要な実行ユーザー権限を設定 します。 |
5.4 | システムベースエイリアスおよびIn-DB接続エイリアスの復元 | システムデータ接続:
システムIn-DBデータ接続:
|
5.5 | ユーザベースエイリアスおよびユーザーIn-DB接続エイリアスの復元 | ユーザーデータ接続:
ユーザーIn-DBデータ接続:
|
5.6 | ワークフローでコネクタを使用しているか | コネクタフォルダーを元のサーバーから以下にコピー
|
5.7 | ワークフローでPythonツールを使用しているか | ワークフローがインストールしたPythonパッケージがあれば、再インストールします。ServerアップグレードでのPythonツール環境を参照してください。 |
5.8 | SSLを使用しているか | テスト用にサンドボックスServerに復元する場合は、HTTPを使用してテストします。 新しいServerに移行する場合は、SSLを再確立します。 |
ステップ6: Alteryx Serverの起動
# | ステップ | 詳細 |
|---|---|---|
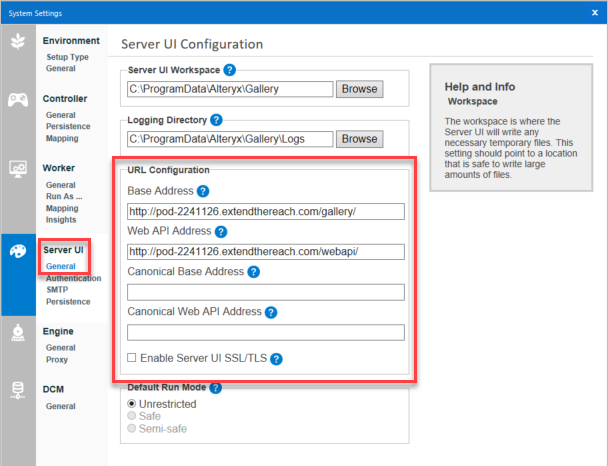
6.1 | Alteryxシステム設定を確認し、必要に応じてスケジュールを一時停止します。 | Alteryxシステム設定 を実行し、各ページの手順を実行して、設定(コントローラートークンなど)に期待される値が含まれていることを確認します。 サービスの開始時にスケジュールを実行しない場合は、次のチェックボックスをオフにします。 [Worker] > [General] > [Allow machine to run scheduled Alteryx workflows] (スケジュール設定されたAlteryxワークフローの実行をマシンに許可する) [Finish] (完了) を選択すると、AlteryxServiceが起動し、ブラウザでServerが使用可能になります。 |
ステップ7: テスト
# | ステップ | 詳細 |
|---|---|---|
7.1 | 基本テスト | AlteryxService は実行されていますか? 次のことができるか確認します。
|
7.2 | ワークフロー固有のテスト | 次のような拡張機能や外部接続を含むワークフローを実行できますか?
|
スクリプト
スクリプトでの実行を選択した場合、次のスクリプトを使用します。このスクリプトは、ステップ1-4を自動的に実行します。ライセンスポータルからスクリプトをダウンロードできます。
スクリプトが完了したら、ステップ5: その他のファイルと設定の復元に直接進みます。
注意
設定を手動で確認し、復元後にAlteryx Serverを起動する必要があります。
すべての機密データは、ユーザーが指定したキーを使用して暗号化されます。このキーは紛失しないようにしてください。復元に必要になります。
スクリプトでは、すべてのアクションとエラーがスクリプトディレクトリの
Serverhostrecovery.logに記録されます。機密データは設定ファイルに書き込まれません。すべての設定は読み取り専用です。
スクリプトの実行方法
注記
このセクションのすべてのコマンドを、
Server Host Recovery Automation.zipから抽出されたファイルを含む作業ディレクトリから実行します。スクリプトでは、欠落している設定値と、必要に応じて暗号化キーが要求されます。
このスクリプトは、物理的なServerライセンスキーのみをチェックします。別の種類のライセンス(Alteryx One、オフライン、またはLicense Server)を使用するには、ライセンスキーとEメールアドレスのフィールドへの入力が求められる際に空白のままにします。次に、スクリプト完了後にServerのライセンス認証を手動で行います。スクリプト実行時にServerのライセンスがすでに認証されている場合は、再有効化は不要です。
ヘルプが必要な場合は、コマンド
.\ServerHostRecovery.ps1 -Helpを実行します。
ライセンスポータルからスクリプトをダウンロードし、任意の場所に保存します。
設定ファイル「alteryx_recovery_config.json」を編集し、お使いの環境に合わせて以下の値を更新します。
- BackupDirToBackup
新しいバックアップが作成されるルートディレクトリ。
例:
C:\\AlteryxServerBackup- PresentProgramDataPath
Alteryx ProgramDataディレクトリへのパス。
例:
C:\\ProgramData\\Alteryx- AlteryxInstallerPath
Alteryx Serverインストーラーの実行可能ファイルへの完全なパス。
例:
C:\\Users\\...\\AlteryxServerInstallx64_2025.2.0.14427.exe- TargetDirectoryPath
Alteryx Serverをインストールするディレクトリ。
例:
C:\\Program Files\\Alteryx- MongoRestorePath
Alteryx Serverで使用されるMongoDBデータディレクトリへのパス。
例:
C:\\ProgramData\\Alteryx\\Service\\Persistence\\MongoDB要件:
このパスは、スクリプトのバックアップ処理の部分でバックアップされた
RuntimeSettings.xmlファイルの<EmbeddedMongoDBRootPath>フィールドと一致している必要があります。ディレクトリが存在し、空でない場合、復元手順中に元のディレクトリの名前が変更されます。
- BackupDirToRecover
復元に使用するバックアップディレクトリへの完全なパス。これは、このスクリプトのバックアップ処理の部分で使用される
BackupDirToBackupフォルダーのコピーです。このフォルダーには次のものが含まれます。
MongoBackupフォルダーBackupkeys.jsonRuntimeSettings.xmlSerial.ini
例:
C:\\AlteryxServerBackup\\Backup_YYYYMMDD_HHMMSS
管理者としてPowerShellを開きます。
Server Host Recovery Automation.zipから抽出されたファイルを含むフォルダーに移動します。既存のServerのバックアップを実行するには、次のコマンドを使用してメインスクリプトを実行します。
.\ServerHostRecovery.ps1 -Backupバックアップから復元するには、次のコマンドを実行します。
.\ServerHostRecovery.ps1 -Recoverこのコマンドを実行する前に、バックアップ手順で作成したバックアップフォルダーをターゲットマシンにコピーします。このフォルダーは、
alteryx_recovery_config.jsonファイルのBackupDirToRecoverで定義されているパスと一致する必要があります。復元中にキーが見つからない場合、ライセンスキーとEメールの入力を求められます(サンプル入力はコンソールに表示されます)。
インストールまたはアップグレード中、プログレスバーがコンソールに表示されます。
デジタル署名エラーが表示された場合、またはスクリプトの実行がブロックされる場合は、次のヘルパースクリプトを実行します。
.\Enable-Run-ServerHostRecovery.ps1これにより、メインスクリプトのブロックが解除され、セッションの実行ポリシーが設定されます。
Enable-Run-ServerHostRecovery.ps1もブロックされている場合は、次のコマンドを実行してファイルのブロックを手動で解除します。Unblock-File .\ServerHostRecovery.ps1スクリプトが終了したら、手順5-7を手動で実行します。
スクリプトによる実行のトラブルシューティングとサポート
設定についてご不明な点がある場合は、
alteryx_recovery_config.README.txtを参照してください。スクリプトの問題については、
Serverhostrecovery.logを確認するか、Alteryx管理者にお問い合わせください。