Server Host Recovery Guide
This guide is intended to help a Server administrator recover a Server instance in the following scenarios:
Failure of the original host*
Migration to a new Server machine
Transition from an on-premises to a cloud Server
Other infrastructure changes
A Server recovery allows you to get a new Server running with your original users, workflows, schedules, etc., based on having the following from your original Server:
Controller Token
RuntimeSettings.xml*MongoDB backup
* To fully recover a Server instance in a disaster recovery scenario where the original host is no longer accessible, the RuntimeSettings.xml must be prepared in advance, while the original host is in a fully functioning state. For more details refer to the Disaster Recovery Preparation help page.
Recovery Options
You now have 2 ways to recover a Server host:
Option | What It Does | Ideal When... |
|---|---|---|
(Steps 1-7) | You perform all steps manually: prepare the host, install Server, recover RuntimeSettings, restore MongoDB, restore additional files/settings, start Server, and test. | Fine when scripting is not available or when you need full control, or for custom environments. |
(Script for Steps 1-4 and Manual for Steps 5-7) | Run a provided script that automates Steps 1 through 4 (Prepare, Install, Recover RuntimeSettings, and Recover MongoDB). After the script finishes, you complete Steps 5-7 manually. | Useful to speed up recovery, reduce manual error, especially in standard setups with embedded MongoDB. |
Note: Both options assume the same prerequisites (version compatibility, credentials, backups) and that Steps 5-7 (restore files/settings, start the server, test) are done manually.
Below are details for each step of the process:
3: Recover RuntimeSettings.xml
5: Restore Other Files and Settings
In Scope
Recovery from the failure of a single node, default Server installation using embedded MongoDB.
Available backup with necessary information intact.
The target host can be overwritten.
Out of Scope
Multi-node Server environment, user-managed MongoDB, or user-managed SQL Server - please contact Customer Support for help.
Back up or restoration of ODBC drivers.
Back up or restoration of User or System DSNs.
Back up or restoration of other aliases stored in Windows that exist outside of Alteryx.
Prerequisites
Version Compatibility:
Original Host | Compatible Target Hosts |
|---|---|
2021.4.2.47792 (Patch 5) or newer patch | 2021.4.2.47884 (Patch 11) or newer patch of 2021.4 version |
2022.1.1.42590 (Patch 3) or newer patch | 2022.1.1.42691 (Patch 9) or newer patch of 2022.1 version |
2022.3.1.430 (Server GA) or newer patch | 2022.3.1.553 (Patch 6) or newer patch of 2022.3 version |
2023.1.1.123 (Server GA) or newer patch | 2023.1.1.247 (Patch 2) or newer patch of 2023.1 version |
All newer and future versions of Alteryx Server | Any GA or patch release as long as the original host and target host are on the same version and patch. |
Install all database drivers and necessary software for workflow operation before completing the steps outlined in this guide to ensure minimal downtime.
Administrator rights on the target host.
Access to all credentials used for impersonation. This includes the service account (if not Local System), the Run As user, and any defined/used workflow credentials.
Controller Token from the original host.
A direct line of sight is needed to restore your encryption key as part of the recovery. Your new Server will need access to the AlteryxService running on your original Server Controller node over your network. Contact Customer Support if you are unable to meet this prerequisite.
Backup of MongoDB from the original host. Learn how to perform a backup.
For more information on Server Backup & Recovery, refer to the Server Backup & Restore Best Practices: Part 1 and Part 2.
Verify the target host is set to the same time zone as the original host in Windows time zone settings. If not set to the same time zone, errors might occur in schedule views.
Optional
The following items might not have been leveraged in the original Server. Check if the functionality is being used on your original Server and if so, complete the corresponding steps marked (Optional) in this guide.
Service Log On user
Run-As User details for Worker configuration:
Domain
Username
Password
SMTP server username and password for Server configuration.
Connectors from
%ProgramData%\Alteryx\Tools.Alteryx System-Based and In-DB Connection aliases from the original Server.
System In-DB Data Connections see
%ProgramData%\Alteryx\Engine\SystemConnections.xmlSystem Data Connections see
%ProgramData%\Alteryx\Engine\SystemAlias.xml
Alteryx User-Based and In-DB Connection Aliases from the original Server – the below might be relevant for each run-as or workflow credential user account
User Data Connections see
C:\Users\[username]\AppData\Roaming\Alteryx\Engine\UserConnections.xmlUser In-DB Data Connections see
C:\Users\[username]\AppData\Roaming\Alteryx\Engine\UserAlias.xml
Alteryx Predictive Tools and any R libraries used by workflows in the original Server.
Install Predictive Tools during Step 2 of the Alteryx Server installation to ensure proper version is used.
Choose Your Recovery Path
To use the Manual Path, follow all Steps 1-7 as documented.
To use the Scripted Path, first run the script (covers Steps 1-4), then continue with Steps 5-7.
Step 1: Prepare
# | Step | Details |
|---|---|---|
1.1 | Set host time zone | The Windows time zone of the target host must be set to match the original host. |
1.2 | Ensure access to Alteryx | Ensure the host can contact whitelist.alteryx.com used by the Alteryx licensing system. |
Step 2: Install Alteryx Server
# | Step | Details |
|---|---|---|
2.1 | Is the version of Alteryx Server on your original host any of the following versions?
| YES: Install or upgrade the target host to the exact same major and patch version that exists on the original host. Use the full install file opposed to the patch install. If needed, please contact fulfillment@alteryx.com to request the needed install file. Go to step 2.4. NO: Continue to step 2.2. |
2.2 | Is the version of Alteryx Server on your original host listed in the Compatible Target Hosts columns of the Version Compatibility table in the Prerequisites section? | YES: Install or upgrade the target host to the exact same major and patch version that exists on the original host. Use the full install file opposed to the patch install. If needed, please contact fulfillment@alteryx.com to request the needed install file. Go to step 2.4. NO: Continue to step 2.3. |
2.3 | Install the newest patch version of Alteryx Server on target host | Install or upgrade the target host to the newest patch available for the major version the original host is on (for example, if original host is on 2022.3 Patch 3, install the newest patch of 2022.3 on the target host). |
2.4 | Configure Alteryx Server | Configure Alteryx Server using the default settings. Make sure the AlteryxService is running, as it’s required for later steps. You don’t need to sign in to the Server UI. |
2.5 | Troubleshoot License key "in use" error | If your license key is still tied to your old server, you will need to deactivate it on that machine. If that machine is inaccessible, contact your License Administrator to release the license. |
Step 3: Recover RuntimeSettings.xml
# | Step | Details |
|---|---|---|
3.1 | Open Command Prompt 1 in bin folder | Open a Command Prompt As Administrator and navigate to the
|
3.2 | Stop the Service | Enter the command
On success you should see |
3.3 | Backup existing RuntimeSettings.xml | Enter the command
|
3.4 | Do you have a RuntimeSettings.xml previously prepared on your target host from a Disaster Recovery Preparation? | YES: Your RuntimeSettings.xml from the Disaster Recovery Process should already be located in your target host’s Go to step 3.13. NO: Copy the RuntimeSettings.xml file from your original host to the current target host's Continue to step 3.5. |
3.5 | Clear Controller Token | Edit the RuntimeSettings.xml you just copied and delete everything between the <ServerSecretEncrypted> tags, leaving just the tags as shown below:  Save and close the file. |
3.6 | Restore Controller Token | Enter the command using your original server Controller Token
Troubleshooting: Version 2021.3+ can error on this step with: "Set server secret failed: Error in CryptImportKey(3): Bad Data. (-2146893819)". To correct this, see the previous step to ensure the value was removed from between the tags. |
3.7 | Restore Storage Keys Encrypted | The 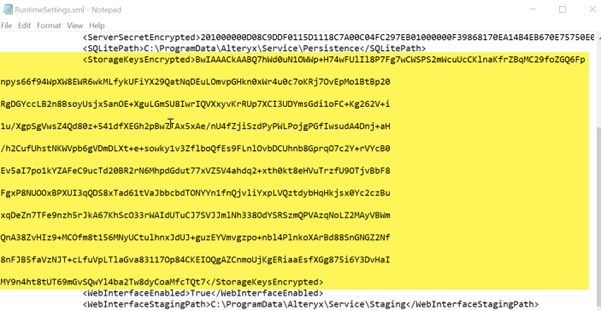 |
3.8 | Restore Run As User | If you had a Run As User on the original host, enter the following command, otherwise skip this step. |
3.9 | Restore SMTP Password | If you had filled in Alteryx System Settings > Server UI > SMTP > Password (even if the SMTP checkbox was unchecked), enter the following command, otherwise skip this step. |
3.10 | Save RuntimeSettings.xml | Save the RuntimeSettings.xml file. |
3.11 | Is the version of Alteryx Server on your original host any of the following versions?
| YES: Go to step 3.13. NO: Continue to step 3.12. |
3.12 | Transfer Encryption Key This functionality is only available on the following versions:
| Important: Please note that this requires the AlteryxService to be running on your original host and your target host will need to be able to access it over the network. The steps in Encryption Key Transfer Process will allow you to transfer the encryption key from your existing controller to your new one. |
3.13 | Remain on the Command Line | Step 4 assumes you are in an Administrator command line in the |
Step 4: Recover MongoDB
# | Step | |
|---|---|---|
4.1 | Get MongoDB backup | Copy the Mongo backup from the original host to a |
4.2 | Restore to a new folder | Restore the Mongo database from the backup folder to a new restore folder. Review mongoRestore.log as described below to ensure the restore was successful. Refer to the Restore from a MongoDB Backup section in the MongoDB Backups document to find the appropriate restore command for your Server version. |
4.3 | Confirm the restore was successful | Confirm the restore was successful. Caution This is a necessary step as a restore failure will not be reported in the previous step and can lead to missing data on your Server. To do so, review the mongoRestore.log file in the MongoDB folder where the data was restored. Open mongoRestore.log and follow these steps:
If the recovery has failed, or if you find any results when searching the key words listed above, please contact Customer Support with all the information you have gathered. Do not proceed if the MongoDB restore failed. |
4.4 | Set Mongo path in RuntimeSettings.XML | Edit RuntimeSettings.xml and enter the path to the Example:  Save and close the text editor. |
4.5 | Start MongoDB | Enter the command
Example
|
Do not close the command prompt window. If you close the window from step 4.5, none of the subsequent steps will work. | ||
<< Begin second Command Prompt section >> | ||
4.6 | Open second Command Prompt in bin folder | Open a SECOND Command Prompt As Administrator and navigate to the
|
4.7 | Get Non-Admin Mongo password | Enter the command and copy your NON_ADMIN_MONGO_PASSWORD to Notepad
|
4.8 | Start Mongo Command Line | Enter the command
Example
On success you should see a " |
4.9 | Delete AlteryxGallery locks set by original Server | Enter the Mongo command
On success you should see: " |
4.10 | Exit AlteryxGallery Command Line | Enter the command
|
4.11 | Connect to AlteryxService database | Enter the command
Example:
On success you should see a ">" prompt. |
4.12 | Delete AlteryxService locks set by original Server | Enter the Mongo command
On success you should see: " |
4.13 | Quit Mongo Command Line and Command Prompt 2 | Enter the command
Close Command_Prompt_2 |
<< End second Command Prompt section >> | ||
4.14 | Stop Mongo database | In the original command prompt, enter the keyboard command
one or more times until you exit MongoDB and return to a normal command prompt. Close the command prompt. |
Step 5: Restore Other Files and Settings
# | Step | Details |
|---|---|---|
5.1 | Did you have a Service Log On User on the original Server? | Set Service Log On User on new Server. Windows Services app > right-click AlteryxService > Properties > Log On |
5.2 | Add data drivers and System DSNs. | Add same-version drivers and same-name System DSNs to match original Server, https://downloads.alteryx.com/. |
Advanced issues that may not apply to your recovery: | ||
5.3 | In more secure environments, configure required Run As user permissions. | Ensure all credentials used to run workflows (Run As, Service Log On, or credential set when saving the workflow) have proper sufficient access, configure required run user permissions. |
5.4 | Restore System-based and In-DB Connection Aliases | System Data Connections:
System In-DB Data Connections:
|
5.5 | Restore User-Based and User In-DB Connection Aliases | User Data Connections:
User In-DB Data Connections:
|
5.6 | Do workflows use Connectors? | Copy Connector folders from your original server to
|
5.7 | Do workflows use the Python Tool? | Re-install any Python packages that workflows had installed. See Python Tool Environment in Server Upgrades. |
5.8 | Do you use SSL? | If you are recovering to a Sandbox Server for testing, use HTTP for testing. If you are migrating to a new Server, re-establish your SSL: Configuring Alteryx Server for SSL Obtaining and Installing Certificates |
Step 6: Start Alteryx Server
# | Step | Details |
|---|---|---|
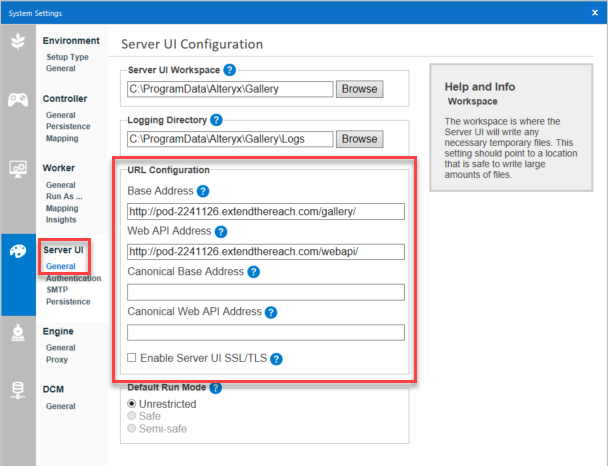
6.1 | Review Alteryx System Settings, suspend Schedules if desired. | Run Alteryx System Settings and step through each page confirming the settings (like the Controller Token) contain the values you expect. If you do not want Schedules to run when the Service starts, uncheck: Worker > General > Allow machine to run scheduled Alteryx workflows When you select Finish,the AlteryxService should start and the Server should be available in a browser. |
Important
Pay extra attention to the Server UI Configuration settings as a new Server might have a different URL or might not have an SSL certificate.
Step 7: Test
# | Step | Details |
|---|---|---|
7.1 | Basic testing | Is the AlteryxService running? Can you:
|
7.2 | Workflow-specific testing | Can you run workflows that contain extensions or external connections, such as
|
Scripted Path
If you choose the Scripted Path, use the following script, which will perform Steps 1 through 4 automatically. You can download the script from the License Portal.
After the script completes, go directly to Step 5: Restore Other Files and Settings.
Caution
You must manually verify settings and start the Alteryx Server after recovery.
All sensitive data is encrypted using a user-supplied key. Do not lose this key. It is required for recovery.
The script logs all actions and errors to
Serverhostrecovery.login the script directory.No sensitive data is written to the config file. All config is read-only.
How to Run the Script
Note
Run all commands in this section from the working directory that contains the files extracted from
Server Host Recovery Automation.zip.The script prompts for any missing config values and for encryption keys as needed.
The script checks only for a physical Server License Key. To use another license type (Alteryx One, Offline, or License Server), leave the license key and email address fields blank when prompted. Then, manually license Server after the script finishes. If Server is already licensed when the script runs, reactivation isn’t required.
For help, run the command
.\ServerHostRecovery.ps1 -Help.
Download the script from the License Portal and save it to your preferred location.
Edit the configuration file alteryx_recovery_config.json and update the values for your environment:
- BackupDirToBackup
Root directory where new backups will be created.
Example:
C:\\AlteryxServerBackup- PresentProgramDataPath
Path to the Alteryx ProgramData directory.
Example:
C:\\ProgramData\\Alteryx- AlteryxInstallerPath
Full path to the Alteryx Server installer executable.
Example:
C:\\Users\\...\\AlteryxServerInstallx64_2025.2.0.14427.exe- TargetDirectoryPath
Directory where Alteryx Server should be installed.
Example:
C:\\Program Files\\Alteryx- MongoRestorePath
Path to the MongoDB data directory used by Alteryx Server.
Example:
C:\\ProgramData\\Alteryx\\Service\\Persistence\\MongoDBRequirements:
This path must match the
<EmbeddedMongoDBRootPath>field in theRuntimeSettings.xmlfile that was backed up during the Backup portion of the script.If the directory exists and is not empty, the original will be renamed during the Restore procedure.
- BackupDirToRecover
Full path to the backup directory to use for recovery. This is a copy of the
BackupDirToBackupfolder used during the Backup portion of this script.This folder includes:
MongoBackupfolderBackupkeys.jsonRuntimeSettings.xmlSerial.ini
Example:
C:\\AlteryxServerBackup\\Backup_YYYYMMDD_HHMMSS
Open PowerShell as Administrator.
Navigate to the folder that contains the files extracted from
Server Host Recovery Automation.zip.To perform a backup of your existing Server, run the main script with the following command:
.\ServerHostRecovery.ps1 -BackupTo recover from a backup, run the following command:
.\ServerHostRecovery.ps1 -RecoverBefore you run this command, copy the backup folder—created during the -Backup procedure—to the target machine. This folder should match the path defined in
BackupDirToRecoverin thealteryx_recovery_config.jsonfile.During recovery, you will be prompted to enter license keys and email if no keys are found (sample input is shown in the console).
During installation or upgrade, a progress bar appears in the console.
If you see a digital signature error or script execution is blocked, run the helper script:
.\Enable-Run-ServerHostRecovery.ps1This unblocks the main script and sets the execution policy for your session.
If the
Enable-Run-ServerHostRecovery.ps1is also blocked, run the following command to manually unblock the file:Unblock-File .\ServerHostRecovery.ps1Complete manual Steps 5 - 7 after the script finishes.
Scripted Path Troubleshooting and Support
For questions about configuration, see
alteryx_recovery_config.README.txt.For script issues, review
Serverhostrecovery.logor contact your Alteryx administrator.