In this chapter, you will connect DCM to your HashiCorp instance, so that later you can fetch authentication data from HashiCorp to your workflow.
Open DCM by going to File - Manage Connections.
Select External Vaults in the bottom-left corner.
Select the + New button to add a new Vault to DCM.
Choose your HashiCorp Vault technology. Only the KV secrets engine is supported, in versions 1 and 2.
Enter a custom name for this Vault connection.
Next, enter the URL and Namespace, where your HashiCorp Vault is located, and select Save.
For exampleURL:
https://vault.your-company.hashicorp.cloud:8200Namespace:
Namespace1Select + Connect Credential and choose Create New Credential in the Credential dropdown.
Fill in the fields (the username and password you use to access HashiCorp).
Select Create and Link.
From now on, you will be able to select this newly created Vault when you create new Credentials.

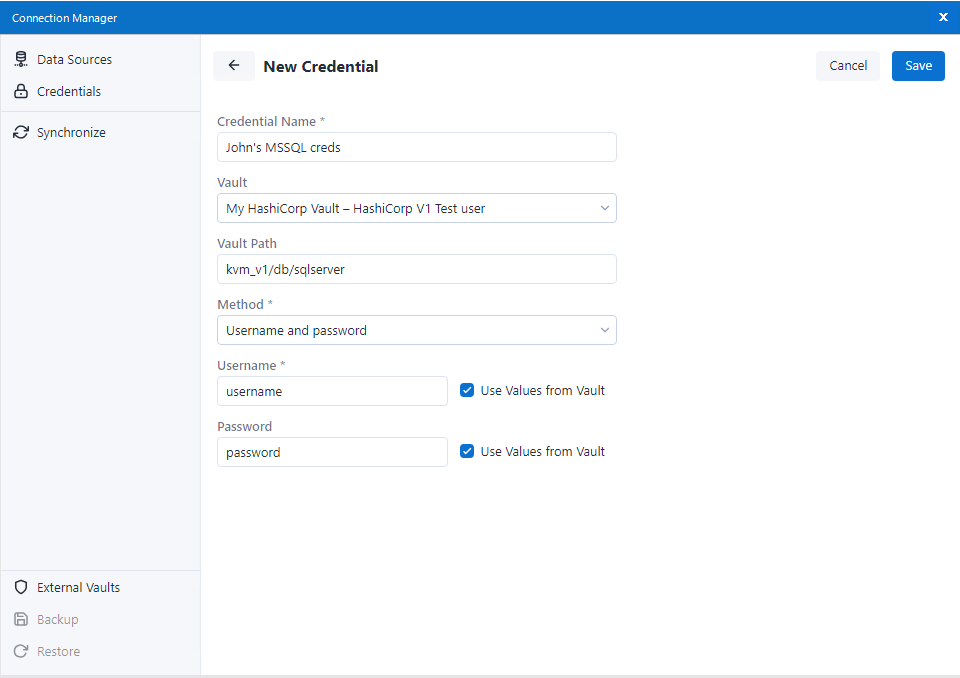
In this chapter, you will create a new DCM Credential, which will use the External Vault connection to get authentication data from HashiCorp.
Open DCM by going to File - Manage Connections.
Select Credentials in the top-left corner.
Select the + Add Credential button to add a new Credential.
Enter a name for your new Credential.
In the Vault dropdown, choose the HashiCorp instance you created in the previous chapter.
Fill in the Vault Path field with the path to the authentication data in your HashiCorp Vault.
For example, if I have a username and password for my Microsoft SQL database saved in HashiCorp, the path could be this: "vault_name/databases/mssql"
Next, choose your preferred Method of authentication. This method should match the authentication data you want to fetch from HashiCorp.
For example, if I want to get the Username and Password from HashiCorp, I will select the "Username and password" option.
Make sure the Use Values from Vault checkbox is enabled, if you want the authentication data to be fetched from HashiCorp. Then, each corresponding field should contain the key, under which is the value saved in your HashiCorp.
For example, if my Username is saved in HashiCorp under a key named "SQLUsername1", then I will check "Use Values from Vault" and enter "SQLUsername1" in the Username field.
Select Save.
From now on, you will be able to use this newly created Credential for a corresponding Data Source when you configure a workflow tool.
In this chapter, you will use your new Credential in a workflow. This flow is identical to using a Credential stored in DCM.
Start by creating a new Workflow, and adding some input or output data tools.
For example, I can add the Input Data tool
Make sure the tool is configured to use DCM (enable the Use Data Connection Manager (DCM) checkbox in my Input Data tool)
Setting up your connection, choose your desired technology.
For example, I will select "MSSQL Server Quick Connect" in my Input Data tool
Once the Connection Manager window opens, choose an existing Data Source or create a new one.
Select + Connect Credential and choose the credential created in the previous chapter (the one that gets authentication data from HashiCorp).
For example, I will select the Credential that I named "John's MSSQL creds".
Select Create and Link.
Select Connect.
Now, the connection is set up. You can proceed to configure any specific details related to your data source technology (e.g. select database table, record limit, etc.).
Once your workflow is ready, run it to see if you correctly authenticate to your Data Source using Credentials obtained from your HashiCorp Vault.