Results Window Data Manipulations
The Designer Results window lets you perform several data manipulations on a given column in your dataset that you can then add to your workflow as tools. Specifically, the Results window supports the Data Cleanse, Filter, and Sort data manipulations.
Data Manipulation Indicator
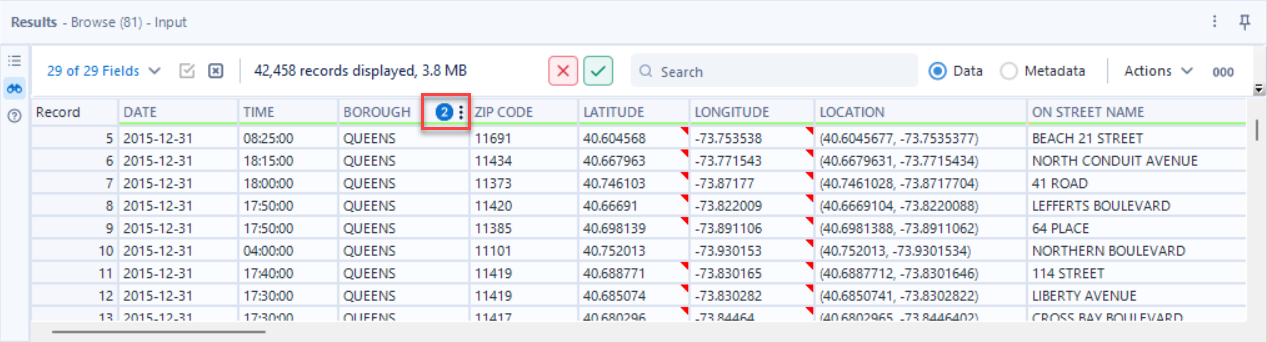
If you perform any data manipulations to a column (data cleanse, filter, sort), a blue change indicator appears in the column header. This indicator lets you know that the column's data has been updated, but those changes have not been applied to the workflow canvas. If you choose to select the green check box icon to apply your data manipulations, the indicator icon goes away.
Data Cleanse
The Results window gives you access to several data cleansing functions that are otherwise available via the Data Cleanse Pro tool. To cleanse data in a given column...
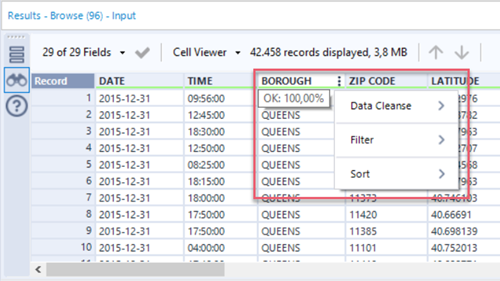
Hover your mouse over a column header and select the vertical ellipsis icon to access the Data Cleanse, Filter, and Sort options for the column.
Select Data Cleanse to access the data cleansing functions. Refer to the Data Cleanse Pro tool for detailed descriptions of these functions:
Replace Null Data: Only one of these options is available (depending on data type). Check the checkbox and select Apply to perform this action. To remove this action, uncheck the box and select Apply.
Replace Nulls with Blanks (String)
Replace Nulls with 0 (Numeric)
Remove Unwanted Characters: Check one or more of these options and select Apply to perform the actions. To remove these actions, uncheck the boxes and select Apply.
Leading/Trailing Whitespace
Tabs, Line Breaks, and Duplicate Whitespace
All Whitespace
Letters
Numbers
Punctuation
Modify Case: Select one of these options and select Apply to modify the case of all rows in the column.
Don't Modify Case: Use this option to return to the original state of the column.
Upper Case
Lower Case
Title Case
Perform your desired data cleanse actions and select Apply to add the changes to the column in the Results window. To undo the action, select the Cancel Data Manipulations (red x) button.
Add Data Cleansing Tool to Workflow
When you apply a data cleansing action to a column in the Results window, you have the option to apply that action as a Data Cleanse Pro tool in the workflow. Read the Apply Data Manipulations section below for instructions.
Filter
The Results window also gives you access to many filtering options that are otherwise available via the Filter tool. To create a filter based on data from a given column...
Hover your mouse over a column header and select the vertical ellipsis icon to access the Data Cleanse, Filter, and Sort options for that column.
Select Filter to create a filter condition like what is available via the Filter tool. The available filter operators vary based on the data type of the selected column.
Is OK and Is Not OK Filter
Note that string data types allow you to filter based on data quality, which now includes the Is OK and Is not OK operators.
When you filter for OK records, the return includes non-null and non-empty records that don't have leading or trailing spaces.
When you filter for Not OK records, the return doesn't include empty or null records.
Date Filtering
As of the 2023.2 release, you have access to more date-filtering options. You can use the =, !=, <, <=, >, and >= operators and also specify a date range. A calendar date picker is also now available. Go to the Filter tool page for more information about filter operators.
Create your condition and select Apply. The Results window refreshes and shows only the data that matches the active filter condition. The column where the filter was applied is indicated with a vertical ellipsis icon.
To remove the filter, hover over the filtered column and select the vertical ellipses icon. Select Filter and select the Clear link. The Results window refreshes to show data without the filter. Alternatively, select the Cancel Data Manipulations (red x) button.
To create a custom or advanced filter condition, use and configure a Filter tool in your workflow.
Add Filter Tool to Workflow
When you filter a column in the Results window, you have the option to apply that filter as a Filter tool in the workflow. Read the Apply Data Manipulations section below for instructions.
Sort
The Results window also gives you access to sorting options that are otherwise available via the Sort tool. To sort a specific column in your Results window...
Hover your mouse over a column header and select the vertical ellipsis icon to access the Data Cleanse, Filter, and Sort options for that column.
Select Sort.
Select one of these sorting options and select Apply.
Don't Sort: Default option.
Sort Ascending
Sort Descending
To remove the sort, select the Don't Sort option. Alternatively, select the Cancel Data Manipulations (red x) button.
Add Sort Tool to Workflow
When you sort a column in the Results window, you have the option to apply that action as a Sort tool in the workflow. Read the Apply Data Manipulations section below for instructions.
Apply Data Manipulations
After you perform a data cleanse function, apply a filter to a column, or sort a column in the Results window, you have the option to apply those changes to your workflow via associated tools. For example, if you applied a filter to a column in your Results window, you can add a preconfigured Filter tool to your workflow with the click of a button.
Tip
Note that when you modify a column, a blue indicator icon appears in the column header. This icon remains visible until you either cancel or apply your data manipulations.
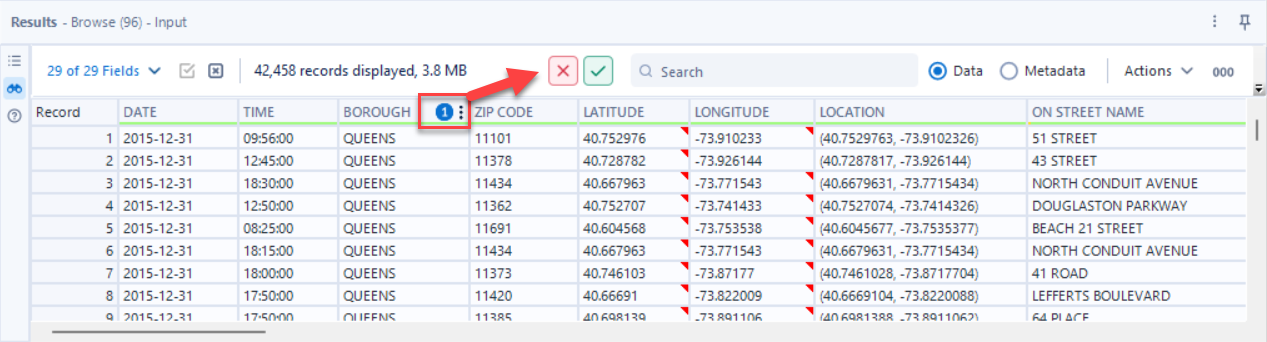
To add tools to your workflow, select the Apply Data Manipulations icon (checkmark).
Data Cleanse: When you perform a data cleanse action on a column, select Apply Data Manipulations. This adds a Data Cleanse Pro tool to your workflow with the data cleanse function that you applied in the Results window.
Filter: When you filter a column in the Results window, select Apply Data Manipulations. This adds a Filter tool to your workflow with the filter condition that you applied in the Results window.
Sort: When you sort a column in the Results window, select Apply Data Manipulations. This adds a Sort tool to your workflow with the sort condition that you applied in the Results window.
To revert any changes that you have made to the Results table (you can only do this before you apply data manipulations), select the Cancel Data Manipulations icon.
Notes
The Apply and Cancel Data Manipulations icons are only usable in the Data view of the Results table. They activate when you make a change to the data (for example, sort a column) and select Apply. The icons are not active in the Metadata view of the Results table.