 Control Container Tool
 Control Container Tool
User Role Requirements
User Role* | Tool/Feature Access |
|---|---|
Full User | ✓ |
Basic User | ✓ |
*Applies to Alteryx One Professional and Enterprise Edition customers on Designer versions 2025.1+.

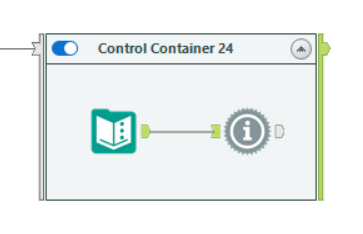
Use Control Containers to manage the sequence in which tools run in your workflow and ensure that the steps in your process are executed in the correct order. Control Containers let you use information about the tools that are run, either as logging information or as data to use in your workflow. As a result, you can build more dynamic and complex processes based on that execution information.
Additionally, Control Containers let you conditionally execute certain blocks of logic based on data from your workflow, whether from another Control Container or from other tools in your workflow. You don’t need to build complicated conditional orchestration via Detours, Chained Apps, and Runner tools.
AMP Only
The Control Container tool is compatible with Alteryx Multi-threaded Processing (AMP) only. If you attempt to run the tool in a workflow where AMP is disabled, the tool displays an error.
One Tool Example
This tool has a One Tool Example. Go to Sample Workflows to learn how to access this and many other examples directly in Designer.
Tool Components
The Control Container has 2 anchors: the optional Control Input and the Logging Output.

Control Input (Optional)
Control Containers have an optional input anchor. Use this input to activate the container.
If the Control Input doesn’t have a connection, the container is considered activated. In this case, the Control Container acts like a Tool Container, with the exception that it outputs messages from its Logging Output anchor about the actions completed within it.
If the Control Input has a connection, the container activates when the connection closes with at least 1 input record*. The metadata and the contents of the data stream don’t matter. The only thing that matters is that at least 1 record is present.
Important
*While it takes 1 record to activate a Control Container, the container doesn’t execute the tools inside of it until all records pass through the Control Input anchor. So, if you pass 1000 records into your Control Container, the container doesn't execute tools inside of it until it receives all 1000 records.
Logging Output
The Logging Output produces all user-facing log messages for only the tools in the container (including other containers within the container). You can use this message data as any other data stream in Designer. For example, you can write this log information to a file or parse it to perform further logic.
Note
Note that the only messages that are displayed in the Control Container data are the messages that are otherwise displayed via the Results grid. Because of this, tools that don’t produce messages via the Results grid also don't produce messages via Control Containers.
You can always use a Message tool to create and customize messages for tools that don’t generate their own messages.
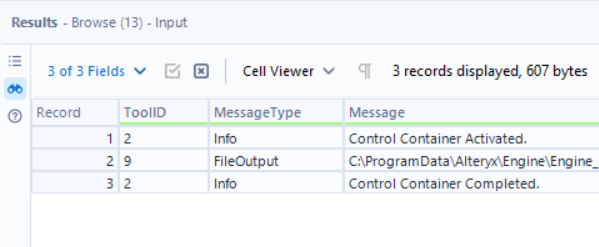
The Control Container logs an Info message when it activates: "Control Container Activated."
The container then logs another Info message when it processes all contained tools: "Control Container Completed."
The container then closes its Logging Output anchor. Note that the container might send messages before all tools within it complete execution. Refer to the Important Considerations about Execution Order section for details.
This means that all data streams out of the container will have been closed already and that you are guaranteed to get 2 messages out of every Logging Output if the container was activated. If the container is disabled, it closes its Logging Output without sending any messages.
How Do Control Containers Work?
It’s important to note that the Control Container behaves very differently from the Tool Container. It uses a boolean (true/false) scenario to determine if there is a data stream attached to the optional Control Input anchor and if there is an incoming data stream, whether that data stream contains any records.
If there isn’t an incoming data stream, the Control Container acts like a Tool Container, with the exception that it outputs messages from its Logging Output anchor about the actions that execute within it. The messages follow the same behavior as messages that you typically find in the Designer Results window.
If there is an incoming data stream attached to the Control Input anchor, the Control Container evaluates whether to run the tools in the container. It bases this on whether or not it receives at least 1 record when the input connection closes.
If it receives 1 record, the container activates once the connection closes—once all records pass through the input.
If the Control Input doesn’t receive records, the container only pushes cached metadata through the output. It doesn’t pass messages and doesn’t run tools within it.
Disabled Control Container vs. Inactive Control Container
It's important to note the different behavior between a disabled Control Container and an enabled (but inactive) Control Container.
When you disable a Control Container, Designer ignores the container (as well as all tools within it)—it also doesn't report any configuration errors for the container or any tools inside it.
When your Control Container is enabled, Designer doesn't know whether to activate the container until you run the workflow and the container's input anchor either receives or doesn't receive records.
Designer needs to run all workflow prevalidation checks when you run the workflow. This prevalidation check generates errors inside of Control Containers if contained tools aren't configured properly—regardless of whether that container is eventually activated via its input anchor receiving records. To avoid this, make sure that any tools inside of a Control Container are correctly configured, even if that container isn't going to be activated as part of the workflow.
Important Considerations about Execution Order
In some scenarios, tools inside Control Containers can send data outside of the container before all tools inside the container have completed execution, and as a result, before the container sends data through its Logging Output anchor. This can happen when tools inside the container directly connect to tools outside.
To understand why this can happen, it’s important to understand how AMP processes data. AMP sends data between tools in packets of records to minimize synchronization work between tools and to ensure better performance. If there are a lot of records that pass through tools, the packets fill up, and they must be sent downstream.
Execution Order Overview
As noted earlier, a Control Container doesn’t execute tools inside of it until it receives all records via its Control Input anchor. If the input anchor receives a large number of records via multiple packets, the container holds the packets at its input until it receives all packets. Once it receives all packets, the container activates.
Once the container activates, it executes the tools within it. If during this process the container passes data outside of its boundaries, that data might leave the container before all tools within it finish executing. This depends on how the AMP engine assembles and sequences record packets.
The container’s Logging Output anchor starts to gather messages for tools that execute within it as soon as it's activated. It continues to gather messages until either…
A record packet gets big enough to send downstream, at which point the next packet starts to gather messages.
The container executes all tools within it and ends with the Control Container Completed message.
Recommendations for Ensuring Execution Order
With the above in mind, if execution order is critical to your workflow, you should use additional Control Containers to ensure that records that cross container boundaries are sequenced correctly.
Remember that when you connect a Control Container’s output anchor to another Control Container’s input anchor, the second container must receive all records via its Control Input anchor before it can activate and execute any tools inside of it.
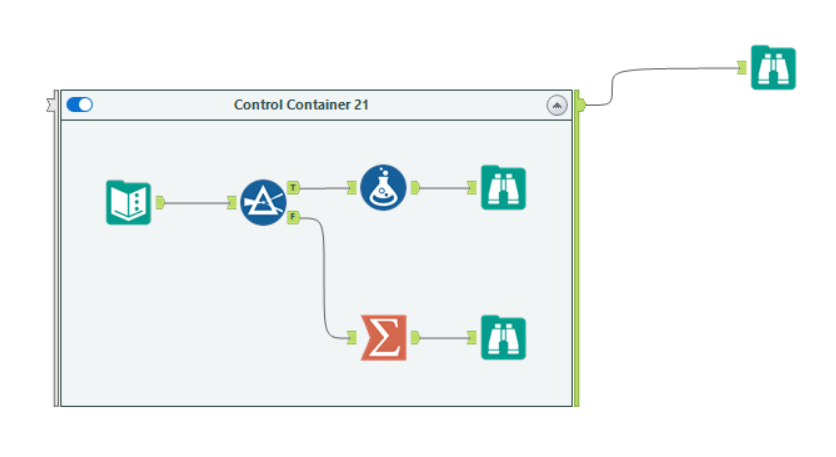
To use a simplified example, if you need to be absolutely certain that a process doesn’t start before another process finishes, you should always use multiple Control Containers, like in Example 2 below.
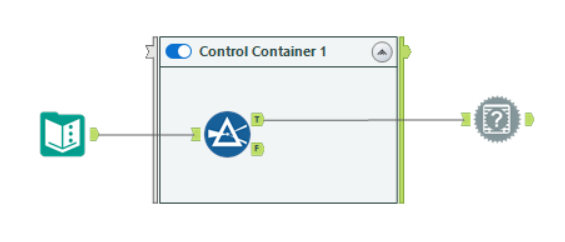
Example 1
This configuration doesn’t guarantee that the Message tool waits to start until all records pass through the Filter tool, nor does it guarantee that all tools have completed execution in the Control Container (if other tools were included).
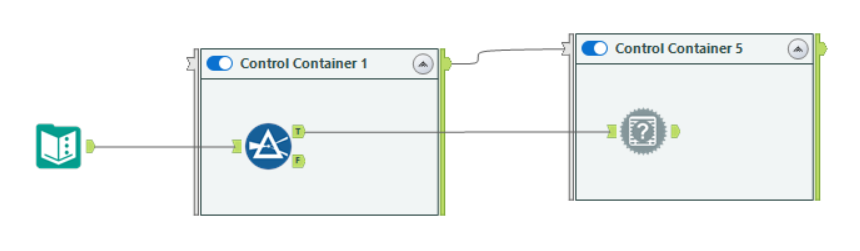
Example 2
This configuration ensures that the Message tool waits to start until after Control Container 5 receives all records via its Control Input anchor. This only occurs once all tools in the first container complete execution and the container logs the "Control Container Completed" message.
Group Tools in a Container
There are multiple ways to group tools in a container:
Select one or more tools on the canvas and right-click, then select Add To New Control Container.
Drag the Control Container tool to the canvas and place it near the tools you want to group. Press the Ctrl keyboard key and select the tools, then drag and drop them into the container.
To expand or collapse the container, select the expand/collapse icon in the upper-right portion of the container.
Modify Container Contents
To delete a container without deleting the tools in it, right-click the expanded container and select Delete Container Only.
To remove a tool from a container, select the tool and drag it out of the container.
Disable a Container
Disable a container when you don't want to run a section or process in your workflow. The disabled container remains expanded on the canvas and appears dimmed to indicate the disabled state. The tools within the container don't process data until you enable the container again. If the container is disabled, it closes its Logging Output anchor without sending any messages.
Interface Tools in Disabled Container
Interface tools can’t be used inside a disabled Control Container.
To disable the container, you have 2 options:
In the container's Configuration window, check the Disabled check box.
On the canvas, select the toggle at the top left of the container so the slider is to the left.
You can collapse a disabled container to hide its contents. Select the expand/collapse icon within the container to do so.
Enable a Container
To enable the container, you have 2 options:
In the container's Configuration window, uncheck the Disabled check box.
Select the toggle at the top left of the container so the slider is to the right.
Configure the Tool
Once your Control Container tool is on the workflow canvas, you can use the Control Container's tool configuration window to provide a label for the container, modify the container's appearance, and disable the container, if needed.
In the Configuration window, enter a name for the container in the Caption field, or double-click the container box on the canvas and enter text directly into the box. The default text is "Control Container" plus the tool ID that displays in the ID field.
Note that the tool caption allows for multi-line titles. You must use the Enter key to create a line break. When you enter a multi-line caption via the canvas, use Ctrl+Enter to save it.
Set the color theme for the container.
Select "..." next to Text Color, Fill Color, and Border Color, and select a color from the palette or enter RGB values.
In Transparency, enter a value or use the up and down icons to set the color transparency.
In Margin, select a width to change the space between the container border and the contained tools.
To set the default fill container color...
Go to Options > User Settings > Edit User Settings and select the Themes tab.
Under Default Canvas Settings > Containers, set your desired RGB values or select a color using the "..." button.
Save your settings.
Next, configure error handling, if needed:
Design Time: Suppress errors that show during Design Time within a Control Container.
Treat Errors as Errors: (Default) Allow configuration errors to still show as errors when you configure a workflow.
Ignore Errors: Prevent configuration errors from showing while you configure a workflow.
Runtime: Reduce the severity of error messages encountered at runtime within a Control Container.
Treat Errors as Errors: (Default) Allow all errors to show as errors in the Message log.
Treat Errors as Warnings: Error messages show as Warning messages.
Treat Errors as Messages: Error messages show as regular Info messages.
Compatibility Notes and Limitations
In-Database Tools
In-Database tools work inside Control Containers. However, an In-Database connection can’t cross the Control Container boundary. In other words, you can’t have a Connect In-DB tool outside of your Control Container and then connect that to a Filter In-DB tool inside the container.
Interface Tools
Interface tools are not supported inside Control Containers. You can have Interface tools and Control Containers in the same workflow—the Interface tools just can’t be inside the Control Containers.
Block Until Done Tools
Block Until Done (BUD) tools have no effect when in workflows that also contain Control Containers. If your workflow contains both BUD tools and Control Containers, you’ll encounter an error message, and the BUD tools will be treated as pass-through tools (with no sequencing behavior).
Detour Tools
Detour Tools work with Control Containers. You must follow the usual rules for Detour Start and Detour End, but note that if a Detour End tool is in a Control Container that is never activated, it drops its data stream.
Nested Control Containers
Control Containers work when nested within other Control Containers. However, looped connections generate an error. For example, you can’t connect the Logging Output from one Control Container to a tool inside the same container.
Control Containers and Macros
Control Containers work inside macros. Macro and app actions are applied before the XML translation, and macros also work inside Control Containers.
Control Containers and Run Until Selected Tool Setting
The "Run Until Selected Tool" setting is not available for the Control Container tool. Additionally, the setting doesn't account for Control Containers when deciding whether to run the tools inside them. Instead, "Run Until Selected Tool" specifically examines the data streams independent of Control Containers to determine whether to run or disable those tools.
When you select Run Until Selected Tool, the workflow runs immediately, and any tools after the selected tool (as well as any tools that are not part of the selected tool's data stream) are displayed as inactive in the workflow, regardless of whether those tools are inside or outside of Control Containers.